
BLR-320 · Lesson 12 of 12 · 19 min
Capstone: documenting a pressure vessel repair
In June, V-412 finally gets its deferred internal inspection during the Northgate turnaround. On the second day, the owner's inspector runs magnetic particle along the nozzle welds and stops at N3, a 8 in nozzle on the lower shell. A thin red line runs along the toe of the weld for about 3 1/2 in. Ruth Ambrose writes the finding, the turnaround planner calls Ironbridge, and by the afternoon Kiera is standing beside the nozzle with Harjit, Grant Mahler and the crew that will do the repair. "This is the whole course on one nozzle," Harjit says. "Code, plan, materials, welding, examination, test and report. You're going to write it up as we go." This capstone follows the repair from finding to return to service, with the documents produced at every step.
The finding
The finding report records the vessel, its registration and serial numbers, the location of the indication, its length, the method used to find it and the inspector's requirement: remove the crack, repair to the original design, and examine. Ruth adds the engineering context. V-412 is a Section VIII, Division 1 drum, 5/8 in SA-516 Grade 70, design pressure 250 psi, corrosion allowance 1/8 in, built by Ironbridge in 2027. N3 connects to a line that was rerouted in the last turnaround, and the operators have reported vibration on it since.
The first decision is whether this is a repair or an alteration. Removing a crack and restoring the original weld is a repair, as long as the nozzle, its reinforcement and the shell stay as designed. If the excavation went so deep that the reinforcement calculation was affected, or if Ruth wanted to change the nozzle, it could become an alteration. For now the plan is written as a repair, with a note that the engineer will be consulted if the remaining wall falls below what the design needs.
The repair plan
Kiera drafts the plan from Ironbridge's repair procedure template, and Harjit reviews it before it goes to Grant. Every heading in the plan points back to a lesson in this course.
| Plan item | V-412 N3 repair | Lesson |
|---|---|---|
| Code and classification | Repair under the NBIC, R certificate holder, to the original Section VIII-1 design | 1, 2, 9 |
| Description and extent | Toe crack at N3, 3 1/2 in long, depth unknown | 8, 9 |
| Removal | Grind out, examine by MT until clear, measure depth by UT | 9 |
| Design check | Compare remaining wall with the required thickness; consult engineer if below | 4 |
| Welding | WPS 12, SMAW, E7018, preheat 50 °F minimum; qualified current welder | 5 |
| Materials | Filler metal heat recorded; no new base metal | 6 |
| Heat treatment | Not required: thickness below the UCS-56 limit and no service requirement | 4 |
| Examination | MT of excavation; MT and UT after welding | 4, 9 |
| Test | Hydrostatic test or examination in lieu, as the inspector accepts | 9 |
| Hold points | Excavation clear; final examination; report | 9, 10 |
| Report | R-1 report and repair nameplate | 9, 11 |
Grant reads the plan and accepts it with one change: because the drum is in place with internals installed and Northgate cannot fill it with water during the turnaround without a long delay, he will decide on the test after he has seen the excavation, choosing between a hydrostatic test and additional examination. He signs the acceptance, and the work can start.
Removing the crack
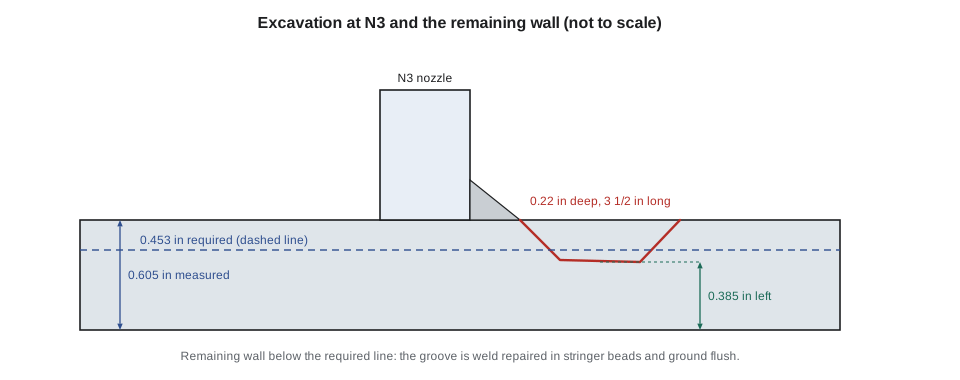
Before any grinding, the crew confirms the vessel is isolated, blinded, purged and cleared for hot work and entry under Northgate's permits, and the welding area is protected. The crack is ground out with a carbide burr and a small grinder, working along its length in shallow passes and keeping the groove smooth and boat-shaped so that it can be welded without trapping slag. After each pass the inspector's technician runs magnetic particle on the groove. At 0.16 in there is still a short indication at one end; at 0.22 in the groove is clear.
Kiera records the finished excavation: its length, width and depth, a sketch with dimensions from the nozzle centerline, the MT results at each stage, and the ultrasonic thickness readings around it. The lowest thickness reading near N3 is 0.605 in, a little under the nominal 5/8 in plate, which is expected after two years of service.
Worked problem
Can the excavation be blended, or must it be welded?
The required thickness from the hoop formula, without corrosion allowance, is compared with the wall left under the excavation. If enough wall remains, the groove can be blended smooth and left; if not, it must be weld repaired.
Show solution
- Work out the required thickness from the design pressure, radius, allowable stress and joint efficiency.
- Subtract the excavation depth from the lowest thickness reading near the nozzle.
- Compare, then estimate the weld metal needed to fill the groove.
Answer: The remaining wall, about 0.39 in, is below the required 0.45 in, so the groove must be welded. The groove needs only a small amount of weld metal, and the program also lists the report fields still to be completed.
# V-412 nozzle N3 repair: can the excavation be weld repaired, and what goes on the report? (US units)
P, R, S, E, CA = 250, 36, 20000, 1.0, 0.125
t_req = P * R / (S * E - 0.6 * P)            # required thickness without corrosion allowance
nominal, ut_min = 0.625, 0.605                # nominal shell and lowest thickness measured near N3
depth = 0.22                               # deepest point of the excavation after the crack was removed
remaining = ut_min - depth
print(f"required {t_req:.3f} in, measured {ut_min} in, excavation {depth} in, remaining {remaining:.3f} in")
print("remaining wall is below the required thickness: weld repair needed" if remaining < t_req
      else "remaining wall meets the required thickness: blend and examine")
length, width = 3.5, 0.8                  # excavation size
vol = 0.5 * length * width * depth            # rough boat-shaped groove volume
print(f"weld metal about {vol * 0.2836:.2f} lb (groove {length} x {width} x {depth} in)")
report = {"repair organization and R certificate number": "Ironbridge Industrial, R certificate on file", "owner": "Northgate Refinery", "National Board number of the vessel": "V-412, NB number", "description of work": "crack at N3 toe removed, weld repaired, MT and UT", "materials and filler": "E7018, heat recorded", "welders and WPS": "J. Okeke, WPS 12", "pressure test or NDE": "MT and UT, inspector accepted", "inspector signature": ""}
blank = [k for k, v in report.items() if not v]
print("report fields still blank:", ", ".join(blank) if blank else "none")required 0.453 in, measured 0.605 in, excavation 0.22 in, remaining 0.385 in remaining wall is below the required thickness: weld repair needed weld metal about 0.09 lb (groove 3.5 x 0.8 x 0.22 in) report fields still blank: inspector signature
Grant comes at the hold point, looks at the clear groove and the MT record, checks the thickness figures and agrees that a weld repair is needed and that the original design is not affected. He also decides on the test: because the repair is a small, shallow weld at a nozzle toe, he will accept magnetic particle and ultrasonic examination after welding in place of a hydrostatic test, and records that decision on the plan.
Welding
J. Okeke makes the repair. Before he strikes an arc, Harjit checks three things in front of the class. The WPS: WPS 12 covers SMAW, P-No. 1 to P-No. 1, F-No. 4, the thickness and the preheat. The welder: J. Okeke's SMAW qualification is current, with his last code weld in May. The filler: the E7018 electrodes come from the rod oven, and their lot number goes on the weld record. The area is preheated, checked with a temperature indicator, and the groove is welded in stringer beads, each cleaned and inspected, with the final layer slightly above the surface and then ground flush to the shell and blended into the nozzle weld so that there is no sharp toe left to start a new crack.
Kiera fills in the weld record as the work goes: the date, the welder, the WPS, the electrode size and lot, the preheat reading, the interpass temperatures, the number of passes and the time. It takes less than an hour of welding, and more than an hour of paperwork, which Harjit says is about the right ratio for a code repair.
Examination and acceptance
After the weld has cooled for the time the shop's procedure requires, the technician examines the repair by magnetic particle on the surface and ultrasonics through the weld. Both are clear. The NDE reports are signed by the technician, with his certification level, and attached to the repair record. Grant reviews the reports, looks at the finished repair, checks the weld record against the WPS and the welder's qualification, and accepts the work.
Ruth adds one more action that is not part of the code repair but is the reason it should not happen again. The crack ran along the toe of a nozzle weld on a line that vibrates, which points to fatigue. She has Northgate's piping group add a support and a vibration check on the N3 line before start-up, and she sets a shorter interval for the next MT of N3 in V-412's inspection plan.
The report
The repair is reported on an R-1. Kiera fills in each field from the records: Ironbridge and its R certificate number, Northgate as owner, V-412 with its National Board and serial numbers, a description of the work, the filler metal and its lot, the welder and WPS, the examinations and their results, the inspector's decision on the test and his acceptance. The program shows the one field she cannot fill: the inspector's signature, which Grant adds once the package is complete. A repair nameplate stamped with the R symbol is attached beside V-412's original nameplate, and the R-1 is registered with the National Board and given to Northgate for V-412's records.
| Document | Who signs | Where it goes |
|---|---|---|
| Finding report | Owner's inspector | Owner's records |
| Repair plan with acceptance | Ironbridge quality control, the inspector | Repair file |
| Excavation record and MT reports | Fitter or welder, NDE technician | Repair file |
| Weld record | Welder, quality control | Repair file |
| Final MT and UT reports | NDE technician | Repair file |
| R-1 report | Ironbridge, the inspector | Owner, the National Board and the jurisdiction where required |
On the last night of the code block, Harjit hands back the blacked-out V-412 calculation from lesson 4 and the N3 repair package side by side. "Two years ago this drum was a stack of plate in the yard," he says. "Somebody had to register it, buy the right steel, keep it traceable, weld it with qualified people, examine it, test it, stamp it and write it all down. Now it's cracked, and the same chain starts again. That's the job: not just making the weld, but making sure the next person can trust it."
The time line of the repair
Kiera's write-up ends with a short time line, because the turnaround schedule depends on how long code repairs take, and the planner wants to know where the time went.
| Day and time | Step | Hold point or record |
|---|---|---|
| Day 2, 10:00 | MT finds the toe crack at N3 | Finding report |
| Day 2, 15:00 | Repair plan drafted and reviewed | Plan |
| Day 2, 18:00 | Inspector accepts the plan | Signed acceptance |
| Day 3, 07:00 | Permits issued, area prepared | Hot work and entry permits |
| Day 3, 08:00 to 11:30 | Excavation in passes with MT | Excavation record, MT reports |
| Day 3, 13:00 | Inspector reviews the clear groove and decides on the test | Hold point |
| Day 3, 14:00 to 15:00 | Preheat and welding | Weld record |
| Day 4, 09:00 | Final MT and UT | NDE reports |
| Day 4, 11:00 | Inspector accepts the repair | Acceptance |
| Day 4, 15:00 | Report completed and signed | R-1 and repair nameplate |
Less than two days went into the repair itself, and most of that was waiting for permits, for the steel to cool and for examination. The planner's lesson, which Ruth passes on, is that a code repair is fast when the repair organization has its procedures ready, its welders current and its paperwork templates prepared, and slow when it has to work any of that out on the day.
Common mistakes
MistakeGrinding out a crack without examining between passes.
InsteadExamine as you go, so you know when it is gone and how deep the groove is.
MistakeBlending a deep excavation without checking the remaining wall.
InsteadCompare the remaining wall with the required thickness; weld if it is below.
MistakeSkipping the test because the repair is small.
InsteadThe inspector decides whether examination may replace the test, and records it.
MistakeTreating the code repair as the end of the job.
InsteadFind and fix the cause, such as vibration, so the crack does not return.
Summary and key terms
- A crack found in service is written up with its location, size, method and the inspector's requirement.
- The repair plan covers classification, removal, design check, welding, materials, heat treatment, examination, test, hold points and report.
- The crack is removed in stages with examination until clear, and the remaining wall is compared with the required thickness.
- Welding uses a qualified WPS and a current welder, with every variable recorded.
- Examination, the inspector's decision on the test and his acceptance close out the repair.
- The repair is reported on an R-1, a repair nameplate is attached and the report is registered.
- Finding
- An inspector's record of a defect and the requirement to deal with it.
- Excavation
- The groove ground to remove a defect before repair welding.
- Remaining wall
- The thickness left under an excavation.
- Examination in lieu of test
- Additional NDE accepted by the inspector instead of a pressure test.
- Weld record
- The record of who welded what, with which procedure, filler and temperatures.
- Root cause
- The underlying reason a defect occurred, such as vibration causing fatigue.
Practice problems
Work each problem on paper first, then reveal the answer to check.
Why was the N3 work classed as a repair?
Show answer
It removed a crack and restored the original weld without changing the design.
The groove is 0.22 in deep in wall measured at 0.605 in. What is left?
Show answer
0.385 in.
Who decided that examination could replace the hydrostatic test?
Show answer
The inspector, Grant, after seeing the excavation.
Why did Ruth add a pipe support?
Show answer
Because vibration was the likely cause of the fatigue crack, and fixing it stops it recurring.
Lesson quiz · 5 questions
Score 60% or more to complete this lesson.
Create a free account to save your progress, take quizzes and earn a certificate.