
AUTO-130 · Lesson 8 of 12 · 21 min
Drum brakes
Theo Banks, Ridgeline's lube and tire technician, drives a 2012 compact car that he bought from his aunt. It has disc brakes at the front and drum brakes at the rear, like many small front-wheel-drive cars of its age. One Friday he asks Marty if Kiran can look at it after hours, as training. “The pedal's gone low,” Theo says, “and the handbrake comes up about ten clicks before it holds. And the back end grabs a bit on wet mornings.” Marty nods at Kiran. “Three symptoms, probably two problems. Drums hide everything inside, so you'll have to take them apart to see.”
Drum brakes are less common than they were, but millions of cars, trucks, vans and trailers still use them at the rear, and many disc-braked vehicles use a small drum inside the rear rotor for the parking brake. This lesson explains how drum brakes work, the two main designs and the self-energizing action that makes them powerful, how they adjust themselves, how drums and shoes are inspected and measured, and how a drum brake job is done.
The parts of a drum brake
A drum brake has a cast iron drum that turns with the wheel and a set of parts mounted on a stationary backing plate inside it. Two curved brake shoes, each with friction lining bonded or riveted to a steel shoe, rest against an anchor at one end. A wheel cylinder, a small hydraulic cylinder with a piston and cup seal at each end, sits between the shoes' other ends. When the driver brakes, fluid pressure pushes the wheel cylinder's pistons outward, which pushes the shoes against the inside of the drum. Return springs pull the shoes back when the pressure is released, hold-down springs keep the shoes against the backing plate, and an adjuster between the shoes keeps the lining close to the drum as it wears. A lever and strut, worked by the parking brake cable, can also push the shoes against the drum mechanically.
Self-energizing action
A drum brake has a property that a disc brake lacks: it can use the rotation of the drum to help apply itself. Picture a shoe whose free end is pushed against the drum by the wheel cylinder while its other end rests on the anchor. If the drum turns from the free end toward the anchored end, the friction between lining and drum drags the shoe in the direction of rotation, wedging it harder against the drum and increasing its own braking force. That shoe is called a leading shoe. A shoe facing the other way, with the drum turning from its anchored end toward its free end, is pushed away from the drum by the same friction and brakes less; it is a trailing shoe. The extra force from wedging is called self-energizing action.
Self-energizing action makes drums powerful for their size and lets them work with modest hydraulic pressure, which is why a metering valve, Lesson 3, is needed to match them with front discs. It also makes their output sensitive to the lining's friction. Wet linings, or linings contaminated with fluid or grease, change their friction a great deal, and because the self-energizing effect multiplies that change, the brake can grab, which is one of Theo's symptoms.
# Self-energizing action: braking from a leading and a trailing shoe for the same apply force
# (simplified model; the factor k depends on the shoe geometry, here an illustrative value)
UNITS = "US"
apply_force = 1500        # N from the wheel cylinder on each shoe
k = 1.2                   # geometry factor
for mu, condition in [(0.38, "dry lining"), (0.30, "wet lining"), (0.50, "lining with fluid on it, hot and sticky")]:
    leading = apply_force * mu / (1 - mu * k)      # wedged harder by the drum
    trailing = apply_force * mu / (1 + mu * k)     # pushed away by the drum
    if UNITS == "metric":
        print(f"{condition:<40} leading {leading:4.0f} N, trailing {trailing:4.0f} N, ratio {leading / trailing:.1f}")
    else:
print(f"{condition:<40} leading {leading * 0.2248:4.0f} lb, trailing {trailing * 0.2248:4.0f} lb, ratio {leading / trailing:.1f}")dry lining leading 236 lb, trailing 88 lb, ratio 2.7 wet lining leading 158 lb, trailing 74 lb, ratio 2.1 lining with fluid on it, hot and sticky leading 422 lb, trailing 105 lb, ratio 4.0
The model is simplified, but it shows how strongly a leading shoe responds to a change in friction. A small increase in the lining's friction, from contamination or from the sticky surface of wet, rusty drums on a cold morning, gives a much larger increase in braking from the leading shoe, and the brake grabs.
Leading-trailing and duo-servo designs
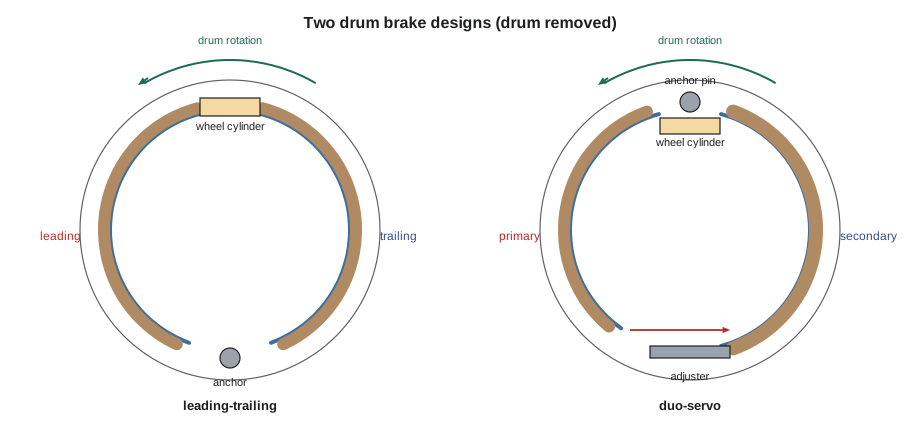
In a leading-trailing brake, used at the rear of most small cars including Theo's, the two shoes are anchored at the bottom and pushed apart at the top by a single double-ended wheel cylinder. In forward motion, the front shoe is leading and the rear shoe trailing; in reverse, they swap. The design is simple, gives the same braking in both directions, and is less sensitive to changes in friction, which makes it smooth and predictable.
In a duo-servo brake, used on many trucks, vans and larger rear-wheel-drive cars, the shoes are anchored at the top by a single anchor pin and joined at the bottom by a floating adjuster screw. When the brakes are applied in forward motion, the front shoe, called the primary shoe, is dragged by the drum and pushes through the adjuster on the bottom of the rear shoe, the secondary shoe, which is then forced against the drum and the anchor pin by both the wheel cylinder and the primary shoe. Both shoes are leading, and the secondary shoe does most of the work, which is why its lining is longer. Duo-servo brakes are very powerful, which suits heavy vehicles and makes them good parking brakes, but they are also the most sensitive to friction changes and adjustment.
Automatic adjusters
As the linings wear, the gap between them and the drum grows, and the wheel cylinder pistons must travel further before the shoes touch. Since the wheel cylinder is fed by the master cylinder, that extra travel shows up as a low pedal, as Lesson 2 explained. Drum brakes therefore have adjusters that move the shoes out as they wear. Duo-servo brakes usually use a star wheel adjuster, a threaded screw with a toothed wheel; a lever and cable or link, worked by the secondary shoe when the brakes are applied while the vehicle backs up, turns the star wheel a tooth at a time when the gap grows too large. Leading-trailing brakes usually use a ratchet-type adjuster on the parking brake strut, worked by the parking brake or by the shoes' movement each time the brakes are applied.
Adjusters fail when their threads corrode, when their levers or springs are fitted wrongly, or when they are never worked; a driver who never uses the parking brake can keep a parking-brake-operated adjuster from ever adjusting. Seized adjusters cause a gradually lower pedal and more parking brake lever travel, exactly Theo's first two symptoms.
Inspection and measurement
With the vehicle safely on the lift and the wheel off, the drum is removed. Some drums slide off once any retaining screws or clips are removed; others are part of the hub and come off with the bearing. A drum that will not come off often has a ridge worn into its inner edge that catches the shoes, and the adjuster must be backed off through an access hole before it will clear. The brake parts are then cleaned of dust with a wet method, as Lesson 1 described, before anything is inspected.
Kiran works through the inspection on Theo's car. The left wheel cylinder's boot is wet with fluid, and the trailing shoe beside it has dark, glossy patches where fluid has soaked into the lining: that explains the grab on wet mornings and part of the low pedal. The right side is dry. Both adjusters are seized solid with rust, and both sides' linings are worn to about half their thickness, with large gaps to their drums.
The drum's inside diameter is measured with a drum micrometer at several points. Every drum has a maximum diameter cast into it, often marked MAX DIA, the drum equivalent of a rotor's discard thickness. A drum worn or machined past it is too thin to hold heat and may crack or distort. As with rotors, many manuals give a smaller maximum machining diameter. Drums are also checked for out-of-round, which causes a pulsation like a rotor's thickness variation; for bell-mouthing, where the open edge wears larger than the inner edge; for scoring and grooves; and for hard spots, shiny bluish patches where the iron has overheated and hardened, which must be replaced rather than machined.
# Theo's rear drums: inside diameter at three points, and the limits cast on the drum
UNITS = "US"
max_dia = 8.051             # in, discard (cast on the drum)
max_machine = 8.031         # in, largest diameter allowed after machining
out_of_round_limit = 0.004   # in
drums = {"left":  [8.009, 8.014, 8.011],
         "right": [8.020, 8.020, 8.021]}
for side, d in drums.items():
    oor = max(d) - min(d)
    after_cut = max(d) + 0.016            # diameter after a light clean-up cut
    print(f"{side:<6} largest {max(d):.3f} in, out-of-round {oor:.3f} in", end=" -> ")
    if max(d) >= max_dia:
        print("at or over the maximum: replace")
    elif after_cut > max_machine:
        print("cannot be machined within the limit: replace")
    elif oor > out_of_round_limit:
        print("machine to clean up")
    else:
print("serviceable as is")left largest 8.014 in, out-of-round 0.005 in -> machine to clean up right largest 8.021 in, out-of-round 0.001 in -> cannot be machined within the limit: replace
The left drum could be machined, but the right could not stay within the machining limit, and drums on an axle must be matched, so both are replaced. The left trailing shoe is soaked, and because shoes, like pads, are always replaced as an axle set so that both sides brake equally, Kiran prices new shoes for both sides, both wheel cylinders, new adjusters and a hardware kit of new springs and clips. Return springs lose tension with heat over the years, and a weak spring can let a shoe drag, so most shops replace the hardware with every shoe job.
Reassembly and adjustment
Before reassembly, the raised pads on the backing plate where the shoes rest, called shoe ledges, are cleaned and given a thin film of the high-temperature brake grease specified by the manufacturer, so that the shoes can slide without squeaking or sticking. The adjuster threads are cleaned and lubricated too. No grease may reach the linings or the drum's friction surface. The shoes, springs and parking brake lever are assembled exactly as they came apart; Kiran works on one side at a time so that the other side is always there as a reference, and photographs each side before taking it apart.
Once assembled, the shoes are preadjusted so that the drum just slides on with a light drag. A brake shoe gauge, a simple caliper with an inside jaw for the drum and an outside jaw for the shoes, makes this quick: it is set to the drum's inside diameter, then turned over and used to adjust the shoes to just under that diameter. The rest of the adjustment is done by the self-adjusters, which are worked by applying the parking brake several times, or by stopping firmly in reverse several times on a duo-servo design. Then the parking brake cable is adjusted if needed, as Lesson 9 explains, the system is bled, because new wheel cylinders were fitted, and the brakes are tested.
# Preadjusting the shoes with a brake shoe gauge (Theo's car, new drums)
UNITS = "US"
drum_inside = 8.000          # in, new drum
running_clearance = 0.020     # in total, shoes to drum, for a light drag
shoe_setting = drum_inside - running_clearance
print(f"set the gauge to the drum: {drum_inside} in")
print(f"adjust the shoes to about {shoe_setting:.3f} in across the linings")
clicks_before, clicks_after = 10, 5
print(f"parking brake lever: {clicks_before} clicks before the repair, {clicks_after} after (specification: 4 to 7 clicks)")set the gauge to the drum: 8.0 in adjust the shoes to about 7.980 in across the linings parking brake lever: 10 clicks before the repair, 5 after (specification: 4 to 7 clicks)
New shoes and drums do not reach full braking until their surfaces conform to each other, so the new brakes are burnished with a series of moderate stops, as the parts supplier recommends. Theo's pedal is now high and firm, his parking brake holds at five clicks, and on Monday morning, after a wet weekend, the rear no longer grabs.
Drums and heat
Drums have a weakness that discs do not: they expand away from their shoes when they get hot. A hot drum's inside diameter grows, so the wheel cylinder pistons have to travel further to bring the shoes into contact, and the pedal goes lower; at the same time the lining's friction may fall. This is mechanical fade, and on a long, steep downhill a heavily loaded vehicle with drum brakes can lose much of its braking. Because the friction surface is inside the drum, drums also cool more slowly than rotors and hold water and dust inside. That is why drums are now used mainly at the rear of lighter vehicles, where they do less of the work, and in parking brakes, where heat does not matter.
Worked problem
Two problems, three symptoms
Explain Theo's three symptoms with the two problems Kiran found.
Show solution
- The seized adjusters let the gap between linings and drums grow as the linings wore, so the wheel cylinders had to travel further: a low pedal and a parking brake lever that came up ten clicks.
- The left wheel cylinder was leaking, which used up a little more fluid volume and soaked the trailing shoe; the contaminated lining grabbed, especially on wet mornings when the drums were damp and rusty.
- The repair is new drums, shoes, wheel cylinders, adjusters and hardware on both sides, with the backing plate ledges lubricated, the shoes preadjusted, the system bled and the brakes burnished.
Answer: Seized adjusters caused the low pedal and high lever; a leaking wheel cylinder contaminated a shoe and caused the grab.
Common mistakes
MistakeReplacing shoes on one side only.
InsteadReplace shoes as an axle set so that both sides brake equally.
MistakeMachining a drum past its maximum diameter.
InsteadReplace it; it is too thin to hold heat.
MistakeReusing tired return springs.
InsteadFit a new hardware kit with new shoes.
MistakeGetting grease on the linings or drum surface.
InsteadGrease only the backing plate ledges and adjuster threads.
MistakeDisassembling both sides at once.
InsteadWork one side at a time and photograph each before taking it apart.
Summary and key terms
- A drum brake pushes curved shoes against the inside of a drum with a wheel cylinder.
- Leading shoes are wedged by the drum's rotation, which gives self-energizing action.
- Leading-trailing brakes are smooth and simple; duo-servo brakes are more powerful and more sensitive.
- Automatic adjusters keep the shoes close to the drum; seized adjusters give a low pedal and high parking brake lever.
- Drums are measured against their maximum diameter and checked for out-of-round, bell-mouthing and hard spots.
- Hot drums expand away from their shoes, causing mechanical fade.
- Wheel cylinder
- A small hydraulic cylinder that pushes the brake shoes against the drum.
- Leading shoe
- A shoe that the drum's rotation wedges harder against the drum.
- Trailing shoe
- A shoe that the drum's rotation pushes away from the drum.
- Self-energizing action
- The increase in braking force from a shoe being wedged by the turning drum.
- Duo-servo brake
- A drum brake in which the primary shoe pushes the secondary shoe against a single anchor.
- Star wheel adjuster
- A threaded adjuster with a toothed wheel that moves the shoes out as they wear.
- Maximum diameter
- The largest inside diameter a drum may have before it must be discarded.
Practice problems
Work each problem on paper first, then reveal the answer to check.
Why do drum brakes grab when their linings are contaminated?
Show answer
Self-energizing action multiplies the increase in friction.
What symptoms do seized adjusters cause?
Show answer
A low pedal and too much parking brake lever travel.
A drum's largest diameter is 8.054 in and its maximum is 8.051 in. What must be done?
Show answer
Replace it; it is over the maximum diameter.
Why do drums suffer mechanical fade?
Show answer
They expand away from the shoes as they heat, so the pistons must travel further.
Lesson quiz · 5 questions
Score 60% or more to complete this lesson.
Create a free account to save your progress, take quizzes and earn a certificate.