
ARCH-100 · Lesson 10 of 12 · 20 min
Models as thinking tools
On Monday morning the studio smells of glue and cut card. Visser has asked every student to make a quick model of the riverbank at Kestrel Point, with the slope, the big cottonwood trees and the path, so that next week's pavilion designs can be tested in place. Ingrid cuts contour layers from corrugated card and stacks them into a hillside. Joon-ho makes trees from twisted wire. Callum, impatient, builds a box for his pavilion first and then realizes it sits wrong on the slope; he pushes it into the soft card until it fits and suddenly sees that his building could step down the bank instead of sitting on top of it. 'That,' says Visser, 'is what models are for. You did not draw that idea. Your hands found it.' Architects make models for many reasons: to see a design in three dimensions, to test ideas quickly, to study light and structure, to communicate with clients and to explore forms that are hard to draw. This lesson introduces the kinds of models, the scales they are made at, the materials and tools used and, above all, how to use models as tools for thinking rather than only for presenting.
Why make models?
Drawings flatten space onto paper; a model is space you can hold. You can turn it, look at it from eye level, peer inside, take it outside into the sun and photograph it. A model reveals problems that drawings hide: a wall that blocks a view, a roof that looks heavier than expected, a corner that does not quite meet, a room that feels too tall. It also lets other people understand a design, because almost anyone can read a model, while plans and sections take training to read.
Most importantly, models let you think with your hands. Cutting, folding, bending and stacking materials suggests ideas that do not occur at a desk. The Danish architect Jørn Utzon struggled for years to find a buildable geometry for the curved shells of the Sydney Opera House. The breakthrough, in 1961, came when he saw that all the shells could be cut from the surface of a single sphere, which he showed with a model of a sphere with the shell shapes cut from it like segments of an orange peel. The idea made the shells repeatable and buildable, and the building opened in 1973.
Kinds of model
- Site model: shows the land, contours, trees, roads and neighboring buildings, usually with a removable spot where different design options can be tested.
- Massing model: shows the overall form and size of a building as simple solid blocks, with no windows or details. Used early to test how big a building is and how it sits on the site.
- Study or sketch model: quick, rough and disposable, made to test one idea. Many study models are made for every final design.
- Concept model: an abstract model that captures the central idea, such as a sheltering wall or a sequence of rooms, without showing the actual building.
- Sectional model: a model cut open to show the inside, the floors and how light enters.
- Structural model: tests how parts carry load, often made with sticks, string or wire.
- Light model: a closed model with the exact openings, used to study daylight inside by placing it in the sun or under a lamp.
- Detail model: a large-scale model of one part, such as a corner, a stair or a joint between materials.
- Presentation model: a careful, finished model for showing a design to clients or the public.
In a design studio, most of your models should be study models. A student who makes twenty rough models will almost always produce a better design than one who makes a single perfect model at the end.
Model scales
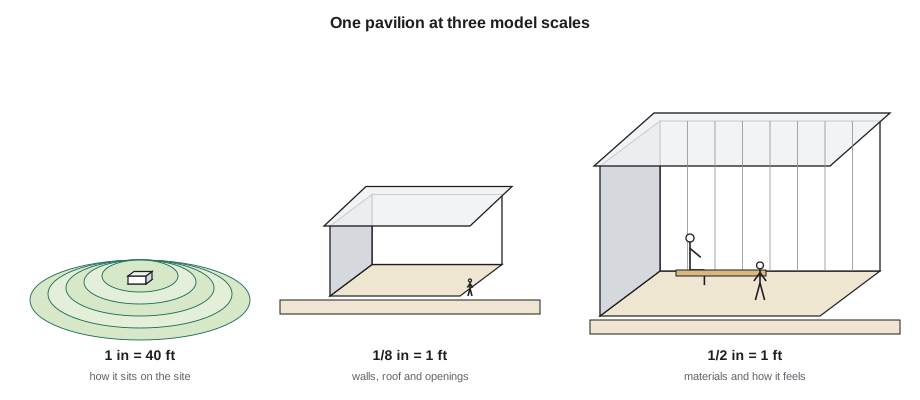
Models are made at the same scales as drawings. Common scales are 1 inch = 40 feet or 1 inch = 100 feet for site and urban models; 1/16 inch = 1 foot for massing; 1/8 inch = 1 foot and 1/4 inch = 1 foot for building and study models; and 1/2 inch = 1 foot or 1 inch = 1 foot for detail and large interior models. At 1/8 inch = 1 foot, a person 5 feet 8 inches tall is a little over 11/16 inch tall and a 10-foot room is 1 1/4 inches high. Smaller scales show context; larger scales show the experience of being inside.
# Model sizes: how big is a real thing at model scale?
scales = [("1/16 in = 1 ft", 192), ("1/8 in = 1 ft", 96), ("1/4 in = 1 ft", 48), ("1/2 in = 1 ft", 24)]
things = [("person", 5.7), ("door height", 7.0), ("pavilion length", 20.0), ("cottonwood tree", 65.0)]
for scale_name, ratio in scales:
    print(f"At {scale_name}:")
    for name, real in things:
        print(f"   {name:<26} {real:>6} ft real  ->  {real / ratio * 12:6.1f} in in the model")
print("Plan every model around the size of a scale person.")At 1/16 in = 1 ft: person 5.7 ft real -> 0.4 in in the model door height 7.0 ft real -> 0.4 in in the model pavilion length 20.0 ft real -> 1.2 in in the model cottonwood tree 65.0 ft real -> 4.1 in in the model At 1/8 in = 1 ft: person 5.7 ft real -> 0.7 in in the model door height 7.0 ft real -> 0.9 in in the model pavilion length 20.0 ft real -> 2.5 in in the model cottonwood tree 65.0 ft real -> 8.1 in in the model At 1/4 in = 1 ft: person 5.7 ft real -> 1.4 in in the model door height 7.0 ft real -> 1.8 in in the model pavilion length 20.0 ft real -> 5.0 in in the model cottonwood tree 65.0 ft real -> 16.2 in in the model At 1/2 in = 1 ft: person 5.7 ft real -> 2.9 in in the model door height 7.0 ft real -> 3.5 in in the model pavilion length 20.0 ft real -> 10.0 in in the model cottonwood tree 65.0 ft real -> 32.5 in in the model Plan every model around the size of a scale person.
The table shows why choosing the scale is the first decision for any model. At the largest scale a whole cottonwood tree would stand about 32 inches tall, as high as the studio table, while at the smallest scale the pavilion is only 1 1/4 inches long, small enough to balance on a fingertip. Choose the scale that shows what you need to study and that fits on your table.
Materials and tools
Study models are made from cheap, fast materials: chipboard, corrugated card, foam board, paper, balsa or basswood sticks, wire, clay and found objects. Presentation models often use a single uniform material, such as white card or light basswood, so that the form reads clearly without distraction. Different materials suggest different ideas: clay for shaping solid masses, card for walls and planes, sticks for frames, string for tension structures, fabric for membranes.
The basic tools are a sharp craft knife with plenty of spare blades, a steel ruler, a self-healing cutting mat, a set square, white glue and a quick-setting glue, pins and masking tape. Change blades often, because a dull blade tears card and is more likely to slip. Always cut away from your body and the hand holding the ruler, with the ruler between the blade and your fingers. Many schools also have laser cutters and 3D printers. These are useful for precise final models, but they are slow to set up and tempt students to make finished-looking models of unfinished ideas. Make the first models by hand.
Models that compute: Gaudí and Otto
Some architects have used models not just to show forms but to find them. Antoni Gaudí, working on the church for the Colònia Güell near Barcelona from 1898, built a large upside-down model from strings hung with small bags of shot. Under gravity each string took the shape of a catenary, the curve of a hanging chain, which is purely in tension. Turned right side up, the same curves give arches and vaults that are purely in compression, so masonry can stand with little or no bending. Gaudí photographed the hanging model and painted over the photographs to see the church; only the crypt was built, between 1908 and 1914, but the method shaped his later work, including the Sagrada Família.
In the twentieth century, the German engineer and architect Frei Otto used soap films stretched across wire frames to find minimal surfaces for tensioned roofs, because a soap film always pulls itself into the smallest possible area. His research led to the cable-net roofs of the Olympic Park in Munich, built for the 1972 Games. Today engineers do the same calculations in software, but physical form-finding models are still used in teaching because they let you see and feel why a structure takes its shape.
Photographing models
A good model photograph can be as convincing as a rendering. Photograph models at eye level, from the height of a scale person, with the camera close to the base; this shows the space as someone would actually see it. Use real sunlight or a single strong lamp to cast clear shadows, and set the sun angle to match the site and season. A plain background, such as a sheet of white or black card, keeps attention on the model. Phones are good for this because their lenses are small enough to sit inside a model.
Worked problem
Testing a pavilion roof with models
Joon-ho is unsure whether his small pavilion's roof should be flat, single-sloped or curved. He decides to test the options with models rather than drawings.
Show solution
- He builds the riverbank and the pavilion walls once at 1/4 inch = 1 foot in chipboard.
- He makes three removable roofs in card: flat, sloping down to the north, and gently curved.
- He photographs each at eye level from the path and from the river, in morning and afternoon sun from a desk lamp.
- The flat roof looks heavy from the path; the curved roof competes with the trees; the north-sloping roof opens the pavilion to the river and the sun and sheds snow away from the entrance.
- He keeps all three roofs and the photographs in his process record, with notes, and develops the sloping roof.
Answer: Making several quick, interchangeable models and testing them in the same way turns a vague preference into a clear, explainable decision.
Exercise 10: three models, three questions
This exercise takes about six hours.
- Make a site model of your chosen spot at 1/8 inch = 1 foot from layered card, with trees and a scale figure, leaving a removable area for the design.
- Make three study models of possible shelters for the spot, each built to answer one question, such as how it meets the ground, where the light enters, or how it shelters from wind.
- Make one concept model, abstract and about the size of your hand, that captures your central idea.
- Photograph every model at eye level with directional light.
- Deliverable: the models, at least twelve photographs and a page stating the question each model asked and what it answered.
Self-critique checklist
- Did each model have a clear question?
- Is there a scale figure in every model?
- Are my photographs at eye level, with clear light and a plain background?
- Did I make rough models early, rather than one polished model at the end?
- Did I cut safely, with sharp blades and the ruler protecting my fingers?
Digital and physical models together
Most offices now build three-dimensional digital models of every project. These let designers turn a building on screen, cut sections anywhere, simulate sunlight for any date and produce drawings directly from the model. Some architects, notably Frank Gehry, have moved back and forth between physical and digital models: for the Guggenheim Museum Bilbao (1997), the office built physical models by hand, scanned them into software originally developed for the aerospace industry and used the digital model to engineer and fabricate the curved forms. The two kinds of model are partners, not rivals. Physical models are better for quick, intuitive exploration and for judging real light and scale with your eyes and hands; digital models are better for precision, repetition and calculation. Learn both, and learn when to use each.
Common mistakes
MistakeMaking a presentation model too early.
InsteadMake many quick study models first; polish only when the idea is settled.
MistakeLeaving out the scale figure.
InsteadWithout a person, nobody can judge the size of a space.
MistakePhotographing models from above.
InsteadPhotograph at eye level, as a person would see the space.
MistakeChoosing a scale that is too small to study what matters.
InsteadPick the scale that shows the question you are testing.
Summary and key terms
- Models show space in three dimensions, reveal problems and let anyone understand a design.
- Study models are quick and disposable; presentation models are careful and finished.
- Model scale follows drawing scale: small scales for context, large scales for experience.
- Form-finding models, such as Gaudí's hanging strings and Otto's soap films, compute shapes physically.
- Photograph models at eye level with directional light and a scale figure.
- Massing model
- A model of a building's overall form as simple solids.
- Study model
- A quick model made to test one idea.
- Catenary
- The curve of a hanging chain, purely in tension; inverted, it gives an arch purely in compression.
- Form-finding
- Discovering a structural shape through physical or digital simulation of forces.
- Scale figure
- A model or drawn person used to show the size of a space.
Practice problems
Work each problem on paper first, then reveal the answer to check.
What is the difference between a study model and a presentation model?
Show answer
A study model is quick and tests one idea; a presentation model is careful and finished for showing to others.
Why did Gaudí hang his models upside down?
Show answer
Hanging strings take tension-only catenary shapes, which, turned upright, give compression-only arches.
What helped Utzon make the Sydney Opera House shells buildable?
Show answer
Cutting all the shell shapes from a single sphere, shown with a model.
How should you photograph a model?
Show answer
At eye level from a scale figure's height, with directional light and a plain background.
Why use a single uniform material for a presentation model?
Show answer
So the form reads clearly without distraction.
Lesson quiz · 5 questions
Score 60% or more to complete this lesson.
Create a free account to save your progress, take quizzes and earn a certificate.