
SMW-320 · Lesson 8 of 12 · 19 min
Traditional copper roofing: flat lock, batten seam and turret work
Before roll formers and seaming machines, metal roofs were made by hand from small sheets. The methods have not changed much in two hundred years, and they are still the right ones for heritage buildings and for shapes that long panels cannot follow: low-slope roofs, curved and conical roofs, domes, dormers and turrets. St. Brendan's has all three classic copper roof types: standing seam on the steep nave, soldered flat-lock pans on the low-slope side aisles, and batten seam on the apse. This lesson covers each, building on the seams and soldering from SMW-130 and the cone layout from SMW-210.
Flat-lock soldered roofing
Flat-lock roofing is made of small rectangular pans, typically cut from a sheet into pieces about 450 × 600 mm (18 × 24 in), with all four edges folded: two edges folded up and back and two folded down and under. Adjacent pans hook into each other, the seams are flattened with a mallet, and the joints are then soldered so the whole roof becomes one watertight skin. Because the seams are soldered, flat-lock roofing is used on low slopes, down to nearly flat, and on curves. Its weakness is that it cannot move much, so each pan is held by cleats locked into its folds, and large roofs are broken into fields with expansion joints between them, such as raised seams, so the movement does not crack the solder.
The pans are laid in a staggered pattern, like bricks, starting at the low edge and working up the slope, each course locked into the one below with the upper pan's fold over the lower. Two or three cleats per pan, of the same copper, are nailed to the deck with copper nails and folded into the pan edges. Every seam is then soldered from the top, with the solder flowing fully through all the folds, the three legs that the SMW-130 test panel showed, not just sitting on the surface.
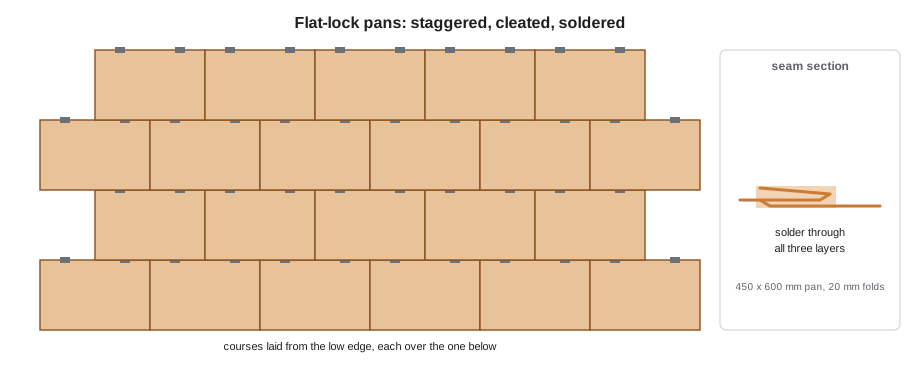
The St. Brendan's side aisles
The two side aisle roofs at St. Brendan's slope at about 1 in 12, too low for standing seam with the original detailing. They were roofed with soldered flat-lock 16 oz copper. The SMW-130 survey found that repairs made in the 1980s had used solder that only bridged the top of the seams; it cracked within a few years and water had worked into the deck at dozens of seams. Keelson's restoration strips the aisle roofs, replaces rotted boards, lays a rosin paper slip sheet over a new underlayment, and re-roofs in new 16 oz flat-lock pans with copper cleats, soldered with 50/50 tin-lead solder on the roof seams as the specification allows, and lead-free solder on the downspouts that feed the church garden.
Kai worked out the number of pans, cleats and the solder for the north aisle roof, 24.0 m by 4.0 m on the slope, from Keelson's flat-lock chart.
import math
# Flat-lock pans, cleats and solder for a low-slope copper roof (illustrative shop values)
length, width = 24.0, 4.0          # roof size on the slope, m
pan_l, pan_w = 0.55, 0.40             # finished pan size (exposed), m
pans = math.ceil(length / pan_l) * math.ceil(width / pan_w)
pans = math.ceil(pans * 1.05)          # 5 percent for cuts at edges and penetrations
cleats = pans * 3
seam_per_pan = pan_l + pan_w           # each pan adds about one long and one short seam
seam_total = pans * seam_per_pan
solder_per = 0.05                      # solder used per m of seam (shop figure)
print(f"{pans} pans, {cleats} cleats")
print(f"about {seam_total:.0f} m of seam to solder, about {seam_total * solder_per:.1f} kg of solder")
cut_l, cut_w = pan_l + 0.05, pan_w + 0.05   # blank size with folds, m
sheet = (2.438, 0.914)                          # copper sheet size, m
per_sheet = int(sheet[0] // cut_l) * int(sheet[1] // cut_w)
print(f"blank {cut_l:.2f} x {cut_w:.2f} m; {per_sheet} blanks per sheet; {math.ceil(pans / per_sheet)} sheets")462 pans, 1386 cleats about 439 m of seam to solder, about 21.9 kg of solder blank 0.60 x 0.45 m; 8 blanks per sheet; 58 sheets
The pan count set the cutting list for Walt's shop, which cuts and folds the pans on the brake and the hand folder in batches so they are ready in the order the crew lays them. The solder figure is Keelson's own estimate from past jobs, and Aggie adds a margin because cold or windy days use more.
Batten seam roofing
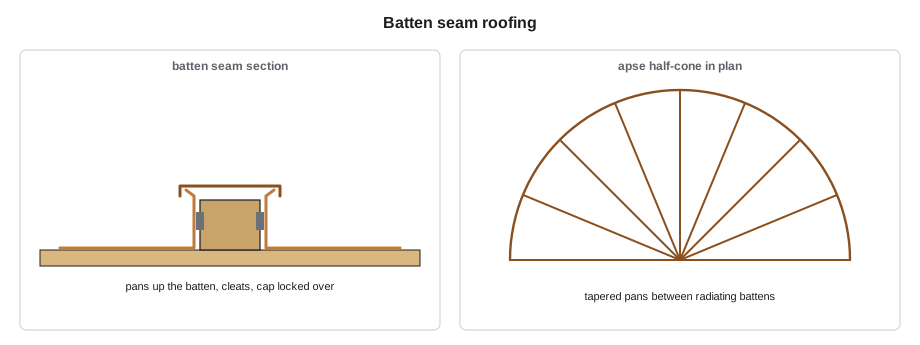
A batten seam roof has wooden or metal battens running from eave to ridge, with copper pans between them turned up the sides of each batten, and a copper cap folded over the top of each batten and locked to the pan edges. The battens give a strong shadow line, typical of nineteenth-century churches and public buildings, and the joint over the batten allows the pans to move sideways. Cleats are fastened to the sides of the battens and locked into the pan edges and the cap. Where the pans meet end to end along the slope, they are joined with flat or transverse seams, soldered on low slopes and lapped on steep ones.
The St. Brendan's apse is a half-cone with batten seams radiating from its peak. The 1960s repair used galvanized cleats, which corroded in the copper as lesson 2 described, and the roll caps had lifted in storms. The restoration keeps the original battens where sound, replaces rotted ones with matching profile white oak treated only with a compatible preservative, and remakes the caps and pans in 16 oz copper with copper cleats. Each pan is a tapered piece, narrower at the top, laid out by the radial line method from SMW-210.
Standing seam by hand
The St. Brendan's nave is hand-seamed copper standing seam, in sheets about 2.4 m or 8 ft long joined end to end with transverse seams, the standing seams double-locked with hand tongs and mallets. The nave was found sound except for damage around the dormers and at the eaves where snow guards had torn loose. The repair work removes the damaged sheets back to the nearest transverse seam, makes new sheets to match, and reforms the standing seams by hand with tongs, because a machine for this profile does not exist. Aggie had Kai practise on a mock-up on the shop floor until his seams matched the old ones in height and tightness.
Cones, domes and curved work
Curved roofs are covered in smaller pieces. A cone, such as the bell turret cap from SMW-210, is made of tapered panels with standing seams on its radial lines. A dome is made of gores, curved tapering panels laid out like orange segments, with standing or flat seams, and often a horizontal seam at intervals because a single gore from base to top would be too long and too curved. Low curves can be covered with flat-lock pans that follow the shape. Small curved panels are shaped with a stretching or shrinking hammer and stakes, and soft-temper copper is sometimes used for the most curved pieces.
The turret cap went on in eight panels with double-lock standing seams, as laid out in SMW-210, hemmed at the curb onto a continuous copper cleat and capped at the top under the copper finial ring. The crew worked it from a scaffold around the turret, with fall arrest anchored to the tower structure.
Soldering on the roof
Roof soldering follows the SMW-130 practice: clean bright metal, pre-tinned edges, the right flux, enough heat that the solder flows through the seam, and a clean wipe afterwards so flux residue does not stain the copper. On a roof, wind steals heat from the copper, so the crew uses heavier coppers, shields the work from the wind, and solders in shorter runs. Rosin paper or a slip sheet under the copper keeps heat from the deck and lets the copper move. Every seam is checked by eye for full flow, and test seams from each day are cut open, as in SMW-130.
Copper weights and when to use them
Most traditional copper roofing is 16 oz. Twenty-ounce copper is used for built-in gutters, valleys, copings and large flashings where stiffness or wear resistance matters, and heavier weights for special cases. Using lighter copper than the original on a heritage roof is false economy: the original weight lasted a century, and a lighter sheet may not. The specification for St. Brendan's matched each part of the roof to the weight found in the survey.
Worked problem
Laying out the aisle roof
How should the flat-lock pans on the north aisle be set out?
Show solution
- Start at the low edge, with the first course hooked onto a continuous cleat along the eave drip edge.
- Lay each course staggered by half a pan from the one below, upper pans folded over lower pans so every lap sheds downhill.
- Lock two or three copper cleats into each pan's upper and side folds, nailed to the deck with copper nails, before the next pan covers them.
- Divide the 24 m or 80 ft length into two fields with a raised expansion seam between them, so each field moves independently.
- Solder each seam fully through its three layers, working from the low edge up, and clean off the flux.
Answer: Staggered courses from the low edge, cleats in every pan, an expansion seam between fields, and full-penetration solder.
Expansion fields and cross seams in flat-lock work
How large can a flat-lock field be before the solder cracks? There is no single number, because it depends on the slope, the copper temper, the cleat spacing and the temperature range, but the handbooks and the SMACNA manual keep soldered fields small, typically a few metres or ten to twenty feet in each direction, and break them with raised expansion seams or loose-locked cross seams that can slide. On St. Brendan's, each aisle is divided into two fields along its length by a raised seam, and the fields are short enough across the slope that no extra seam is needed that way. The raised seam is itself folded and locked but not soldered, and it stands above the water so it does not need to be.
Where flat-lock roofing meets a wall, the pans turn up as a base flashing and are covered by counterflashing, exactly as in lesson 4, and where it meets the eave they hook onto a continuous cleat on the drip edge. Every edge of the field is detailed to let the field move as a unit.
Copper roofing tools
Hand copper roofing needs few tools but good ones: hand seamers and tongs of several widths, wooden and rawhide mallets that close seams without marking the copper, a hand brake and folders for pan edges, snips, a set of soldering coppers with a furnace, a scraper and wire brushes for cleaning, and stakes and hammers for curved work. Kai's first summer on the copper crew was mostly spent with a mallet and tongs, and Aggie judged his seams not by how fast he closed them but by how evenly they stood.
Soldering cleats to pans is never done; the cleat holds the pan mechanically and the pan must be able to move against it. Nor are pans soldered to the deck, to flashings on walls, or across expansion seams. The solder joins pan to pan within a field and nothing else. Kai found that rule easy to remember once Aggie put it in his words: solder makes the water skin, cleats hold it down, and nothing holds it still.
Common mistakes
MistakeSoldering only across the top of a flat-lock seam.
InsteadMake the solder flow through all three layers of the fold.
MistakeLaying flat-lock pans without cleats, relying on the solder.
InsteadLock copper cleats into each pan so the roof is held mechanically.
MistakeRunning one soldered field across a long roof.
InsteadBreak large flat-lock roofs into fields with expansion seams.
MistakeUsing lighter copper than the original on a heritage roof.
InsteadMatch the original weight, or heavier where wear is high.
MistakeSoldering in wind without shielding the work.
InsteadShield the seam, use heavier coppers and solder in short runs.
Summary and key terms
- Traditional copper roofs are made by hand from small sheets and suit heritage, low-slope and curved roofs.
- Flat-lock pans are staggered, cleated and soldered through all folds, and work at very low slopes.
- Large flat-lock roofs need fields with expansion seams so solder does not crack.
- Batten seam roofs have pans turned up battens and caps locked over them; the batten joint allows movement.
- Cones and domes are covered with tapered panels or gores laid out geometrically.
- Roof soldering needs clean metal, shielding from wind, full flow and test cuts.
- Flat-lock pan
- A small copper sheet with all edges folded, locked to its neighbours and soldered.
- Batten seam
- A seam formed over a raised batten with a cap locked over it.
- Transverse seam
- A seam across the slope joining two sheets end to end.
- Gore
- A curved, tapered panel used to cover a dome.
- Rosin paper
- A paper slip sheet laid under copper to let it move and protect the deck.
- Pre-tinning
- Coating the edges to be soldered with solder before assembly.
Practice problems
Work each problem on paper first, then reveal the answer to check.
Why can flat-lock roofing be used on lower slopes than standing seam?
Show answer
Its seams are soldered, so the whole roof is a watertight skin.
A flat-lock roof is 10 m by 3 m with exposed pans of 0.55 × 0.40 m. About how many pans are needed with 5 percent waste?
Show answer
19 × 8 = 152, plus 5 percent ≈ 160 pans.
Why did the St. Brendan's apse caps lift?
Show answer
The galvanized cleats corroded in contact with the copper and let go.
Why is a dome covered with gores and horizontal seams instead of single full-height panels?
Show answer
Full-height gores would be too long and too curved to form and handle.
Lesson quiz · 5 questions
Score 60% or more to complete this lesson.
Create a free account to save your progress, take quizzes and earn a certificate.