
SMW-320 · Lesson 7 of 12 · 19 min
Standing seam roofing systems
A standing seam roof is made of long metal panels running from eave to ridge, joined along their sides by raised seams that stand up out of the water. Because the seams are above the surface and there are no exposed fasteners through the panels, a well-made standing seam roof sheds water at low slopes, lasts for decades and handles the snow loads of Atlantic Canada and the Great Lakes. Keelson installs two kinds: traditional hand-seamed copper and prefinished steel roofs, and modern factory-engineered structural systems. This lesson covers both, how they are attached so they can move, how a roof is laid out into panels, and how the seams are closed.
Architectural and structural panels
There are two families of standing seam panels. Architectural panels are installed over a solid deck, usually plywood or boards with an underlayment, and rely on that deck for support. They are designed to shed water at moderate slopes, and many systems call for a minimum of about 3 in 12. Structural panels can span between purlins without a deck, because the panel itself is strong enough to carry snow and wind loads between supports, and the systems are tested as an assembly. Structural panels with high, mechanically seamed double-lock seams are made watertight enough for very low slopes, around 1/4 in 12 in some systems, because their seams can resist standing water for short periods.
Both families are made to resist wind uplift. In the US, roof systems are commonly tested to UL 580, UL 1897, FM 4471 or ASTM E1592 to show their uplift resistance, and the building code requires the roof to resist the design wind load. In Canada, the same North American tests are widely used to rate systems, and the National Building Code requires the roof assembly to resist the specified wind load. Keelson installs a tested system exactly as it was tested, with the same clip type, clip spacing, fastener and deck, because a change to any of them can cut the uplift resistance substantially.
Panels, seams and clips
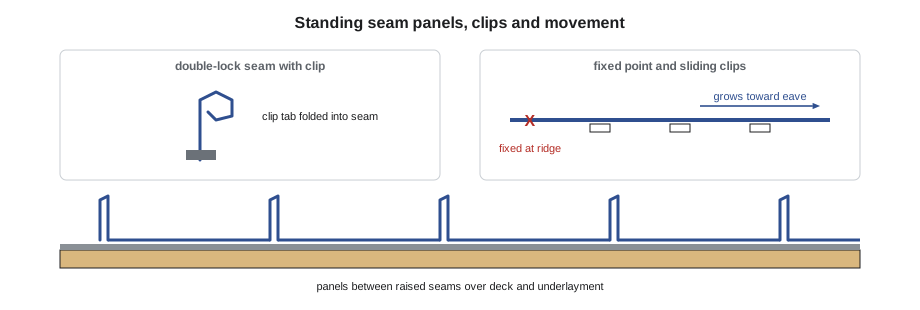
A panel is a flat pan between two raised legs, one male and one female. The panels are laid side by side so each panel's male leg nests into the next panel's female leg, and the pair is closed into a seam. Common seam types are the snap-lock seam, which clicks closed by hand; the single-lock or 90-degree seam, folded once over; and the double-lock or 180-degree seam, folded twice, which is the most watertight. Batten seams, where a separate cap covers a wooden or metal batten between panels, are covered with traditional copper in lesson 8.
Panels are attached to the deck or purlins with clips hidden in the seams. Each clip has a base fastened to the deck and a tab that is folded into the seam. Fixed clips hold the panel in place; sliding or two-piece clips have a tab that slides on its base, so the panel can expand and contract along its length without loading the fasteners. A panel is fixed at one point, usually at the ridge or at mid-length, and slides at every other clip. The fixed point is important: it stops the whole panel creeping downhill under snow and gravity.
Laying out the roof
Panel layout starts with the roof's width at the eave and the chosen panel width. The layout sets where the first panel starts so the panels end at a reasonable width at the far rake, symmetrical if the roof is seen from the front, and so seams do not land in a valley or right beside a skylight. Panel length runs from the eave to the ridge, with allowances for the hook at the eave and the closure at the ridge, and panels are ordered or roll-formed to that length. Clip spacing comes from the system's uplift tables and is usually tighter in the edge and corner zones than in the field, the same pattern as for roof edges in lesson 3.
Ashgrove's new entrance canopy roof is a prefinished steel standing seam over plywood, 9.8 m along the eave and 4.6 m from eave to ridge, with 400 mm wide panels. Kai laid it out from the system tables, with clips at 600 mm in the field and 300 mm within 1.2 m of the edges.
import math
# Standing seam panel layout and clip count (illustrative system values)
eave = 9.8            # roof width along the eave, m
length = 4.6       # eave to ridge, m
pw = 0.40             # panel coverage width, m
n = math.ceil(eave / pw)
last = eave - (n - 1) * pw
print(f"{n} panels; a full layout leaves the last panel {last:.2f} m wide")
start = (pw - last) / 2 if last < pw / 2 else 0
if start:
    print(f"start the first panel cut to {pw - start:.2f} m so both rakes get equal panels")
field_sp, edge_sp, edge_zone = 0.6, 0.3, 1.2   # clip spacing and edge zone, m
def clips_along(L):
    zone = min(edge_zone, L / 2)
    return math.ceil(2 * zone / edge_sp) + math.ceil(max(L - 2 * zone, 0) / field_sp)
seams = n + 1
per_seam = clips_along(length)
edge_seams = 2 * math.ceil(edge_zone / pw)
total = seams * per_seam + edge_seams * math.ceil(length / edge_sp) - edge_seams * per_seam
print(f"about {per_seam} clips on a field seam; {total} clips in all, edge seams at the tighter spacing")25 panels; a full layout leaves the last panel 0.20 m wide start the first panel cut to 0.30 m so both rakes get equal panels about 12 clips on a field seam; 336 clips in all, edge seams at the tighter spacing
Centring the layout gave equal partial panels at both rakes, which the architect preferred to a full panel at one rake and a sliver at the other. The clip count told Walt how many clips and fasteners to send, with a margin for the hip and trim clips.
Thermal movement along the panel
A long panel moves along its length, and that movement must be taken up at the ends. If the panel is fixed at the ridge, all of its movement happens at the eave, where the panel end slides on its cleat; if it is fixed at mid-length, half goes each way, and the ridge and eave details must both allow for it. The ends of the panel, the trim and the closures are detailed to let that movement happen without tearing sealant or opening the hook. Kai worked out the movement at the eave of the canopy panels: for 4.6 m of steel panel over a 100-degree range, about 5.5 mm, small enough for a standard hook and cleat. On a large building with 20 m or 60 ft panels, the same calculation gives several centimetres or more than an inch, and the details have to be designed for it.
Seaming
Snap-lock panels close by pressing the seam together. Mechanically seamed panels are closed in two steps. First, the seam is started by hand with seaming tongs at the ends, the clips and any place the machine cannot reach. Then an electric seaming machine runs along the seam, rolling it closed in one or two passes. The machine must be the one made for that panel profile, set for the seam type, and run with the panel clean and the seam fully nested. An improperly closed seam, or one with a twist from a crooked panel, is a leak and is hard to fix after the fact.
Seam sealant, a factory or field-applied bead inside the female leg, is used in low-slope systems to help the seam resist water under standing snow or ice. Where it is part of the tested system, it must not be left out.
Eaves, ridges, hips and valleys
At the eave, the panel end is hemmed or hooked over a continuous cleat on the drip edge, or turned down over the eave trim, so wind cannot get under it and the panel can slide. At the ridge, panel ends are turned up, closed with foam or metal closures shaped to the panel profile, and covered with a ridge cap, often vented. Hips are covered with a hip cap over cut panels closed the same way. Valleys are lined with a valley pan and the panels are cut and hemmed over a cleat along the valley, so water runs down the pan, not into the cut ends. Every one of these details has to let the panels move.
The panel cut ends at hips and valleys are where many standing seam roofs fail, because the seams are cut through there and must be closed. The manuals show folding the cut seam over and closing it with a closure and a bead of sealant under the cap. Kai's job at Ashgrove was the two short valleys where the canopy roof met the building's L-shaped entry wall.
Snow on standing seam roofs
Metal roofs shed snow, often all at once. A slab of snow and ice sliding off a steep standing seam roof onto a walkway or a lower roof is a real hazard; on St. Brendan's nave, the old snow guards are part of the heritage fabric and are being re-set, and on the Ashgrove canopy, which is over the school's main entrance, snow guards are required. Lesson 10 covers snow guards and snow loads. Snow retention devices for standing seam roofs clamp to the seams without piercing the panels; anything that pierces a panel is a leak.
Worked problem
Choosing a system
Which standing seam system suits each roof?
Show solution
- Ashgrove canopy, 6 in 12 slope over plywood, small and visible: a prefinished steel architectural panel with snap-lock or single-lock seams and a tested clip pattern.
- Eastgate wing's mechanical penthouse roof, about 1/2 in 12 over purlins: a structural standing seam system with mechanically seamed double-lock seams and seam sealant, installed to its uplift test.
- St. Brendan's nave, steep and original: hand-seamed copper double-lock standing seams, repaired to match where needed, which lesson 8 continues.
Answer: Slope, support, wind exposure and character decide the panel family and seam type.
Handling long panels
Long standing seam panels are flexible and easily kinked. A panel picked up from one end folds under its own weight; one carried flat in wind becomes a sail. Panels are carried on edge by several workers spaced along their length, or lifted with a spreader bar so they hang without bending, and set on the roof in bundles that are tied down until installed. A kinked panel shows the kink in the finished roof forever, and a kinked seam leg will not seam properly. On long roofs, panels are often roll-formed on site at the eave to avoid transporting long lengths at all; the roll former must be set up on a level base and the panels checked for oil canning, the slight waviness of wide flat pans, which is reduced by stiffening ribs and good substrate flatness.
Oil canning is a cosmetic issue, not a leak, but on a visible roof like the Ashgrove canopy it matters. The architect chose a panel with light striations in the pan, a flat, true plywood deck and a slightly heavier gauge, all of which reduce it.
Standing seam roofs carry warranties from the panel manufacturer, and the warranties usually depend on installation by a trained installer to the published details, an inspection by the manufacturer's representative and the use of the manufacturer's clips and trims. Keelson keeps a file of the training certificates for each system it installs, and Sean books the manufacturer's inspection before the roofer and the general contractor need the roof finished.
Common mistakes
MistakeInstalling an architectural panel below its minimum slope.
InsteadCheck the system's minimum slope; use a structural double-lock system on low slopes.
MistakeChanging the clip spacing or fastener from the tested assembly.
InsteadInstall exactly as tested, with tighter clips in edge and corner zones.
MistakeUsing only fixed clips along a panel.
InsteadFix each panel at one point and use sliding clips elsewhere.
MistakeRunning the seaming machine over a seam that is not fully nested.
InsteadHand-start ends and clips, check the seam, then run the correct machine.
MistakeFastening snow guards through the panels.
InsteadClamp snow retention to the seams without piercing the panel.
Summary and key terms
- Standing seam panels join with raised seams and hidden clips, with no exposed fasteners.
- Architectural panels need a deck and a moderate slope; structural panels span purlins and suit low slopes.
- Uplift resistance comes from the tested assembly; install it exactly as tested.
- Panels are fixed at one point and slide on clips elsewhere; ends and trims allow the movement.
- Layout centres partial panels, keeps seams out of valleys and tightens clips at edges and corners.
- Seams are hand-started and machine-closed with the right machine; snow guards clamp to seams.
- Standing seam
- A raised seam joining two roof panels, closed above the water surface.
- Double-lock seam
- A seam folded twice, through 180 degrees, for the best water resistance.
- Sliding clip
- A concealed clip whose tab slides on its base so the panel can expand.
- Fixed point
- The place where a panel is held so it cannot creep, usually at the ridge or mid-length.
- Closure
- A shaped foam or metal piece that closes the open end of a panel profile.
- Structural panel
- A standing seam panel that spans between purlins without a deck.
Practice problems
Work each problem on paper first, then reveal the answer to check.
A roof is 12.0 m along the eave with 400 mm panels. How many panels, and how wide is the last one if laid from one rake?
Show answer
30 panels exactly; the last is a full 400 mm.
A 15 m steel panel is fixed at mid-length. How much does each end move over a 100-degree range?
Show answer
12 × 10⁻⁶ × 7500 × 100 ≈ 9 mm at each end.
Why is a panel fixed at one point?
Show answer
To stop it creeping downhill while letting it expand and contract.
Why are snow guards clamped to the seams?
Show answer
Piercing the panel would make a leak.
Lesson quiz · 5 questions
Score 60% or more to complete this lesson.
Create a free account to save your progress, take quizzes and earn a certificate.