
PLB-120 · Lesson 12 of 12 · 22 min
Testing and inspection of DWV
On a cold morning in November, Maya stood on the seventh floor of Kingsway Tower with a hose, a set of test plugs and a clipboard. The rough-in for the seventh-floor suites was complete: every branch hung, every vent tied in, every stub capped. Before the drywallers could close the walls, the drainage and vent piping had to be filled with water, held for the required time without a drop, and seen by the inspector. Luis had given her the job of setting up the test herself, with him checking each step. It was, he said, the moment when everything in this course either works or does not.
This final lesson covers why drainage systems are tested, the water and air tests used at rough-in, the final test of the completed system, testing building drains and sewers, the serious hazards of test plugs, preparing for the inspector, and the records that follow the building. It ends by walking through the seventh-floor test as a review of the whole course.
Why DWV systems are tested
A drainage system is mostly concealed. Once walls and ceilings are closed and slabs poured, a leaking joint, a cracked fitting or a missing cap can only be found by opening up finished work, often in someone's home. A test before concealment proves that every joint is tight while the pipe is still exposed and cheap to repair. Codes require drainage and vent piping to be tested, and inspectors must see the test, or the evidence of it, before the work is covered.
Tests are done in stages: underground piping before backfill, each floor's rough-in before walls are closed, and the completed system after fixtures are installed. On a high-rise like Kingsway, the stacks are tested in sections as they rise, so that the lower floors can be closed in while the upper floors are still being built.
The water test
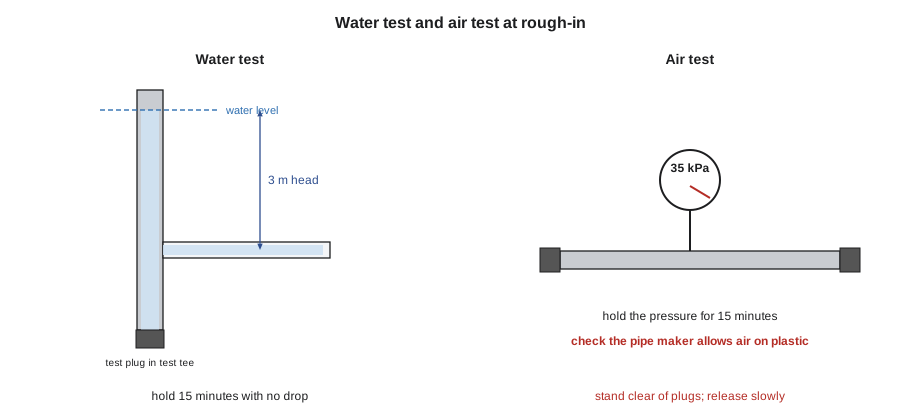
The most common rough-in test for drainage and vent piping is the water test. All openings in the section being tested are closed with test plugs or caps, except the highest one, and the system is filled with water until it overflows at the top or reaches the required head above the highest joint in the section. The water level is then watched for a set time. If it does not drop, the section is tight.
The Ontario Building Code generally requires the water test to apply a head of at least 3 m of water to every joint in the section, held for at least 15 minutes without loss. On a tall stack, this means testing in sections no taller than practical: the water at the bottom of a long section is under much more pressure than at the top, and the plugs and joints at the bottom must withstand it.
Water tests are reliable and easy to read: a leaking joint drips. Their drawbacks are weight, freezing and cleanup. Water in a long stack is heavy, the test water must be drained safely afterward, and in winter an unheated building can freeze the test water and crack pipe and fittings. On Kingsway in November, Luis checked that the seventh floor was heated before allowing a water test.
The air test
An air test closes all openings and pressurizes the system with air to a set pressure, read on a gauge, which must hold for a set time. Air tests are useful where water would freeze or where the weight of water is a problem. They are harder to diagnose, because a leak can only be found by listening, by soapy water on each joint, or by the gauge slowly dropping.
Codes typically set the air test at about 35 kPa, held for 15 minutes. Air is compressible and stores energy: a pipe or fitting that fails under air pressure can burst violently and throw fragments, unlike water, which simply leaks. For this reason, many manufacturers of plastic pipe do not allow air testing of their products, or allow it only under strict conditions. Always check the pipe manufacturer's instructions before using air on plastic.
Air testing also needs a calibrated gauge with an appropriate range, so that small drops can be read, and a temperature that stays steady during the test: air that warms or cools in the pipe changes the gauge reading even with no leak.
Test plugs: the hidden hazard
Test plugs hold back the water or air in a test, and they are the most dangerous part of it. A plug at the bottom of a filled stack holds back the full weight of the water above it. If the plug slips or is released carelessly, it can be fired out of the pipe with enough force to cause serious injury, followed by a rush of water. Plumbers have been injured and killed by test plugs blowing out of building drains and sewers.
The force on a plug is the pressure behind it multiplied by the plug's area. That force grows quickly with pipe size and with the height of water above the plug, which is why large plugs at the bottom of tall test sections are especially dangerous.
Worked problem
Force on a test plug
A 100 mm test plug sits at the bottom of a water test section with 3 m of water above it. What force does the water exert on the plug?
Show solution
- Pressure at the plug: \(p = \rho g h = 1000 \times 9.81 \times 3 \approx 29{,}400\) Pa.
- Plug area: \(\tfrac{\pi}{4} \times 0.1^2 \approx 0.00785\) m².
- Force: \(29{,}400 \times 0.00785 \approx 231\) N, about the weight of a 23 kg mass.
Answer: About 231 N; a plug lower down a taller stack, or a larger plug, carries much more.
# Force on a test plug for different pipe sizes and water heads
import math

for d_mm in (75, 100, 150, 200):
    area = math.pi / 4 * (d_mm / 1000) ** 2
    forces = []
    for head_m in (3, 10, 30):
        force_n = 1000 * 9.81 * head_m * area
        forces.append(f"{head_m:2d} m head: {force_n / 1000:5.2f} kN")
print(f"{d_mm:3d} mm plug -> " + ", ".join(forces))75 mm plug -> 3 m head: 0.13 kN, 10 m head: 0.43 kN, 30 m head: 1.30 kN 100 mm plug -> 3 m head: 0.23 kN, 10 m head: 0.77 kN, 30 m head: 2.31 kN 150 mm plug -> 3 m head: 0.52 kN, 10 m head: 1.73 kN, 30 m head: 5.20 kN 200 mm plug -> 3 m head: 0.92 kN, 10 m head: 3.08 kN, 30 m head: 9.25 kN
The output shows why a large plug at the base of a full stack is so dangerous: the force runs to thousands of newtons. Safe practice with test plugs follows a few firm rules:
- Use plugs rated for the pipe size and the pressure, inspect them before each use, and inflate inflatable plugs only to the manufacturer's pressure.
- Restrain plugs where the manufacturer or the situation calls for it, and never rely on friction alone at high heads.
- Never stand in line with a plug, in a trench or in front of a cleanout, while the system is under test or while draining it.
- Release pressure slowly from the top first, drain the water through a controlled point, and remove the plug only when the system is empty.
- Know where the test water will go when it is released, and protect people, equipment and finishes downstream.
The final test
After the fixtures are installed and the system is complete, codes may require a final test to show that the finished system, including fixture connections and traps, is tight against sewer gas. Because the traps are now in place and full, the test uses a much lower pressure than the rough-in tests, so as not to blow the trap seals.
Ontario practice allows a final test of the completed drainage and venting system using air or smoke at a low pressure that does not unseal the traps, as Part 7 sets out. Ontario also uses a ball test for some building drains and sewers, rolling a ball of a set size through the pipe to show it is clear and has not deformed.
Even where a formal final test is not required, a good plumber runs every fixture at finish, checks every trap and connection for leaks, and checks that every fixture drains freely without gurgling. Slow drainage or gurgling at finish usually points to a venting or grade problem that should have been caught earlier.
Testing building drains and sewers
Building drains and building sewers are tested before backfill, usually by a water test with the downstream end plugged and the upstream end filled to the required head. Many cities also require a camera inspection of the building sewer before they accept it, to show that the pipe has no sags, offsets, cracks or debris, and that the connection to the public sewer is made correctly.
For a buried sewer, testing is also about bedding: a pipe that passes a water test can still sag later if the bedding is poor. That is why inspectors look at the bedding and the backfill, not only at the test.
Preparing for the inspector
Luis's rule, from PLB-110, was never to let the inspector be the first person to find a problem. For a drainage rough-in, that means:
- The work is complete for the stage, with every branch, vent and stub in place and supported.
- The test is on, filled to the required head or pressure, and has already held for the required time before the inspector arrives.
- Pipe markings are visible, and cleanouts, test tees and firestop devices are in place.
- The permit card, the approved drawings and any approved changes are on site.
- The crew has walked the system themselves, checking grade, fittings, trap arm lengths, vent connections and sizes against the drawings.
If the inspector finds a problem, fix it promptly and arrange a reinspection. Arguing rarely helps; asking for the code reference and understanding the concern always does. Many apprentices learn more from one failed inspection than from a week of reading.
Records and turnover
Every test and inspection produces a record: the test type, section, date, duration and result, signed by the person who did it, along with the inspector's report. These records go into the project's files and, at the end, into the turnover package for the owner, with the as-built drawings showing any changes from the design, the cleanout schedule, the interceptor and pump manuals, and the backwater valve location. On Kingsway, Maya filled in the test record for each floor herself, and Luis signed it.
Course review: the seventh-floor test
Maya's seventh-floor test brought together everything in the course. Before filling, she walked the floor with Luis and checked each part of the system against what she had learned:
- Gravity and slope (lessons 1 and 6): every suite branch fell toward its stack at the design slope, with no bellies, checked with a digital level.
- Materials and fittings (lesson 2): PVC suite branches joined to the cast iron stacks through listed transition couplings, with sanitary tees where branches entered the stacks and double fixture fittings for the back-to-back water closets.
- Loads and sizes (lessons 3, 4 and 9): each branch and vent matched the sizes on the drawings, which she had checked against the tallies.
- Traps and trap arms (lessons 7 and 8): each trap arm stub was at the right height, within the length limit, with the vent connection above the weir.
- Vents (lessons 8 and 9): individual and wet vents rose above the flood level rims before running horizontally, the island sinks had accessible air admittance valves, and every vent connected to the vent stack.
- Cleanouts and firestopping (lessons 2 and 6): cleanouts were accessible, and every floor penetration had its listed firestop device.
Then she plugged the test tee on each stack below the seventh floor, capped the stubs, filled the system from the vent stack until the water stood 3 m above the highest joint, and started the clock. Fifteen minutes later the level had not moved. The inspector arrived, looked at the water level, walked the floor, checked two trap arm heights with a tape and signed the card. Maya drained the test slowly from the top, standing to the side of each plug as she released it, and recorded the result.
Luis's comment was short: the system works because every part of it was done right, and the test proves it while it can still be fixed. That is the job.
Common mistakes
MistakeCovering drainage work before it has been tested and inspected.
InsteadKeep each stage exposed until the test passes and the inspector signs off.
MistakeAir testing plastic pipe without checking the manufacturer's instructions.
InsteadUse water, or air only where the pipe manufacturer allows it and with all precautions.
MistakeStanding in front of a test plug while releasing pressure.
InsteadStand to the side, release slowly from the top and drain through a controlled point.
MistakeWater testing in an unheated building in freezing weather.
InsteadHeat the space, use an approved alternative test, or drain the system promptly.
MistakeLeaving test plugs in the system after the test.
InsteadRemove every plug and reinstall cleanout plugs and caps, then check that every fixture drains.
Summary and key terms
- Drainage and vent piping is tested before concealment, in stages: underground, rough-in and final.
- The water test applies at least 3 m of head to every joint for 15 minutes without loss.
- Air tests suit cold conditions but store energy; many plastic pipe makers do not allow them.
- Test plugs carry large forces; use rated plugs, restrain them, stand aside and release slowly.
- Final tests use low pressure smoke, air or peppermint so trap seals are not blown out.
- Prepare for inspection with the test already holding, records ready and the work checked against the drawings.
- Water test
- A test in which a section of drainage piping is filled with water to a required head and watched for loss.
- Air test
- A test in which a section of piping is pressurized with air and the pressure is watched on a gauge.
- Test plug
- A device that seals an opening in a pipe during a test.
- Head
- The height of a column of water above a point, which sets the pressure at that point.
- Smoke test
- A final test in which smoke is introduced into the completed system to reveal leaks.
- As-built drawings
- Drawings updated to show what was actually installed, including changes from the design.
Practice problems
Work each problem on paper first, then reveal the answer to check.
Why are drainage systems tested before walls are closed?
Show answer
So leaks can be found and fixed cheaply while the pipe is exposed.
What head does the water test require in Ontario, and for how long?
Show answer
At least 3 m on every joint, for at least 15 minutes.
Why is air testing of plastic pipe restricted by many manufacturers?
Show answer
Compressed air stores energy, so a failure can burst violently.
What is the force on a 150 mm plug with 3 m of water above it?
Show answer
About 29,400 Pa times 0.0177 m², roughly 520 N.
Why does the final test use low pressure?
Show answer
The traps are installed and full, and high pressure would blow out their seals.
Name three things that should be ready before the inspector arrives.
Show answer
The test already holding, the approved drawings and permit card on site, and the work checked and complete for the stage.
Lesson quiz · 5 questions
Score 60% or more to complete this lesson.
Create a free account to save your progress, take quizzes and earn a certificate.