
PHOT-102 · Lesson 8 of 12 · 26 min
Off-camera flash and light modifiers
Taking the flash off the camera is the biggest single step in lighting. Once the light can be placed anywhere, at any height, distance and angle, and fitted with modifiers that control its size and spread, a photographer can create the light of a large window, a spotlight, a sunset or a studio portrait in any location. This lesson covers how off-camera flashes are triggered, the main light modifiers and their effects, how to place a single light, how multiple lights are organized and named, balancing flash against bright daylight, and a practical workflow for building a lit photograph step by step.
Triggering off-camera flash
An off-camera flash must fire at the instant the shutter is fully open. Several methods exist:
- Sync cords: a cable from the camera's PC socket or hot shoe to the flash. Simple and reliable but restrictive and easily tripped over.
- Optical slaves: a light sensor on the remote flash fires it when it sees another flash. Inexpensive, but they can be fooled by TTL preflashes and other photographers' flashes, and need line of sight.
- Optical wireless control: the camera or master flash sends coded pulses of light to control remote flashes, including TTL and power settings. Built into many systems, but limited by line of sight and range, and unreliable outdoors in bright sun.
- Radio triggers: a transmitter on the camera's hot shoe sends radio signals to receivers built into or attached to the flashes. Radio works through walls and around corners, at ranges of 100 m or more, and modern systems allow TTL, manual power adjustment of each group from the camera, high-speed sync, and several groups on separate channels. Radio is now the standard for off-camera work.
Lights are organized into groups (often A, B, C), each of which can be set to its own power or TTL compensation from the transmitter. All lights acting as the key might be group A, the fill group B, and background lights group C.
Light modifiers
Modifiers change the size, shape, spread and quality of a light. The choice depends on how soft the light should be, how widely it should spread, and how much control over spill is needed:
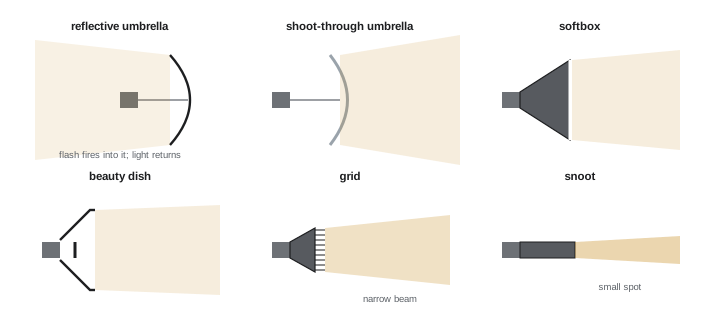
- Umbrellas: the simplest soft modifiers. A reflective umbrella bounces light from its inner surface (white for soft, silver for brighter and crisper); a shoot-through umbrella of translucent fabric lets the light pass through, so it can be placed very close to the subject for maximum softness. Umbrellas spill light widely around a room, which fills shadows but is hard to control. Deep parabolic umbrellas give a more directional, focusable light.
- Softboxes: enclosed boxes with a diffusion front panel, often with an inner baffle, producing even, soft light with defined edges and less spill than umbrellas. Rectangular softboxes mimic windows; octaboxes give round catchlights; long, narrow stripboxes are used as rim and accent lights and for products.
- Beauty dishes: shallow, wide reflectors with a central deflector that blocks direct light, giving a crisp but smooth light with a distinctive falloff from centre to edge, popular for fashion and beauty portraits.
- Standard reflectors: metal bowls that give hard, directional light with a defined spread angle; zoom heads on speedlights do the same.
- Grids (honeycombs): placed over a reflector or softbox, a grid restricts the spread of light to a narrow angle, commonly 10° to 40°, without hardening it, preventing spill onto backgrounds and the lens.
- Snoots: tubes that confine the light to a small circle, used for spotlights on hair, backgrounds and products.
- Barn doors and flags: adjustable flaps that cut the light off from parts of the scene.
- Gels: coloured filters for correction (Lesson 7) or creative colour on backgrounds and accents.
Larger and closer modifiers give softer light (Lesson 2), but each modifier also loses light: a bare reflector delivers the most, an umbrella or softbox one to two stops less, and heavily diffused or gridded modifiers more. For a given size, a softbox with double diffusion gives the most even light, an umbrella the widest spread.
| Modifier | Quality | Spread and control | Typical uses |
|---|---|---|---|
| Bare flash or reflector | Hard | Wide or set by zoom; high spill | Rim, background, sunlight effects |
| Reflective umbrella | Soft | Very wide; much spill | Groups, fill, quick setups |
| Shoot-through umbrella | Very soft close up | Very wide; much spill | Portraits in small spaces |
| Softbox | Soft, even | Defined edges; moderate spill | Portraits, products |
| Stripbox | Soft, narrow | Long and thin | Rim light, glassware, full-length |
| Beauty dish | Crisp but smooth | Moderate | Fashion, beauty |
| Grid | Unchanged | Narrow beam, little spill | Hair, background, accents |
| Snoot | Hard | Small spot | Spotlights, products |
Placing one light
A single off-camera light, used thoughtfully, can produce professional results. The key decisions are:
- Height: a light above the subject's eye level, angled down at about 30° to 45°, mimics the sun and places catchlights in the upper part of the eyes; lower lights look unnatural, higher ones shadow the eyes.
- Angle around the subject: from near the camera (flat, frontal) through 45° (modelling with soft shadows) to 90° (split light) and behind (rim). See the portrait patterns in Lesson 10.
- Distance: closer for softer light and darker backgrounds; further for harder light and more even coverage (Lesson 2).
- Modifier: size and type set the quality and spill.
Ambient light, walls and reflectors provide fill for a one-light setup. Indoors, a single light in a large softbox at 45°, with a white reflector opposite, is a complete portrait setup used by many professionals.
Multiple lights and their roles
When more lights are used, each has a defined role:
- Key light: the main light that establishes direction, modelling and exposure.
- Fill light: a softer, weaker light (or reflector), usually near the camera, that lightens shadows and controls contrast. Fill should not create its own visible shadows.
- Rim (edge, kicker) light: from behind and to the side, outlining the subject and separating it from the background.
- Hair light: from above and behind, adding shine and separation to hair.
- Background light: lights the background independently, controlling its brightness, colour and gradient.
- Accent lights: small lights for specific details.
The guiding principle is that each light should have a clear purpose, and the picture should look as if it were lit by one dominant source. Adding lights without purpose produces multiple shadows, conflicting catchlights and a flat, artificial look. Professional practice is to add one light at a time, checking its effect alone before adding the next.
Power ratios and metering multiple lights
The relative power of the lights determines contrast and separation. Photographers express this in stops: for example, a fill one and a half stops below the key, a rim light half a stop above the key (rim lights often need to be bright because they graze the edges), and a background one stop below the key. A handheld flash meter is the precise way to set these: measure each light separately at the subject (or background) with the others off, adjust power to the target, then meter all together. Without a meter, test shots and the histogram work, adjusting one group at a time from the radio trigger.
Worked problem
Setting up a three-light portrait
A photographer wants a portrait at f/8, ISO 100, with a key light in a softbox at 45°, fill from a large umbrella near the camera one and a half stops below the key, and a gridded rim light behind the subject half a stop above the key. How should the lights be metered and set?
Show solution
- Turn on only the key. Adjust its power until the incident meter at the subject's face, pointed toward the key, reads f/8.
- Turn off the key and turn on the fill. Adjust until the meter, pointed toward the camera, reads between f/4.5 and f/5 (one and a half stops below f/8).
- Turn off the fill and turn on the rim. Meter at the subject's edge, pointed toward the rim light, and adjust to f/9.5 (half a stop above f/8).
- Turn all lights on, take a test shot and check highlights on skin and the rim, adjusting in third stops.
Answer: Metering each light alone and then together gives predictable, repeatable results. Record the settings and distances, so the setup can be recreated for later sessions.
Flash against the sun
Off-camera flash outdoors can match or overpower the sun to create dramatic, controlled light: a subject lit by flash as the key light, with the sky darkened behind. Because the sun is so bright, this needs power. At ISO 100 and sync speed (1/200 s), full sun requires about f/11 to f/16. To light a subject at f/16 through a softbox, a typical speedlight is not enough: a speedlight at full power in a 60 cm softbox at 1.5 m may give around f/8 at ISO 100, two stops short. Solutions include several speedlights ganged together, a more powerful battery strobe (several hundred watt-seconds), moving the light closer, using a smaller or more efficient modifier, using high-speed sync with a wide aperture (though HSS loses power too), or a neutral density filter to reduce the ambient exposure while keeping sync speed. Darkening the sky by one or two stops below the meter reading, while lighting the subject correctly with flash, gives the popular dramatic look of commercial outdoor portraits.
Shooting in the golden hour or in shade makes the balance much easier, because ambient light is several stops dimmer, and modest flash power then dominates.
A workflow for lit photographs
Professionals build lighting in a consistent order:
- Decide what the picture should look like: the mood, the direction of light, how bright the background should be.
- Set the ambient exposure first, with all flashes off: choose ISO, aperture and shutter speed so the background and existing light look as intended, often a stop or two darker than the meter suggests.
- Add the key light: place it, choose the modifier, and adjust power until the subject is correctly exposed at the chosen aperture.
- Assess shadows and add fill only if needed (reflector or light).
- Add separation (rim, hair or background light) only if needed.
- Refine: adjust each light's position and power in small steps, check catchlights, edges, spill on the background and flare.
Photographers often photograph each step, which is an excellent way to learn and to diagnose problems later. A lighting diagram, a top-down sketch of subject, camera, lights, modifiers, distances and power settings, documents the setup for repetition and for portfolios (Lesson 12).
Common one-light location recipes
A few one-light setups cover a large share of location portrait work and are worth practising until they are automatic:
- Window replacement: a large softbox or umbrella close to the subject at 45°, feathered so the face is lit by the edge of the beam, mimicking window light in a room with poor natural light.
- Sunset key: shoot toward the low sun so it rims the subject, set the ambient exposure one stop under for a rich sky, and light the face with a softbox from the side away from the sun, gelled with a quarter or half CTO so the flash matches the warm light.
- Hard sunlight look: a bare or reflector-fitted flash placed high and to the side, at some distance, recreates crisp sunlight with defined shadows on an overcast day or indoors.
- Night street portrait: ambient set for the city lights at a slow shutter speed, with a small softbox close to the subject at low power, so the flash lights the face without spilling onto the background.
Each recipe is a starting point: adjust height, distance and power to the face and the place, and check the catchlights and shadows in every test frame.
Common mistakes
MistakeRelying on optical triggering in bright sun or around corners.
InsteadUse radio triggers.
MistakeAdding several lights at once.
InsteadBuild one light at a time, checking each alone.
MistakePlacing the key light at or below eye level.
InsteadRaise it above the eyes, angled down 30° to 45°.
MistakeLetting background and rim lights flare into the lens.
InsteadUse grids and flags and check for flare.
MistakeExpecting one speedlight in a softbox to overpower midday sun.
InsteadAdd power, move closer, use ND or HSS, or shoot in shade or golden hour.
Summary and key terms
- Off-camera flash is triggered by cords, optical signals or, most reliably, radio.
- Groups allow power and TTL to be set for each set of lights from the camera.
- Umbrellas, softboxes, beauty dishes, reflectors, grids and snoots shape quality and spread.
- A single light placed above eye level at 45°, with fill, is a complete portrait setup.
- Key, fill, rim, hair, background and accent lights each have a defined role.
- Ratios are set in stops and measured light by light with a flash meter.
- Overpowering the sun requires substantial power; build lighting from ambient to key to accents.
- Radio trigger
- A wireless transmitter and receiver system for firing flashes.
- Optical slave
- A sensor that fires a flash when it sees another flash.
- Group
- A set of flashes controlled together from the trigger.
- Umbrella
- A reflective or translucent modifier that spreads soft light widely.
- Softbox
- An enclosed modifier with a diffusion panel giving soft, even light.
- Beauty dish
- A shallow reflector with central deflector giving crisp, smooth light.
- Grid
- A honeycomb that narrows a light's spread.
- Snoot
- A tube that confines light to a small spot.
- Rim light
- A light from behind that outlines the subject's edges.
- Lighting diagram
- A top-down sketch of a lighting setup.
Practice problems
Work each problem on paper first, then reveal the answer to check.
Why are radio triggers preferred over optical triggers?
Show answer
They work without line of sight, at long range and in bright sun.
What is the difference between reflective and shoot-through umbrellas?
Show answer
Light bounces off the inside of a reflective umbrella; it passes through a shoot-through.
What does a grid do to a light?
Show answer
Narrows its spread without hardening it.
Which modifier gives round catchlights?
Show answer
An octabox or beauty dish (or round umbrella).
At what angle should a key light usually point down at the face?
Show answer
About 30° to 45°.
What is the role of fill light?
Show answer
To lighten shadows and control contrast without creating new shadows.
The key meters f/11. What should a fill one stop under read?
Show answer
f/8.
Why meter each light separately?
Show answer
To set each light's contribution precisely before combining.
Name three ways to overpower bright sun with flash.
Show answer
More power, move the light closer, ND filter, HSS, smaller modifier.
What should be set first in a lighting workflow?
Show answer
The ambient exposure.
Lesson quiz · 5 questions
Score 60% or more to complete this lesson.
Create a free account to save your progress, take quizzes and earn a certificate.