
ELV-310 · Lesson 12 of 12 · 23 min
Capstone: diagnosing a controller fault
In the last week of the term, Quayside car 3 began shutting down. It never happened when a mechanic was in the building. The building manager reported that the car stopped at an upper floor with its doors closed, then opened its doors after a few seconds and went out of service, and that it happened in the afternoons. Remote monitoring had logged it seven times in six days, always as a door zone discrepancy fault, and the car had returned to service by itself after the controller's automatic reset on most occasions and stayed out twice. Lena assigned the callback to Priya and told her to let Tamsin lead it, with Priya checking each step. This capstone follows the job from the first call to the written report, using the method from Lesson 11 and the knowledge from every lesson before it.
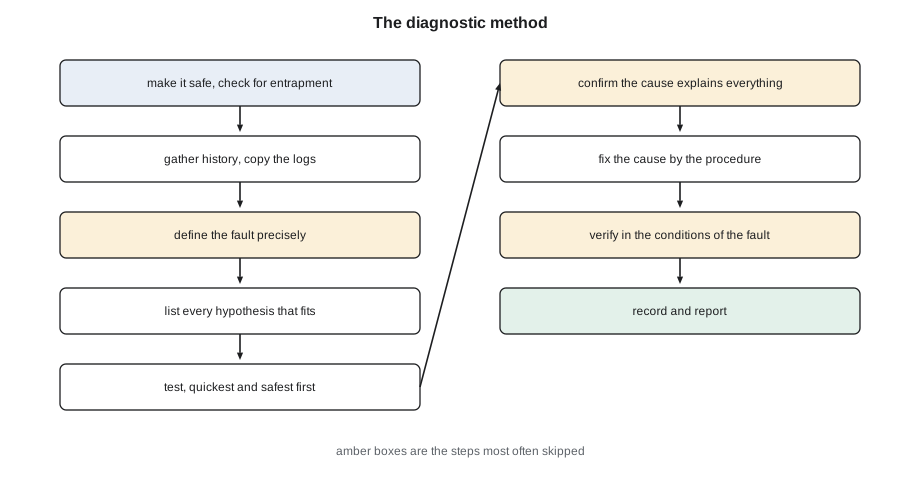
Step 1: make it safe and gather the history
When they arrived at 13:30, car 3 was in service. Tamsin's first question was whether anyone had been trapped during any of the shutdowns; the monitoring history and the building's log showed no entrapment, because each time the car had been at or near a floor and had opened its doors. She then copied the controller's fault and event logs to the laptop and downloaded the monitoring history for the past month. Priya asked her what else she needed to know before touching the car. Tamsin listed it: what work had been done on car 3 or in its hoistway recently, whether the other three cars had the same fault, and what the weather had been.
The answers came quickly. The other cars had no door zone faults. Three weeks earlier, a Northcrest mechanic had replaced car 3's landing system tape, which had been damaged by a falling piece of construction debris during a roof repair; the job card showed the new tape hung, tensioned and learned, and a test of the door zones at every floor. And the past week had been unusually warm and sunny for autumn, with afternoons over 20 °C (68 °F).
| Date | Time | Fault | Floor | Direction | Channel lagging |
|---|---|---|---|---|---|
| Oct 2 | 14:12 | DZ discrepancy | 22 | up | B |
| Oct 2 | 15:40 | DZ discrepancy | 22 | down | B |
| Oct 3 | 14:55 | DZ discrepancy | 21 | up | B |
| Oct 4 | 15:22 | DZ discrepancy | 22 | up | B |
| Oct 5 | 13:48 | DZ discrepancy | 22 | down | B |
| Oct 6 | 15:10 | DZ discrepancy | 23 | up | B |
| Oct 7 | 14:35 | DZ discrepancy | 22 | up | B |
Step 2: define the fault
Tamsin wrote the definition at the top of her worksheet, the way Priya had taught her. The safety board on car 3 stops the car with a door zone discrepancy when its two channels disagree about the door zone for longer than the allowed time. The faults occur only at floors 21 to 23, only between about 13:30 and 16:00, in both directions, and always with channel B lagging channel A. They began within days of the new tape being installed. They do not occur on the other cars, which share the same hoistway.
From that definition, she listed what the fault was not likely to be. It was not a board fault, because a failing board would not care about the floor or the time of day. It was not a single damaged marker, because it occurred at three floors. It was not the controller's software, because the other cars run the same version without the fault. It was something in car 3's landing system, near the top of the hoistway, that changed in the afternoon, and that had probably begun with the tape replacement.
Step 3: form hypotheses
Priya asked for every cause that would fit, before they tested any of them. Tamsin listed four.
- The sensor head on car 3 is out of alignment with the tape, so channel B is near the edge of its range and loses the mark late when anything moves.
- The tape is not properly tensioned, so it moves sideways in the sensor head's guide, more where it is longest from its fixed points and most free to move.
- Heat at the top of the hoistway in the afternoon affects the sensor, the tape or both.
- The tape is rubbing on something, such as a bracket or cable, at floors 21 to 23, so it is pushed sideways there.
The four hypotheses could combine: heat could change the tape's tension, and a slack tape could move in a guide that was not perfectly aligned. Priya said that was the usual way with intermittent faults: one condition is necessary and another makes it appear.
Step 4: test, starting with what is quick and safe
Tamsin put car 3 on inspection operation from the car top, with Priya in the car top station's second position, and ran the car slowly from floor 18 to the top and back while watching the safety board's channel readings on the handheld tool. At 14:05, the hoistway thermometer they had hung at the top landing read 31 °C (88 °F), and the one at the lobby 21 °C (70 °F). The two channels changed state within a few milliseconds of each other at every floor until floor 21, where channel B lagged by about 25 ms, and at floor 22 by about 45 ms, beyond the allowed time; at floor 23 about 30 ms. Above and below, the lags were small. Standing on the car top at floor 22, Tamsin could see the tape moving sideways in the sensor head's guide as the car moved, by perhaps 3 or 4 mm (1/8 in).
She checked the tape for rubbing at those floors and found nothing: no bracket, cable or debris near it. She checked the sensor head's mounting on the car and found it tight and square to the tape. That left tension and heat. At the top of the hoistway, the tape is clamped to a hanger; at the bottom, in the pit, it is held by a tension spring and clamp that set the tape's tension. Tamsin measured the spring's length against the maker's installation instruction. It was 38 mm (1-1/2 in) longer than the length the instruction gave for this rise, which meant the tape had much less tension than intended. The clamp at the tape end showed a bright line where it had slipped along the tape.
# Thermal expansion of the steel landing tape between morning and afternoon
alpha = 12e-6          # thermal expansion of steel per degree
length = 90             # tape length, full rise plus hanging allowance
morning, afternoon = 18, 27      # average hoistway temperature along the tape
dT = afternoon - morning
growth = alpha * length * dT
print(f"temperature rise along the tape: {dT:.0f} degrees C")
print(f"tape grows by {growth * 1000:.1f} mm in the afternoon")
spring_rate = 2.5        # tension spring rate
lost = spring_rate * growth * 1000
print(f"tension lost if the spring takes up the growth: about {lost:.0f} N (spring rate 2.5 N per mm)")temperature rise along the tape: 9 degrees C tape grows by 9.7 mm in the afternoon tension lost if the spring takes up the growth: about 24 N (spring rate 2.5 N per mm)
The steel tape grows by about 10 mm (0.4 in) between morning and afternoon. A correctly tensioned tape takes this up in its spring with only a small loss of tension, and stays straight. Car 3's tape, already slack because its clamp had slipped, lost most of what tension it had left in the afternoon heat, and the upper part of the tape, between the hanger and the car near the top, was free to move sideways in the air pushed ahead of the car. The sensor head's channel B, on the side the tape moved away from, saw the floor marks late.
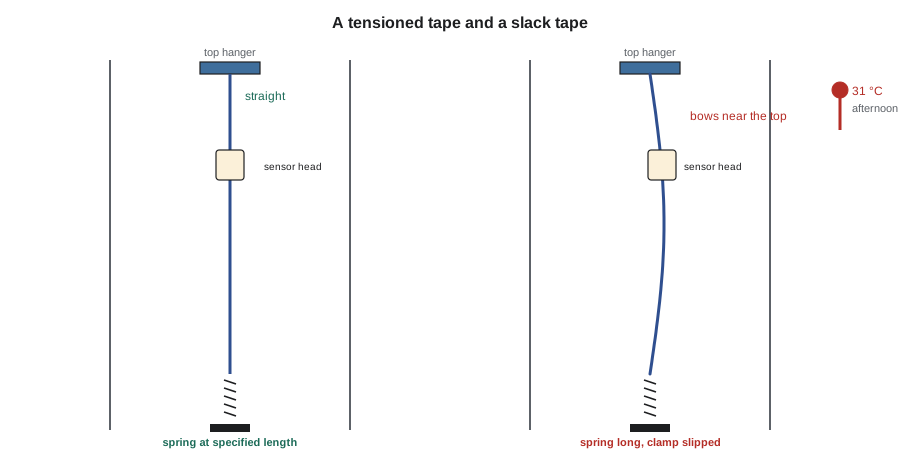
Step 5: confirm the cause
Priya asked how they could prove the cause before fixing it. Tamsin suggested two checks. First, they could compare the tape's tension with car 2's, which hangs in the same hoistway at the same temperature; she pressed each tape sideways by hand with a small spring scale at the same height, and car 3's moved more than three times as far as car 2's under the same push. Second, they could look at the job card for the tape replacement: it recorded the tape tensioned to the maker's instruction, but the clamp bolts' torque was not recorded, and the instruction gave a torque for them. A clamp tightened below that torque would slip as the new tape bedded in over its first weeks of running.
The evidence fitted all of the fault's features. The fault began after the tape was replaced, as the clamp slipped. It affected only car 3. It occurred near the top, where the slack tape could move most and where the hoistway was hottest. And it occurred in the afternoon, when the tape had grown and lost the last of its tension. Channel B lagged because of the side the tape moved toward. None of the other hypotheses explained all of that.
Step 6: fix the cause
The fix was to re-tension the tape and secure the clamp by the maker's procedure. Before starting, Tamsin and Priya put car 3 out of service, locked out its main disconnect and confirmed zero energy, and put the pit access procedure in place with the car parked above the pit and the pit stop switch open. In the pit, Tamsin released the clamp, pulled the tape to set the spring to its specified length, cleaned the tape and clamp faces where the clamp had slipped, and tightened the clamp bolts to the specified torque with a torque wrench, marking them. She checked the tape for kinks where it had been slack and found none.
The tape had moved at the clamp, and the floor markers on it had moved with the whole tape by a few millimetres from where the controller learned them. That was not a problem for the door zones, which are read from the tape itself, but it would affect stopping accuracy slightly at every floor. So after re-tensioning, the maker's procedure called for a learn run and a verification of door zones in both channels at every floor, followed by the safety board's door zone tests. Tamsin ran them all.
# After the fix: channel lag at each upper floor in the verification run, and stop errors
allowed_ms = 40
lag_ms = {18: 3, 19: 4, 20: 3, 21: 5, 22: 4, 23: 4, 24: 3, 25: 3}
stops = {18: 1.5, 19: -1.0, 20: 2.0, 21: 1.0, 22: -1.5, 23: 0.5, 24: 1.0, 25: -0.5}
limit = 6
for f in lag_ms:
    ok = lag_ms[f] < allowed_ms and abs(stops[f]) <= limit
    print(f"floor {f}: channel lag {lag_ms[f]:2d} ms, stop error {stops[f]:+5.1f} mm -> {'pass' if ok else 'FAIL'}")
print("worst lag", max(lag_ms.values()), "ms; worst stop", max(abs(v) for v in stops.values()), "mm")floor 18: channel lag 3 ms, stop error +1.5 mm -> pass floor 19: channel lag 4 ms, stop error -1.0 mm -> pass floor 20: channel lag 3 ms, stop error +2.0 mm -> pass floor 21: channel lag 5 ms, stop error +1.0 mm -> pass floor 22: channel lag 4 ms, stop error -1.5 mm -> pass floor 23: channel lag 4 ms, stop error +0.5 mm -> pass floor 24: channel lag 3 ms, stop error +1.0 mm -> pass floor 25: channel lag 3 ms, stop error -0.5 mm -> pass worst lag 5 ms; worst stop 2.0 mm
Every floor now showed a channel lag of a few milliseconds, and every stop was within Northcrest's own target, which is tighter than the accessibility limit. Tamsin ran car 3 in service from 15:00 to 16:30, the hottest part of the day, with the logger connected to the two door zone inputs, and recorded no discrepancy. She left the logger on for two more days. Remote monitoring showed no faults for the following two weeks of warm weather.
Step 7: record and report
Tamsin's report to Lena had five parts, as Northcrest's procedure requires. The fault: door zone discrepancy shutdowns on car 3 at floors 21 to 23 in the afternoon, seven in six days, no entrapments. The cause: the landing tape's lower tension clamp had slipped after the tape replacement three weeks earlier, leaving the tape slack; afternoon heat in the upper hoistway let the tape grow and move sideways in the sensor head near the top. The repair: tape re-tensioned to the maker's specification, clamp cleaned and torqued with marks, learn run, door zone verification in both channels at every floor, safety board door zone tests, all recorded. The verification: in-service run through the hottest period and two days of logging with no faults. The recommendations: add clamp torque to the job card for tape installations and recheck tape tension one month after any tape installation; check the other cars' tapes at their next visits.
Priya added a line to the report herself: that the job had been led by Tamsin, and that she had found the cause by defining the fault before testing it. Lena added the clamp torque item to the tape installation procedure for the whole branch the next morning.
What the course has covered
Looking back over the term, Tamsin noticed that the capstone had used nearly every lesson. Lesson 1's list of controller jobs had placed the fault in position tracking and the safety circuit. Lesson 6's account of the two-channel safety board explained the discrepancy fault and why the tolerance must not be changed. Lesson 7's landing systems explained the tape, the sensor head and why the learn run was needed after the fix. Lesson 8's stopping accuracy gave the verification limits, Lesson 11's method and fault log analysis organized the whole job, and Lessons 2 and 3's habit of finding the step at which a sequence stops had become a habit of finding the exact condition under which a fault appears. On a relay car the same fault would have looked like a car that stopped short of the floor in hot weather, and the same method would have found the same slack tape or loose vane.
Worked problem
Why the other hypotheses failed
For each of Tamsin's four hypotheses, state the observation that rules it in or out.
Show solution
- Sensor head misaligned: ruled out as the main cause, because the head was tight and square, and a misalignment would show at every floor, not only near the top.
- Tape slack: ruled in, because the tension spring was long, the clamp had slipped, and the tape moved more than three times as far as car 2's under the same push.
- Heat: ruled in as the trigger, because the faults occurred only in the afternoon, the upper hoistway was about 10 °C (18 °F) warmer than the lower, and the tape's growth matched the loss of tension.
- Rubbing: ruled out, because nothing was found near the tape at floors 21 to 23.
Answer: The cause was a slack tape from a slipped clamp, with afternoon heat as the trigger; both were needed for the fault to appear.
Common mistakes
MistakeStarting to test before defining the fault.
InsteadWrite down exactly where, when, how often and on which channel the fault occurs; it rules out many causes at once.
MistakeStopping at the first cause found.
InsteadCheck that the cause explains every feature of the fault, and look for a trigger as well as a condition.
MistakeRelearning the floor table to cure a discrepancy fault.
InsteadFind and fix the physical cause; relearn only after the fix, as the procedure requires.
MistakeSkipping torque on clamps because the job card does not ask for it.
InsteadFollow the maker's instruction for every fastener on safety-related parts, and record it.
MistakeClosing the job after the repair without verification in the conditions that caused the fault.
InsteadRun and log the car in the conditions in which the fault appeared, such as the hottest part of the day.
Summary and key terms
- Make the car safe, gather the history and copy the logs before touching anything.
- Define the fault precisely by place, time, frequency, direction and channel; the definition rules out many causes.
- List every hypothesis that fits, then test from the quickest and safest.
- Confirm the cause explains every feature of the fault, including the trigger.
- Fix the cause by the maker's procedure, then do the learn, verification and safety tests it requires.
- Verify in the conditions that caused the fault, record the job fully and recommend changes that prevent a repeat.
- Callback
- A service call to a car that has shut down or misbehaved between scheduled maintenance visits.
- Hypothesis
- A possible cause that fits the observed fault and can be tested.
- Trigger
- The condition, such as heat or load, that makes an underlying problem appear as a fault.
- Tension spring
- The spring at the bottom of a landing tape that keeps it under the specified tension.
- Verification run
- A run after a repair that checks every affected function, such as door zones in both channels.
- Root cause
- The underlying cause which, when fixed, stops the fault from recurring.
- Job card
- The record of the procedure and measurements for a maintenance or repair task.
Practice problems
Work each problem on paper first, then reveal the answer to check.
Why did the fault appear only on car 3 although all four cars share the hoistway?
Show answer
Only car 3's tape was slack, because its clamp had slipped after the replacement.
Why did the fault appear only in the afternoon?
Show answer
The upper hoistway heated up, the tape grew and lost its remaining tension, and moved sideways in the sensor head.
Why was a learn run needed after re-tensioning the tape?
Show answer
The tape and its markers had moved slightly from the learned positions, affecting stopping accuracy at every floor.
A steel tape 90 m (295 ft) long warms by 9 °C (17 °F). About how much does it grow?
Show answer
About 10 mm (0.4 in).
What change did Lena make to prevent a repeat?
Show answer
She added clamp torque to the tape installation procedure and a tension recheck one month after installation.
Lesson quiz · 5 questions
Score 60% or more to complete this lesson.
Create a free account to save your progress, take quizzes and earn a certificate.