
CINE-210 · Lesson 10 of 12 · 25 min
Filtration and lens accessories
Filters placed in front of the lens, or behind it, alter the light before it reaches the sensor. Some filters solve technical problems, reducing light, controlling reflections or protecting the lens; others shape the look, softening skin, adding halation around highlights, lowering contrast or warming the image. Despite the power of digital grading, many effects of filters cannot be reproduced convincingly in post-production, because they act on the light itself, including highlights that the sensor would otherwise clip. This lesson covers the matte box and filter formats, neutral density filters and infrared contamination, polarizers, graduated filters, diffusion and mist filters, contrast and colour filters, special effect filters and diopters, and testing and choosing filtration.
Matte boxes and filter formats
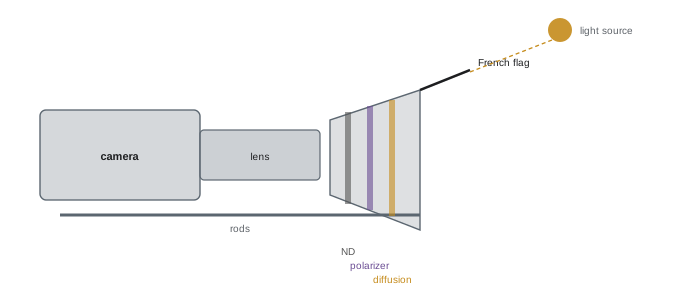
A matte box is a hood mounted in front of the lens that shades it from stray light, reducing flare, and holds filters in slide-in trays. Matte boxes have flags, adjustable panels called French flags and side wings, that can be positioned to block light sources just outside the frame. Cinema filters are usually rectangular or square glass plates in standard sizes, such as 4 × 5.65 inches (the most common size for Super 35 and many large-format lenses), 6.6 × 6.6 inches for very wide lenses and large formats, and 4 × 4 inches; some productions use screw-in round filters on smaller lenses. Filter trays can rotate for polarizers and graduated filters, and slide vertically for positioning grads. Clip-on matte boxes attach directly to the lens front, convenient for handheld and gimbal work; rod-mounted matte boxes are more stable and accept heavier filters and accessories.
Neutral density filters
Neutral density (ND) filters reduce the amount of light evenly across the spectrum without changing colour, allowing wide apertures in bright light and keeping the shutter angle fixed. They are rated by optical density, with each 0.3 reducing light by one stop: ND 0.3, 0.6, 0.9, 1.2, 1.5, 1.8 and 2.1 correspond to 1 to 7 stops. Many cinema cameras now include internal ND filters, which are convenient and avoid adding glass in front of the lens, while external ND remains necessary for cameras without internal filters or when more density is needed. Variable ND filters, made from two polarizers, allow continuous adjustment but can create cross-shaped artefacts and colour shifts at high densities, and are generally avoided on high-end productions.
Infrared contamination
Digital sensors are sensitive to near-infrared light, which is blocked by an IR-cut filter in front of the sensor, but not completely. Strong ND filters reduce visible light much more than infrared, so the proportion of infrared reaching the sensor increases, causing infrared contamination: black fabrics, particularly synthetics, turn reddish or brown, foliage may shift colour, and blacks lose depth. IRND filters, which combine neutral density with additional infrared blocking, solve the problem and are standard for external ND on digital cameras. Internal ND systems in cinema cameras are usually designed with infrared control. Testing ND filters on black fabrics and foliage is a standard camera prep task.
Worked problem
Choosing ND for a day exterior
A cinematographer wants to shoot at T2 on a sunny day at EI 800, 24 fps with a 180-degree shutter. The meter reads T16. The camera has no internal ND. What filtration is needed, and what should be checked?
Show solution
- Stops from T2 to T16: T2, 2.8, 4, 5.6, 8, 11, 16, which is 6 stops.
- Optical density: \(6 \times 0.3 = 1.8\), so an IRND 1.8, or IRND 1.2 plus IRND 0.6.
- Use IRND rather than plain ND to avoid infrared contamination at this density.
- Check black costumes and foliage on a calibrated monitor for colour shifts, and stack as few filters as possible to reduce reflections.
Answer: Six stops of IRND (density 1.8), with a check for infrared contamination on blacks and foliage.
Polarizers
A polarizing filter blocks light vibrating in one plane. Light reflected from non-metallic surfaces such as water, glass, wet roads and leaves is partly polarized, so rotating a polarizer can reduce or remove reflections, revealing what lies behind a window or beneath water, and reducing glare on foliage and skin. Skylight is also polarized, most strongly at 90 degrees from the sun, so a polarizer can darken blue skies. Polarizers reduce light by about 1.5 to 2 stops. With wide lenses, sky darkening varies across the frame, creating uneven bands, and as the camera moves, the effect changes, which can be distracting in pans. Circular polarizers, used with cameras whose autofocus or metering systems need them, and linear polarizers both work for cinema; linear polarizers are common in matte boxes. Polarizers are also used on car windscreens to see actors inside vehicles.
Graduated filters
Graduated filters (grads) are clear on one part and gradually tinted or darkened on the other, with a soft or hard transition. ND grads darken the sky relative to the foreground, reducing scene contrast so that both can be exposed well; coloured grads, such as tobacco, coral or blue, tint the sky for a stylized look. Grads are positioned in sliding matte box trays to align the transition with the horizon. Because the transition is fixed in the frame, grads work best for static or gently moving shots; tilting the camera moves the horizon relative to the grad. Many cinematographers now prefer to darken skies in grading using power windows, but grads remain valuable when the sky would otherwise clip, since grading cannot recover clipped highlights.
Diffusion and mist filters
Diffusion filters soften the image in various ways, and they are among the most important creative filters in cinematography. Different types include:
- Mist filters, such as Tiffen Black Pro-Mist and Glimmerglass, which spread light from highlights into surrounding areas, creating a soft glow, lowering contrast slightly and reducing the digital harshness of high-resolution sensors.
- Softening filters, such as Schneider Hollywood Black Magic and Classic Soft, which reduce fine detail, softening skin texture while keeping overall sharpness.
- Fog filters, which add a hazy atmosphere and greatly lower contrast.
- Net and stocking filters, traditional diffusion made by stretching fine nets or silk stockings over or behind the lens, giving a characteristic halo and softness used in classic Hollywood portraiture.
- Halation and glow filters, such as Tiffen Bronze Glimmerglass or CineBloom, which emulate the halation of film around bright highlights.
Diffusion strengths are graded, typically 1/8, 1/4, 1/2, 1 and 2, and the effect varies with focal length, aperture, distance and lighting: diffusion is more visible with bright highlights, backlight and practical lights in frame, and different focal lengths may need different strengths for a consistent look. Diffusion effects are difficult to reproduce in grading, because they spread light from highlights that the sensor might clip.
| Filter type | Effect | Typical use |
|---|---|---|
| IRND | Reduces light evenly, blocks infrared | Exposure control in bright light |
| Polarizer | Removes reflections, darkens skies | Water, windows, cars, foliage |
| ND grad | Darkens part of the frame | Skies over landscapes |
| Black Pro-Mist | Highlight glow, gentle contrast reduction | Softening digital harshness |
| Black Magic / Classic Soft | Softens fine detail | Skin, beauty, close-ups |
| Net or stocking | Halo and softness | Classic portrait looks |
| Low contrast | Lifts shadows, lowers contrast | Period or gentle looks |
Contrast and colour filters
Low-contrast and ultra-contrast filters lift shadows by spreading ambient light into them, producing a gentler, filmic tonal response, and were widely used with film stocks to reduce contrast. Colour correction filters, such as 85 (warming, for converting daylight to tungsten balance on film) and 80 (cooling), are less necessary with digital white balance, but some cinematographers still use coloured filters, such as coral, sepia or tobacco, for an in-camera tint that interacts differently with light than grading would. Digital cameras usually adjust white balance electronically, and adding colour filters reduces light and can push individual colour channels toward noise, so their use is creative rather than corrective.
Special effects filters and diopters
Special effects filters include star filters, which create rays from point lights; streak filters, which create horizontal flares resembling anamorphic lenses; and prism and multi-image filters for in-camera effects. Diopters are close-up lenses that screw onto or slip in front of the main lens, letting it focus closer for inserts and macro shots. They are rated in dioptres, the reciprocal of their focal length in metres: a +1 dioptre has a focal length of 1 m. With a +1 diopter and the lens focused at infinity, the plane of focus is at 1 m from the diopter; a +2 at 0.5 m. Split diopters cover half the frame, allowing one half to focus close and the other far, creating two planes of focus (Lesson 4). Diopters reduce image quality somewhat, especially at the edges, so achromatic designs with two elements are preferred.
Testing and choosing filtration
Filters interact with lenses, lighting, sensors and formats, so testing is essential. A filter test shows each candidate filter, and strengths, on the production lenses and camera, with faces, backlight, practical lights and dark tones, ideally in representative lighting. Filters should be clean, scratch-free and of high optical quality, since poor filters soften the image, add reflections and colour casts. Stacking many filters increases reflections and flare; using fewer, combined filters, such as an IRND with a built-in diffusion, reduces this. Filters should be mounted parallel to the sensor to avoid reflections between filter and lens, or tilted slightly when reflections cause ghosting. Record filters used for each shot in camera reports, as filtration cannot be removed later.
Filters behind the lens
Some lenses and cameras allow filters to be placed behind the lens, between the rear element and the sensor, using rear filter holders or gel slots. Rear filters can be much smaller and cheaper than front filters, and are useful with very wide lenses or lenses with bulbous front elements that cannot accept front filters. However, rear filters affect focus, since any glass in the light path changes the effective flange distance, so lenses designed for rear filters must always have a filter or clear glass in place. Rear nets and stockings, stretched across the rear of the lens, are a classic diffusion technique producing a distinctive soft halo.
Filtration and lens character together
Filters and lenses work together to create a look. A sharp modern lens with a light mist filter can approach the gentle rendering of a vintage lens while keeping modern reliability; a vintage lens with diffusion may become too soft. Strength choices vary with focal length: longer lenses magnify the diffusion effect relative to the subject, so cinematographers often use lighter diffusion on long lenses and stronger on wide lenses to keep the look consistent. Filter tests should therefore be done with the actual lens set at several focal lengths.
Caring for filters
Filters are expensive optical elements and need the same care as lenses. Keep them in padded cases, handle them by the edges, clean them with blowers, brushes and lens cleaning fluid, and inspect them regularly for scratches and delamination. Fingerprints and smudges on filters, especially diffusion filters, can produce unpredictable softness and flare. In wet, dusty or salty conditions, a clear optical flat can protect the lens front.
Filters in camera reports and continuity
Because filtration changes the image permanently, continuity of filtration across a scene is important. If one shot in a scene uses a 1/4 mist filter and the next none, highlights will glow differently and the cut may look wrong. The 2nd AC records filters for each shot, and the 1st AC checks them before each take.
Many cinematographers keep a personal filter kit, refined over years, because they know exactly how each filter behaves with their favourite lenses and cameras.
Documenting that kit in a simple list, with strengths and typical uses, also helps assistants prepare filters quickly on set.
Common mistakes
MistakeUsing strong plain ND on digital cameras.
InsteadUse IRND to avoid infrared contamination.
MistakeUsing polarizers on wide lenses without checking the sky.
InsteadWatch for uneven sky darkening.
MistakeRelying on grading for clipped skies.
InsteadUse grads when highlights would clip.
MistakeUsing the same diffusion strength on every lens.
InsteadTest and adjust strength by focal length.
MistakeStacking many filters.
InsteadUse few, high-quality filters and keep them clean.
Summary and key terms
- Matte boxes shade lenses and hold standard filter sizes.
- ND filters reduce light: 0.3 density per stop.
- IRND prevents infrared contamination with strong ND on digital sensors.
- Polarizers remove reflections and darken skies.
- Graduated filters balance skies and foregrounds.
- Diffusion, mist and net filters shape highlights and skin in ways grading cannot fully reproduce.
- Diopters enable close focus; test and record all filtration.
- Matte box
- Hood holding filters and shading the lens.
- French flag
- Adjustable flag on a matte box.
- Optical density
- Logarithmic measure of filter darkness.
- IRND
- Neutral density filter with infrared blocking.
- Infrared contamination
- Colour shifts from unblocked infrared light.
- Polarizer
- Filter blocking light polarized in one plane.
- Graduated filter
- Filter with a gradual transition across it.
- Mist filter
- Diffusion that spreads highlight glow.
- Diopter
- Close-up lens added in front of the main lens.
- Lens power
- Measured in dioptres, the reciprocal of focal length in metres.
Practice problems
Work each problem on paper first, then reveal the answer to check.
Most common cinema filter size?
Show answer
4 × 5.65 inches.
What does a French flag do?
Show answer
Blocks light falling on the lens from above.
Stops in ND 1.2?
Show answer
Four.
Transmission of ND 0.9?
Show answer
About 12.5 %.
What does infrared contamination do to black fabric?
Show answer
Turns it reddish or brown.
Where is sky polarization strongest?
Show answer
At 90 degrees from the sun.
Why use a grad instead of grading?
Show answer
Grading cannot recover clipped skies.
What does a Black Pro-Mist do?
Show answer
Adds highlight glow and lowers contrast slightly.
Focus distance of a +2 diopter with the lens at infinity?
Show answer
0.5 m.
Why record filters in camera reports?
Show answer
They cannot be removed later.
Lesson quiz · 5 questions
Score 60% or more to complete this lesson.
Create a free account to save your progress, take quizzes and earn a certificate.