
BLR-130 · Lesson 12 of 12 · 18 min
Capstone: laying out and fitting a vessel shell course
By February, the V-412 drum is on the shop floor. Course 1 is rolled, its long seam welded and examined, and it sits on turning rolls with a spider inside. Course 2's plate is on Joanne's layout table, and Lorne has given the course to Kiera: she will lay it out, follow it through cutting, bevelling and rolling, fit its long seam, and fit it to course 1, with Joanne checking each step and Dale on hand for the fit. Harjit will inspect the long seam fit and the circumferential seam fit at their hold points. This capstone follows the course from flat plate to a tacked seam ready for the welder, and each step draws on a lesson in this course.
Before the first mark
Kiera starts with the paperwork, as lesson 2 taught. She checks that the general arrangement, the shell detail and the shop drawing on her table are at the revision listed on the document register; she reads the notes for seam, weld and inspection requirements; and she checks the nozzle schedule against the shop drawing's seam layout. Course 2 carries the manway M1 and the level nozzle N3, and its long seam is to sit at 120 degrees. The manway at 210 degrees and N3 at 45 degrees are both well clear of the seam and of the circumferential seams above and below.
She then checks the plate. Its heat number matches the material test report and the bill of material, and Harjit witnesses its transfer to the layout. The plate's thickness, measured with calipers at six points, is within its specification. The rolling direction runs the length of the plate, which will run around the circumference, as the specification requires.
The numbers for course 2
From lesson 7, the plate's cut length is the mean circumference less the root opening plus the shrinkage allowance: π times 1,816 mm, less 3 mm, plus 2 mm, which is 5,704 mm. Its width, the course height, is 2,440 mm. Each diagonal of the rectangle should be 6,204 mm. From lesson 6, the bevel for the single-V long seam is 8.1 mm wide on the surface. From lesson 5, a 600 mm template, cut to the inside radius of 900 mm, should rise 51.5 mm above its chord when the plate is rolled right. Kiera puts all of it in her fit-up record script, along with the limits she will be checked against, before she starts.
Layout and cutting
Kiera snaps a base line along the plate, set in from the mill edge, and erects the first end line with a 3-4-5 triangle scaled to the plate. She sets the second end line at the cut length along the base line, burning a measurement off the tape and saying the subtraction aloud, and the top line at the course height, measured at both ends and the middle. The diagonals come out within the shop's tolerance. She marks the outside face, the bevels on both short edges, which will form the long seam, and on both long edges, which will form the circumferential seams, and the quarter lines as arc lengths along the plate, set back from the edges with the set-back written beside them. Joanne checks the layout with her own tape before it goes to the burning table.
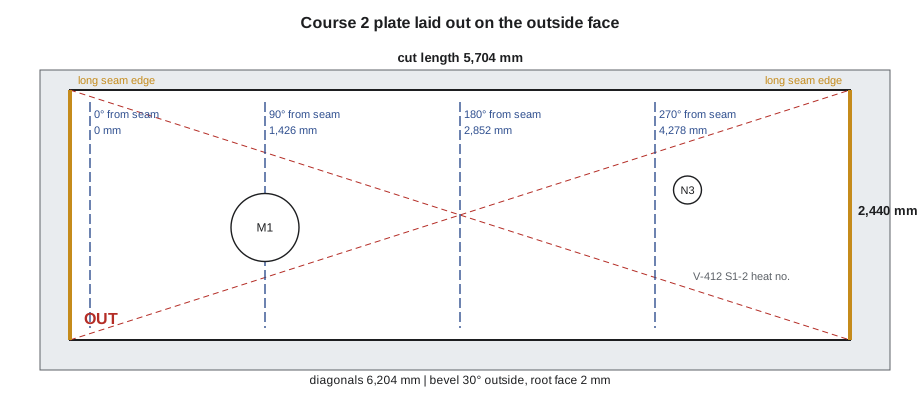
The plate is cut on the CNC plasma table, which follows the layout's dimensions with the kerf offset, and the bevels are cut by the edge bevelling machine. Kiera checks the cut plate's length, width and diagonals again, because the table can drift, and the bevel angle and root face at several points along each edge with a bevel gauge. All are within the procedure's range.
Rolling and the long seam
The roll operator pre-bends both ends of the plate in the four-roll machine, then rolls it in several passes. Kiera checks the curve with the template after each pass near the end and at both ends of the plate when it closes, looking for the even contact that shows the right radius and no flats at the ends. When the plate's ends come together, she and Dale fit the long seam: spacers in the root opening, dogs and wedges to bring the edges into line, and two strongbacks across the seam on the outside to hold it against peaking. She checks the root opening at every tack and between, the offset along the seam with a high-low gauge, and the peaking with a template at both ends and the middle. The tacks are made by the qualified welder with the procedure's preheat, from one end toward the other, as lesson 10 described.
Harjit's first hold point is the long seam fit. He checks the record against his own measurements and releases it. The seam is welded from the outside, back-gouged and welded from the inside, and then the course is checked again: welding has pulled it slightly out of round, as expected, and the spider goes in.
Fitting course 2 to course 1
Course 2, with its spider set, is brought onto the second set of turning rolls beside course 1. Kiera lines up the quarter lines, checks that course 2's long seam lies at 120 degrees, 120 degrees around from course 1's, and closes the circumferential seam onto spacers. Her first pass around the seam with the high-low gauge finds the offset largest at 135 degrees, where course 2 stands proud by more than the limit, just as in lesson 11's example. Rather than force it with wedges alone, she and Dale adjust the spider's jack at that point to pull course 2 in, then bring the edges flush with a strongback. The offsets come down within the limit all the way round, with the mismatch spread evenly.
She tacks the seam in opposite pairs, starting at the quarter lines, with the welder following her plan from lesson 10, checking the root opening and offset at every tack. When the seam is fully tacked, she takes the final measurements for the record: the out-of-roundness of course 2 at its mid-height, the worst offset at the circumferential seam, the peaking at the long seam after welding, the diagonal difference from the cut plate, and the largest root opening on the circumferential seam.
# Capstone: layout and fit-up record for V-412 shell course 2 (metric)
from math import pi, sqrt, tan, radians, gcd
MODE = "mm"

def frac(x, den=16):
    sign = "-" if x < 0 else ""
    n = round(abs(x) * den); whole, rem = divmod(n, den)
    if rem == 0:
        return f"{sign}{whole} in"
    g = gcd(rem, den)
    return f"{sign}{whole} {rem // g}/{den // g} in" if whole else f"{sign}{rem // g}/{den // g} in"

def show(x, den=16):
    return f"{x:,.1f} mm" if MODE == "mm" else f"{x:.3f} in ({frac(x, den)})"

ID, t, H = 1_800, 16, 2_440
gap, shrink, face = 3, 2, 2
cut = pi * (ID + t) - gap + shrink
diag = sqrt(cut ** 2 + H ** 2)
print("cut length", show(cut), "| height", show(H), "| diagonals", show(diag))
print("bevel width", show((t - face) * tan(radians(30))))
s = ID / 2 - sqrt((ID / 2) ** 2 - (600 / 2) ** 2)
print("inside template chord", show(600), "-> sagitta when rolled", show(s))

checks = [  # item, measured, limit
    ("diagonal difference", 2, 3),
    ("out-of-round (max - min)", 12, 0.01 * ID),
    ("long seam offset", 1.5, 3.0),
    ("circ seam offset (worst)", 2.5, 4.0),
    ("peaking at long seam", 2, 3),
    ("root opening, long seam (max)", 3.5, 4),
]
print()
for item, m, lim in checks:
    print(f"{item:<32} {show(m, 64):>22}  limit {show(lim, 64):>22}  {'OK' if m <= lim else 'HOLD'}")
holds = [c[0] for c in checks if c[1] > c[2]]
print("\nready for the inspector's fit-up hold point" if not holds else f"\nnot ready: {holds}")cut length 5,704.1 mm | height 2,440.0 mm | diagonals 6,204.1 mm bevel width 8.1 mm inside template chord 600.0 mm -> sagitta when rolled 51.5 mm diagonal difference 2.0 mm limit 3.0 mm OK out-of-round (max - min) 12.0 mm limit 18.0 mm OK long seam offset 1.5 mm limit 3.0 mm OK circ seam offset (worst) 2.5 mm limit 4.0 mm OK peaking at long seam 2.0 mm limit 3.0 mm OK root opening, long seam (max) 3.5 mm limit 4.0 mm OK ready for the inspector's fit-up hold point
Every item is within its limit. The out-of-roundness of 12 mm is two-thirds of the 18 mm allowed, the worst circumferential offset after the spider adjustment is 2.5 mm against 4 mm, and the peaking at the welded long seam is 2 mm against 3 mm. The record goes to Harjit with the joint, and he releases the circumferential seam for welding the same afternoon.
What the capstone pulls together
| Step | What Kiera did | Lesson |
|---|---|---|
| Check the drawings | Revision, notes, nozzle schedule against seam layout | 2, 3 |
| Check the material | Heat number, test report, thickness, rolling direction | 1 |
| Calculate | Mean circumference, cut length, diagonals, bevel width, template sagitta | 5, 6, 7 |
| Lay out | Base line, 3-4-5, diagonals, bevels, quarter lines with set-backs | 4, 6 |
| Roll and check | Pre-bent ends, template checks, no flats | 5, 7 |
| Fit the long seam | Spacers, dogs, wedges, strongbacks, tacks in order | 10 |
| Fit the course to course | Quarter lines, seam offset, spider, opposite-pair tacks | 10 |
| Check and record | Out-of-roundness, offset, peaking, root opening against limits | 11 |
Dale's comment, when the seam is released, is that Kiera's record was better than most he has seen from journeypersons. Joanne's is shorter: she adds Kiera's name to the list of people allowed to lay out pressure plate in the shop without a second check, on the condition that she keeps checking her own work as if somebody else had done it. The next job on the board is Tank 14's replacement plates, and the one after that is Riverbend's tube dutchmen, both of which Kiera will lay out herself. In Layout and Fitting II, the work moves on to cones, transitions, intersecting cylinders, nozzle openings and pattern development.
Worked problem
Re-checking the cut length
Harjit asks Kiera to show how she got the course 2 cut length. What does she show?
Show solution
- Mean diameter: 1,800 + 16 = 1,816 mm.
- Mean circumference: π × 1,816 = 5,705.1 mm.
- Less the root opening and plus the shrinkage: 5,705.1 − 3 + 2 = 5,704.1 mm.
Answer: A cut length of 5,704 mm, with every step traceable to the drawing and the procedure.
Lessons from the job
When V-412 ships in March, Lorne holds a short review with the shop crew, as he does after every vessel. Three things went well: the drawings were checked before layout, which caught the elevation chain error before any steel was cut; every seam passed its fit-up hold point on the first inspection; and the shell's overall length came out within 2 mm of the drawing. Two things are written down to do better. The CNC table's kerf setting had drifted on the first shell plate and was caught only by Kiera's re-measurement, so the shop adds a daily test cut to its start-up checks. And course 3's long seam needed more pull to close than the others, because the roll operator had not pre-bent its ends far enough; the shop's rolling instruction now calls for a template check of each end after pre-bending, before rolling begins.
Kiera writes up her own notes for the next time: the order she did things in, the numbers she used, and the two places where she would have gone wrong without a second check. Joanne reads them and adds them to her notebook.
Common mistakes
MistakeStarting layout before checking the revision and notes.
InsteadCheck the drawing package first; it decides the seams and the nozzles.
MistakeTrusting the CNC table without checking the cut plate.
InsteadRe-measure length, width, diagonals and bevels after cutting.
MistakeForcing an offset into line with wedges when the course is out of round.
InsteadCorrect the roundness with the spider, then fit the seam.
MistakePresenting a seam to the inspector without a record.
InsteadMeasure, record and hand over the fit-up sheet with the joint.
MistakeTreating the fit as finished at the tacks.
InsteadRe-check roundness and peaking after the long seam is welded.
Summary and key terms
- Course 2 was checked on paper first: revision, notes, nozzles, seams and material.
- Its cut length was the mean circumference less the root opening plus the shrinkage allowance.
- Layout used a base line, a 3-4-5 triangle, a diagonal check and set-back quarter lines.
- Rolling was checked with a template cut to the design radius.
- The long seam and the circumferential seam were fitted with spacers, dogs, wedges, strongbacks and a spider, and tacked in a planned order.
- Every check was recorded and presented at the hold points, and both seams were released.
- Inspection and test plan
- The list of inspections and hold points for a job.
- Fit-up sheet
- The fitter's record of a joint's measurements before welding.
- Back-gouging
- Removing the root of a weld from the second side before welding it.
- Quarter lines
- Reference lines at 0, 90, 180 and 270 degrees around a shell.
- Release
- The inspector's approval to proceed past a hold point.
- Set-back
- The fixed distance a reference line is kept from an edge or weld.
Practice problems
Work each problem on paper first, then reveal the answer to check.
Course 1 has an inside diameter of 1,800 mm and 16 mm plate, with a 3 mm gap and 2 mm shrinkage. What is its cut length?
Show answer
The same as course 2: about 5,704 mm.
Why are course 1 and course 2 long seams 120 degrees apart?
Show answer
To offset them well beyond the code minimum and keep them clear of nozzles.
What did Kiera do when the offset at 135 degrees exceeded the limit?
Show answer
Adjusted the spider to bring the course round, then used a strongback.
Name three measurements on the final fit-up record.
Show answer
Out-of-roundness, worst offset and peaking (also diagonals and root opening).
Lesson quiz · 5 questions
Score 60% or more to complete this lesson.
Create a free account to save your progress, take quizzes and earn a certificate.