
AUTO-110 · Lesson 9 of 12 · 22 min
Tires, wheels and road testing
In late October the phone at Ridgeline starts ringing with the same request: winter tires. For three weeks the tire bay runs from opening to closing, and Kiran spends much of it beside Theo, mounting, balancing and installing tires and checking pressures. It is repetitive work, but Theo reminds her that it is also some of the most safety-critical work in the shop. “Four patches of rubber the size of your hand are all that hold the car on the road,” he says. “If a wheel comes off on the highway because we didn't torque it, nothing else we did that day matters.”
This lesson covers how tires are built and identified, tread depth and inflation, wheels and their fitting, tire rotation and balancing, tire pressure monitoring systems, and the road test that technicians use to confirm concerns and repairs. AUTO-210 covers tire wear patterns and alignment in more depth.
Tire construction and types
Almost all passenger and light truck tires are radial tires. Inside the rubber, cords of polyester or other fibre run across the tire from bead to bead at right angles to the direction of travel, forming the body plies; steel belts under the tread stiffen it and keep it flat on the road. The bead, a bundle of steel wire at the inner edge of each sidewall, holds the tire on the wheel's rim. An inner liner keeps the air in on a tubeless tire. The tread pattern, with its grooves, blocks and sipes, the thin slits in the blocks, determines how the tire handles water, snow and ice, and how quiet and long-wearing it is.
All-season tires are a compromise for moderate climates. Winter tires use softer rubber compounds that stay flexible below about 7°C (45°F), where all-season compounds harden, and deeper treads with many sipes for grip on snow and ice. Tires that meet a standard snow traction test carry the three-peak mountain snowflake symbol; the M+S, mud and snow, marking means only that the tread meets a geometric definition and does not guarantee winter grip. In Alberta winter tires are not required by law, but Ridgeline recommends them to every customer, and Quebec and parts of British Columbia do require them for winter driving. (In Colorado, a traction law applies to Interstate 70 and other mountain highways during storms, requiring tires with adequate tread and an M+S or winter rating, or chains.) Light truck tires, marked LT, have stronger construction for heavy loads and are used on pickups such as Gord's and on the courier vans.
Reading the sidewall
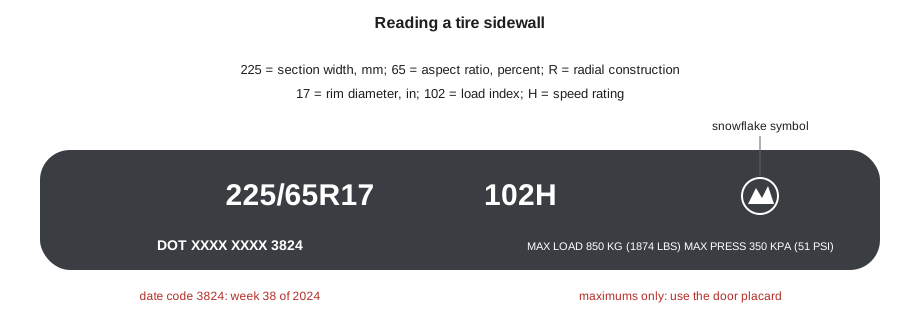
The sidewall carries the information needed to choose and inspect a tire. A typical marking reads 225/65R17 102H. The 225 is the section width in millimetres. The 65 is the aspect ratio, the sidewall height as a percentage of the width. R means radial construction. The 17 is the rim diameter in inches. The 102 is the load index, a code for the maximum load the tire can carry at its maximum pressure, and the H is the speed rating, a code for the maximum sustained speed it is designed for. A P before the width marks a passenger tire to an older US sizing standard; LT marks a light truck tire, whose load and pressure ratings differ.
The sidewall also shows the maximum load and maximum inflation pressure, which are not the pressures to use, and the tire's construction. The tire identification number, which begins with DOT, ends with a four-digit date code: the week and year of manufacture, so 3824 means the 38th week of 2024. Tires age even when they are not used, as the rubber hardens and cracks, and many manufacturers recommend replacing tires that are six to ten years old regardless of tread depth. Uniform tire quality grading on passenger tires shows treadwear, traction and temperature grades.
# Decode a tire size, its diameter, and the speedometer error from a size change
import math, re
load = {98: 750, 100: 800, 102: 850, 104: 900, 106: 950, 112: 1120, 116: 1250, 121: 1450}   # kg per tire
speed = {"S": 180, "T": 190, "H": 210, "V": 240}                                         # km/h
def decode(size):
    w, a, rim, li, sr = re.match(r"P?(\d+)/(\d+)R(\d+) (\d+)([A-Z])", size).groups()
    w, a, rim, li = int(w), int(a), int(rim), int(li)
    dia = 2 * w * a / 100 + rim * 25.4
    return dia, load[li], speed[sr]
for size in ("225/65R17 102H", "235/60R18 102H", "265/70R17 116S"):
    d, kg, kmh = decode(size)
    print(f"{size}: diameter {d:5.0f} mm, load {kg} kg per tire, speed rating {kmh} km/h")
orig, _, _ = decode("225/65R17 102H")
new, _, _ = decode("235/60R18 102H")
shown = 100
print(f"plus-size change: diameter {(new / orig - 1) * 100:+.1f} %; at an indicated {shown} km/h the true speed is {shown * new / orig:.1f} km/h")225/65R17 102H: diameter 724 mm, load 850 kg per tire, speed rating 210 km/h 235/60R18 102H: diameter 739 mm, load 850 kg per tire, speed rating 210 km/h 265/70R17 116S: diameter 803 mm, load 1250 kg per tire, speed rating 180 km/h plus-size change: diameter +2.1 %; at an indicated 100 km/h the true speed is 102.1 km/h
A change of more than about three percent in overall diameter affects the speedometer, odometer, ABS and stability control, transmission shift points and sometimes the driver assistance systems, so replacement tires are normally kept within that range of the original size, with a load index and speed rating at least as high as the original.
Tread depth
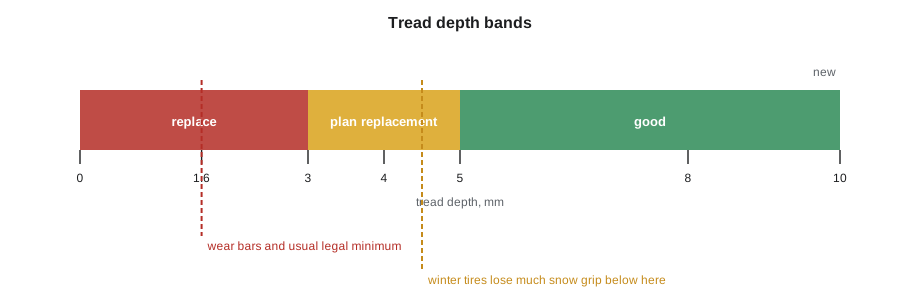
Tread depth is measured with a tread depth gauge in the main grooves, at several points across the tread and around the tire, because wear is rarely even. Tires have tread wear indicators, raised bars across the bottom of the main grooves, at 1.6 mm (2/32 in); when the tread is worn level with the bars, the tire is at the end of its legal life in most places. Grip in water and snow falls well before that point, however, because shallow grooves cannot clear water. Many tire makers and shops recommend replacing tires at about 3 mm (4/32 in) for summer and all-season use, and winter tires at about 4 to 5 mm (5/32 to 6/32 in), below which they lose much of their snow grip.
Uneven wear tells a story. Wear on both shoulders suggests under-inflation; wear in the centre, over-inflation; wear on one edge, an alignment fault such as camber or toe; cupping or scalloped wear, worn shock absorbers or a balance problem. Technicians record the tread depth of each tire on the inspection sheet, and they point out uneven wear because it usually has a cause that should be corrected before new tires are fitted.
Inflation pressure
The correct pressure for each vehicle is on the tire and loading information placard on the driver's door pillar, and it is a cold pressure, measured before the vehicle has been driven more than a short distance or after it has stood for some hours. Pressure rises as a tire warms up in use, so a hot tire is never let down to the cold pressure. Under-inflation is the most common tire fault: it increases flexing and heat, wears the shoulders, worsens handling and fuel economy, and in extreme cases leads to failure. A tire typically loses a little pressure each month through the rubber, so pressures are checked at every service.
Pressure also changes with the air temperature, by roughly 7 kPa for every 6°C (1 psi for every 10°F) for a car tire. A tire set correctly in a heated shop at 20°C (68°F) will be low when the vehicle sits outside on a −20°C (−4°F) morning, which is why a tire pressure warning often appears on the first cold morning of the year. Ridgeline's practice in cold weather is to check pressures outdoors on vehicles that have stood outside, or to add an allowance for the outdoor temperature when setting them in the warm shop, as the code shows.
# Tire pressure set in a warm shop, read again outdoors (ideal gas, constant volume; illustrative)
placard = 240            # cold placard pressure, kPa (gauge)
atm = 89                 # atmospheric pressure, kPa (absolute)
shop_t = 20             # shop temperature, C
def kelvin(c): return c + 273.15
for outside in (10, 0, -20):
    p_abs = (placard + atm) * kelvin(outside) / kelvin(shop_t)
    print(f"outside {outside:>4} C: pressure falls to {p_abs - atm:5.0f} kPa")
target = placard * kelvin(shop_t) / kelvin(-20) + atm * (kelvin(shop_t) / kelvin(-20) - 1)
print(f"to read {placard} kPa at {-20} C outside, set {target:4.0f} kPa in the shop")outside 10 C: pressure falls to 229 kPa outside 0 C: pressure falls to 218 kPa outside -20 C: pressure falls to 195 kPa to read 240 kPa at -20 C outside, set 292 kPa in the shop
The atmospheric pressure in the code is lower than the sea-level figure because Calgary sits about 1,050 m (Denver sits about a mile) above sea level, which slightly changes the calculation. The practical rule of thumb gives nearly the same answer.
Since the 2008 model year, all new passenger vehicles sold in the United States have had a tire pressure monitoring system, and nearly all vehicles sold in Canada have one too. Direct systems have a sensor in each wheel, usually part of the valve stem, that transmits the tire's pressure and temperature by radio to a module; the sensors contain batteries that last several years. Indirect systems use the ABS wheel speed sensors to detect the slightly faster rotation of an under-inflated tire. After tires are rotated or replaced, or a sensor is replaced, some systems must be relearned with a scan tool or a specific procedure so the module knows which sensor is at which wheel. When tires are mounted, the sensor's valve core, seal and nut are serviced as the sensor maker directs, and the sensor is handled carefully by the tire machine.
Wheels, mounting and balancing
Wheels are steel or aluminium alloy. They are centred on the hub either by the hub's pilot diameter, hub-centric, or by the tapered seats of the wheel nuts, lug-centric; aftermarket wheels sometimes need centring rings. The nuts or bolts must match the wheel's seat type, which may be conical, ball or flat, and wheels must match the vehicle's bolt pattern, offset and load rating. Before a wheel is installed, the hub face and wheel mounting face are cleaned of rust and dirt, because a thin layer of scale can let the wheel move and the nuts lose their clamp load. The nuts are tightened as Lesson 5 described.
Tires are mounted on a tire changer, which breaks the bead from the rim and helps work the bead over the rim flange, with the beads lubricated by a mounting paste. Inflation to seat the beads is done in a safety cage or with a clamp-on extension and the technician standing clear, because a tire that bursts during seating, or a split rim that separates, can kill. The bead-seating pressure in the tire maker's instructions is never exceeded. After mounting, the assembly is balanced on a wheel balancer, which spins it and shows where weights are needed on each side of the rim to correct static and dynamic imbalance. An unbalanced tire causes a vibration, usually felt in the steering wheel at highway speed for a front wheel or in the seat for a rear.
Tires are rotated at the interval in the maintenance schedule, often with each oil service, to even out wear between positions. The pattern depends on the drive layout and on whether the tires are directional, with an arrow showing the rotation direction, or a staggered set with different sizes front and rear. After rotation, pressures are set for each position as the placard shows, and the TPMS is relearned if required.
The road test
A road test is driving the vehicle to confirm the customer's concern before diagnosis, and to confirm the repair afterwards. It is often the most useful diagnostic step for noises, vibrations, pulls and driveability problems, and it is the last check after brake, steering and suspension work. Ridgeline allows only licensed, authorized staff to road test customers' vehicles, with the customer's permission on the repair order, on a set route that includes city streets, a rough section, a highway run and an empty lot for low-speed turns and braking.
Before driving, the technician checks the brakes by pressing the pedal, checks that the wheels were torqued and the lift arms or tools are clear, adjusts the mirrors and seat only as needed, fastens the seat belt, and notes the odometer and fuel level. During the drive, they try to recreate the conditions the customer described: speed, road surface, engine temperature, turning, braking. They obey every traffic law, never test above the speed limit, and do not use a phone while driving; if a second person is needed to listen or watch a scan tool, they ride along. After the drive, the technician records what was found, including the distance driven, on the repair order.
# Road test log: what was checked and what was found (Lindqvist minivan, after the brake job)
checks = [("pedal feel at rest", "firm, normal travel"), ("light stops in town", "smooth, no noise"),
          ("firm stop from 60 km/h", "straight, no pull, no pulsation"), ("highway 100 km/h", "no vibration, no wind noise"),
          ("tight turns both ways", "no clicking or rubbing"), ("speed bumps", "no clunk; sway bar link repaired")]
start, end = 148350, 148362
for item, result in checks:
    print(f"{item:<26} {result}")
print(f"road tested {end - start} km, odometer {start:,} to {end:,}; concern corrected")pedal feel at rest firm, normal travel light stops in town smooth, no noise firm stop from 60 km/h straight, no pull, no pulsation highway 100 km/h no vibration, no wind noise tight turns both ways no clicking or rubbing speed bumps no clunk; sway bar link repaired road tested 12 km, odometer 148,350 to 148,362; concern corrected
Worked problem
A vibration complaint
Dr. Singh reports a vibration in the steering wheel of her electric hatchback between 95 and 110 km/h (60 and 70 mph) since her winter tires were installed at another shop. What should the road test and inspection look for?
Show solution
- Road test to confirm the vibration's speed range and where it is felt; a steering wheel vibration at highway speed usually points to the front wheels.
- Check that it is present whether coasting or under power, and with or without braking, to separate wheel and tire causes from brake rotor causes.
- On the lift, check tire pressures, look for a bent rim, uneven tread or a shifted belt, and check that the wheels are properly seated on clean hub faces.
- Rebalance the front wheels, and if the vibration remains, check radial runout with a dial indicator or use a road-force balancer.
Answer: Confirm by road test, then check pressure, wheel seating, rim and tire condition, balance and runout.
Common mistakes
MistakeSetting pressures from the tire sidewall.
InsteadThe sidewall shows the maximum; use the vehicle's placard.
MistakeLetting air out of hot tires to the cold pressure.
InsteadCheck and set pressures cold.
MistakeSeating a bead outside a cage at high pressure.
InsteadUse the cage or a clamp-on extension and stand clear; never exceed the seating pressure.
MistakeInstalling wheels over rusty hub faces.
InsteadClean both mounting faces so the wheel seats flat.
MistakeIgnoring uneven tire wear when fitting new tires.
InsteadFind and correct the cause, such as alignment or pressure.
MistakeRoad testing without the customer's permission or above the speed limit.
InsteadGet permission on the repair order and drive legally on a set route.
Summary and key terms
- Radial tires have body plies, steel belts, beads and an inner liner; winter tires grip better in the cold.
- Sidewall markings give size, load index, speed rating and the four-digit date code.
- Measure tread depth in the main grooves; wear bars are at 1.6 mm (2/32 in) and grip falls before that.
- Set cold pressures from the placard, allowing for temperature; TPMS warns of low pressure.
- Clean hub faces, match nut seats and torque wheels; seat beads safely and balance assemblies.
- Road test to confirm concerns and repairs, legally, on a set route, and record the results.
- Aspect ratio
- The sidewall height as a percentage of the tire’s section width.
- Load index
- A code for the maximum load a tire can carry.
- Speed rating
- A letter code for the maximum sustained speed a tire is designed for.
- Tread wear indicator
- A raised bar in the groove showing the minimum tread depth.
- TPMS
- The tire pressure monitoring system.
- Hub-centric
- A wheel centred on the hub’s pilot diameter rather than by its nuts.
Practice problems
Work each problem on paper first, then reveal the answer to check.
What is the rim diameter of a 245/75R16 tire?
Show answer
16 inches.
A tire's date code is 0723. When was it made?
Show answer
The 7th week of 2023.
Why do many tire pressure warnings appear on the first cold morning of the year?
Show answer
Pressure falls as the air temperature drops.
Name two things checked before a road test.
Show answer
Brake pedal, wheel torque, tools and lift clear, seat belt, odometer (any two).
Lesson quiz · 5 questions
Score 60% or more to complete this lesson.
Create a free account to save your progress, take quizzes and earn a certificate.