
AUTO-110 · Lesson 3 of 12 · 23 min
Lifting, hoisting and supporting vehicles
Kiran is not allowed to operate a lift on her own until Dale has trained her and signed her off, and he does that in her first week. He begins with a story. Years ago, at another shop, a technician lifted a pickup on a two-post lift, removed the transfer case and the rear driveshaft, and then took out the rear axle's heavy differential cover and drained it. Each removal shifted the truck's weight further forward. When he pulled hard on a seized front bolt, the truck rocked forward off the rear arms and came down nose-first. Nobody was under it. “That's the only reason it's a story and not a funeral,” Dale says.
Lifts and jacks let technicians work under vehicles, and they are among the most dangerous equipment in a shop when used carelessly. This lesson covers the types of lifts, finding the correct lifting points, the vehicle's centre of gravity, operating a lift, using floor jacks and jack stands, and inspecting the equipment. The rule behind everything is simple: a vehicle is never worked under unless it is supported by a lift with its locks engaged or by properly rated stands, never by a jack alone.
Types of vehicle lifts
The two-post lift is the most common lift in general repair shops. Two columns stand on either side of the bay, each with two swing arms that reach under the vehicle to lift it at four pads placed at the manufacturer's lifting points. The wheels hang free, so the technician can reach the brakes, suspension, steering, exhaust and drivetrain. A symmetric two-post lift has columns facing each other and arms of equal length, so the vehicle's centre of gravity is placed midway between the columns; it suits pickups and vans. An asymmetric lift has its columns rotated and shorter front arms, so the vehicle sits further back and the doors can be opened without hitting the columns; it suits cars. Using a lift in the configuration it was designed for matters, because the lift's capacity is rated only for loads within the range of positions its manufacturer allows.
A four-post lift has a pair of runways that the vehicle drives onto, so it lifts the vehicle by its tires. It is quick to use and very stable, and it suits oil services, exhaust work, inspections and wheel alignment, where the vehicle must sit on its suspension. To take the wheels off, a rolling jack between the runways lifts the vehicle off them. An in-ground lift has one or two pistons below the floor and arms or a frame that rises to the vehicle's lifting points; it leaves a clear floor when lowered. Scissor and mid-rise lifts raise the vehicle a short distance and are used in tire and quick-service shops. Mobile column lifts, sets of four or six wheeled columns that lift by the tires, are used for heavy trucks and buses.
Lifting points and the centre of gravity
Every vehicle has lifting points chosen by its manufacturer, usually reinforced pinch welds on a unibody car, frame rails on a body-on-frame pickup, or specific pads marked under the sills. They appear in the service information and in the owner's manual, and the Automotive Lift Institute publishes a lifting point guide that covers most vehicles sold in North America. Lifting anywhere else can dent the floor, crush a fuel or brake line, damage a battery pack on an electric vehicle, or put the pads on a surface that lets the vehicle slip. Lesson 11 explains why electric vehicles need extra care here.
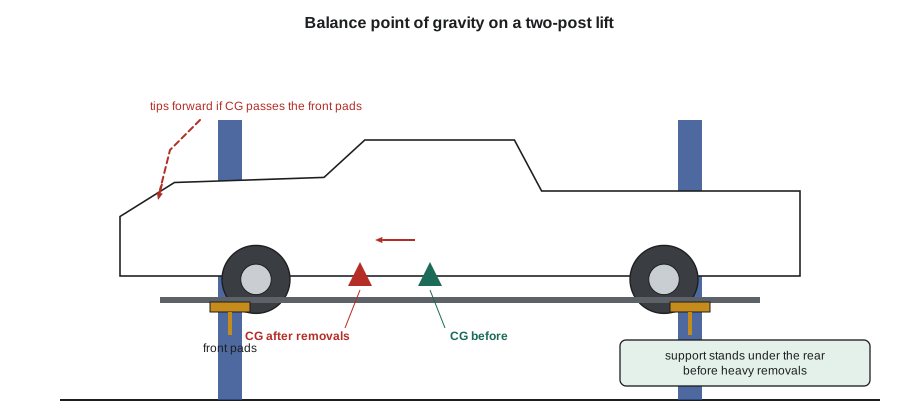
The centre of gravity is the point where the vehicle's whole weight can be considered to act. On a two-post lift it must lie between the front and rear pads, and in the position along the lift that the manufacturer specifies, or the vehicle can tip forward or backward off the arms. Most front-engine vehicles carry more weight on the front wheels than the rear, so their centre of gravity is closer to the front axle than the rear. A pickup with an empty bed is very front-heavy; a minivan or car is less so.
The centre of gravity moves whenever weight is removed or added. Taking out a heavy rear component, such as a rear axle, a fuel tank full of fuel, a spare tire or a load of tools in a van, moves it forward; taking out an engine or transmission moves it back. Before a big removal, the technician checks whether the change will move the centre of gravity outside the safe range and, if so, uses a different lift, adds support stands under the vehicle at suitable points or straps the vehicle to the lift as the manufacturer allows.
In this formula, x is the distance of the centre of gravity behind the front axle, W_r is the weight on the rear axle, W is the total weight, and L is the wheelbase. The axle weights come from a scale, from the service information or, roughly, from the weight distribution the manufacturer publishes.
# Where is the centre of gravity, and does it stay between the lift pads? (illustrative pickup)
wheelbase = 3660                   # mm
front_axle_wt, rear_axle_wt = 1290, 930     # kg
cg = rear_axle_wt / (front_axle_wt + rear_axle_wt) * wheelbase
print(f"total {front_axle_wt + rear_axle_wt:,} kg; CG {cg:.0f} mm behind the front axle")
front_pad, rear_pad = 450, 2900   # pad positions behind the front axle, mm
print(f"pads at {front_pad} and {rear_pad} mm; CG is {cg - front_pad:.0f} mm behind the front pads")
# removing the transfer case and rear driveshaft, then draining and removing rear axle parts
removed = [("transfer case", 40, 1700), ("rear driveshaft", 15, 2500), ("rear axle parts and oil", 180, 3660)]
w = front_axle_wt + rear_axle_wt; moment = w * cg
for name, wt, x in removed:
    w -= wt; moment -= wt * x
print(f"after removing {name:<24} CG {moment / w:6.0f} mm, margin to front pads {moment / w - front_pad:5.0f} mm")total 2,220 kg; CG 1533 mm behind the front axle pads at 450 and 2900 mm; CG is 1083 mm behind the front pads after removing transfer case CG 1530 mm, margin to front pads 1080 mm after removing rear driveshaft CG 1523 mm, margin to front pads 1073 mm after removing rear axle parts and oil CG 1330 mm, margin to front pads 880 mm
The truck starts with a comfortable margin, but every rear removal eats into it. The margin that remains is the distance the centre of gravity can still move before the truck balances on the front pads, and a hard pull on a wrench, a pry bar or a strap can supply the rest. Dale's rule is that before removing anything heavy from one end of a vehicle on a two-post lift, the technician places tall support stands under the other end.
Operating a two-post lift
Ridgeline's procedure for a two-post lift is posted on each column, and Kiran learns it by doing it with Dale watching. First, check that the bay is clear and the lift's arms are swung out of the way. Drive the vehicle in slowly, centred between the columns, with someone guiding, and stop with the centre of gravity at the position marked on the lift. Put the transmission in park or in gear and set the parking brake. Swing the arms under the vehicle and adjust the pads, using the screw pads or height adapters, so each pad contacts its lifting point squarely and all four touch at about the same height.
Raise the vehicle until the tires just leave the floor, stop, and check each pad again. Then push firmly on the front and rear of the vehicle, the shake test, to make sure it is stable. If it moves on the pads, lower it and reset them. Raise it to working height, listening for each lock to click into place, and then lower it onto the locks so that the weight is carried by the mechanical locks, not by the hydraulic system. Before lowering at the end of the job, check that tools, drain pans, stands and people are clear, raise the lift slightly off its locks, release the locks and lower slowly. Swing the arms clear before the vehicle is driven out, so they do not hit the doors or tires.
Several things are never done. A lift is never overloaded, and its capacity, marked on the column, is never exceeded. Nobody rides on a vehicle on a lift. The vehicle is never left raised on hydraulic pressure alone. Lifting by one end only with a two-post lift is not allowed unless the lift is designed for it. Pads are never placed on the floor pan, the bumper, the rocker trim or a battery pack. And a lift with a problem, such as a lock that does not engage, a cable that is frayed, an arm restraint that does not hold, or a leak, is tagged out of service until it is repaired.
# Two-post lift: arm loads for an empty high-roof cargo van (illustrative)
lift_capacity = 4500          # rated capacity, kg (shared by the four arms)
vehicle = 2450                  # vehicle weight, kg
front_share = 0.55              # fraction of weight on the front pads
arm_rating = lift_capacity / 4 * 1.5     # maximum load on one arm in this lift's design (illustrative)
front_arm = vehicle * front_share / 2
rear_arm = vehicle * (1 - front_share) / 2
print(f"vehicle {vehicle:,} kg is {vehicle / lift_capacity * 100:.0f} % of lift capacity")
print(f"front arms {front_arm:,.0f} kg each, rear arms {rear_arm:,.0f} kg each, arm limit {arm_rating:,.0f} kg")
print("OK" if max(front_arm, rear_arm) <= arm_rating and vehicle <= lift_capacity else "do not lift: choose another lift or position")vehicle 2,450 kg is 54 % of lift capacity front arms 674 kg each, rear arms 551 kg each, arm limit 1,688 kg OK
A lift's rated capacity is the total load it can carry when the load is placed as its manufacturer allows; it is not a promise that each arm can carry a quarter of the vehicle in any position. Many lifts are rated for a front-to-rear weight split such as three to two, and the manufacturer's instructions give the allowable distribution. The cargo vans from Prairie Parcel are checked carefully: when loaded with parcels they can weigh far more than when empty, so Simone asks Hal Osei to have the vans emptied before they come in.
Floor jacks, jack stands and other lifting tools
A hydraulic floor jack lifts one corner or one end of a vehicle at a jacking point. It is used only to raise and lower, never to hold a vehicle while someone works under it, because a seal can leak, the release valve can be knocked open, or the jack can roll. As soon as the vehicle is high enough, jack stands are placed under the manufacturer's support points and the vehicle is lowered onto them. Stands are always used in pairs at the same end or side, on a hard level floor, with the opposite wheels chocked.
Jack stands, like jacks, are rated for a load, usually as a pair: a pair of stands rated at 2 tonnes (4,000 lb) together can carry that load, so each carries half. The load on a pair of stands under one end of a vehicle is the weight on that axle, which is usually more than half the vehicle's weight for the front end. A stand's pin or ratchet must be fully engaged, and stands that are bent, cracked or missing pins are discarded.
# Are these jack stands rated for the front of Gord's pickup? (illustrative)
pair_rating = 2000          # rated load for the pair, kg
total = 2220                  # vehicle weight, kg
front_fraction = 0.58
front_load = total * front_fraction
print(f"front axle load {front_load:,.0f} kg on the pair, {front_load / 2:,.0f} kg on each stand")
print(f"pair rating {pair_rating:,} kg: {'adequate' if front_load <= pair_rating else 'too small, use heavier stands'}")
print(f"margin {pair_rating - front_load:,.0f} kg ({(pair_rating / front_load - 1) * 100:.0f} %)")front axle load 1,288 kg on the pair, 644 kg on each stand pair rating 2,000 kg: adequate margin 712 kg (55 %)
Other lifting tools have their own rules. An engine hoist, or shop crane, lifts engines and transmissions out of vehicles. Its capacity falls as its boom is extended, so the rating for each boom position, marked on the boom, is checked before the lift, and the load is lowered as soon as it is clear and moved at a low height. A transmission jack holds a transmission securely with a chain or strap while it is removed or installed. An engine support bar holds an engine from above while a mount is replaced. Each is used only within its rating, with the load secured, and nobody puts any part of their body under a suspended load.
Inspection and maintenance of lifts
The automotive lift industry's standards are published by the Automotive Lift Institute and approved by the American National Standards Institute. ANSI/ALI ALCTV covers the construction, testing and validation of lifts, and lifts certified to it carry the ALI gold label. ANSI/ALI ALOIM, whose current edition dates from 2020, covers the operation, inspection and maintenance of lifts already in service: it requires operators to be trained, lifts to be inspected at least once a year by a qualified lift inspector, and inspections, maintenance and repairs to be recorded. Alberta's OHS Code requires that lifting equipment be used, inspected and maintained according to its manufacturer's specifications, and Ridgeline follows the ALOIM standard as the way to do that.
Besides the annual inspection, the operator checks the lift every day before use: arms, pads and adapters undamaged; arm restraints engaging; locks clicking evenly on both columns; cables or chains and pulleys in good condition; no hydraulic leaks; anchor bolts tight; controls working and returning to off when released; and the capacity label and warning labels readable. Dale keeps a daily checklist on each lift and the annual inspection reports in the office.
| Item | Daily check by the operator | Typical defect that takes the lift out of service |
|---|---|---|
| Arms and pads | Pads present, rubber intact, adapters correct | Missing or split pad, bent arm |
| Arm restraints | Restraints engage when the lift rises | Restraint gear worn so the arm swings |
| Locks | Both columns click together, locks seat fully | One side not locking, lock spring broken |
| Cables and pulleys | Equalizing cables tight and even, no frays | Broken strands, kinks, worn pulley |
| Hydraulics | No leaks at cylinder, hoses or power unit | Oil on the column or floor |
| Controls and labels | Up and down controls return to off, labels readable | Sticking control, missing capacity label |
Worked problem
Planning a heavy removal
Gord Haney's pickup needs a new transfer case. It weighs about 40 kg (88 lb), and Marty will also remove the front and rear driveshafts. The truck is on the symmetric two-post lift. How should Kiran prepare?
Show solution
- Check that the truck's weight and front-to-rear split are within the lift's rating and allowable distribution.
- Note that removing the transfer case and driveshafts moves the centre of gravity forward, as the code above showed; the margin is still positive but smaller.
- Place two tall support stands under the rear frame rails before starting, snug but not lifting.
- Use a transmission jack to support the transfer case while the bolts are removed, and lower it at a low height.
- Avoid heavy pulls toward the front of the truck; use penetrating oil and breaker bars from the side.
Answer: Confirm the lift rating, support the rear with stands, carry the transfer case on a transmission jack and keep pulls controlled.
Common mistakes
MistakeWorking under a vehicle held up only by a jack.
InsteadLower it onto rated jack stands or a lift's locks before going under.
MistakeLeaving a lift on its hydraulics.
InsteadLower it onto the mechanical locks every time.
MistakeSkipping the shake test.
InsteadRaise the tires just off the floor, check the pads and push the vehicle before going higher.
MistakeIgnoring the shift in centre of gravity during a big removal.
InsteadSupport the other end with stands before removing heavy parts.
MistakePlacing pads on the floor pan, rocker trim or a battery pack.
InsteadUse only the manufacturer's lifting points.
MistakeUsing a damaged lift because the job is short.
InsteadTag it out of service and report it.
Summary and key terms
- Two-post lifts lift by the body or frame; four-post lifts lift by the tires; in-ground and mid-rise lifts have their own uses.
- Lift only at the manufacturer's lifting points, found in the service information or the ALI guide.
- Keep the centre of gravity within the lift's allowable range and remember that removing parts moves it.
- Raise slightly, check the pads, shake test, raise to height, and lower onto the locks.
- Floor jacks raise and lower; jack stands rated for the axle load hold the vehicle.
- Inspect lifts daily, have them inspected yearly by a qualified inspector, and tag out any defect.
- Lifting point
- A location on the body or frame chosen by the manufacturer for lifting the vehicle.
- Centre of gravity
- The point at which the whole weight of the vehicle acts.
- Symmetric lift
- A two-post lift with equal arms that places the vehicle centred between the columns.
- Asymmetric lift
- A two-post lift with rotated columns and shorter front arms that places the vehicle further back.
- Shake test
- Pushing on a just-lifted vehicle to confirm it is stable on the pads.
- Mechanical lock
- The lock that holds a lift at height independently of its hydraulic system.
Practice problems
Work each problem on paper first, then reveal the answer to check.
A car weighs 1,500 with 900 on the front axle and a wheelbase of 2,700. How far behind the front axle is the centre of gravity?
Show answer
600 / 1,500 × 2,700 = 1,080.
Why are jack stands used in pairs?
Show answer
A single stand cannot keep one end level and stable; a pair supports both sides of the same end.
What must happen before a vehicle is lowered at the end of a job?
Show answer
Check that tools, pans, stands and people are clear, lift slightly off the locks, release them and lower slowly.
Name three daily lift checks.
Show answer
Pads and arms, arm restraints, locks, cables, leaks, controls and labels (any three).
Lesson quiz · 5 questions
Score 60% or more to complete this lesson.
Create a free account to save your progress, take quizzes and earn a certificate.