
WLD-320 · Lesson 6 of 12 · 16 min
GTAW root passes and purging on pipe
Most of the Unit 4 spools are carbon steel, and their procedures call for a combination weld: a GTAW root and hot pass, followed by SMAW fill and cap with low-hydrogen electrodes. The GTAW root gives a smooth, clean inside bead with almost no risk of slag, which is why refinery owners prefer it on lines where a slag inclusion or a rough root can start corrosion or catch debris. Devon has already run GTAW on stainless pipe in the flat position. Now he has to run it on fixed carbon steel pipe, all the way around, feeding filler into a keyhole he can only partly see. This lesson covers the GTAW open root on pipe, how filler is fed, how the root is purged when the material needs it, and how a GTAW root is joined to SMAW fill.
Why GTAW roots
A GTAW root has several advantages over a cellulosic SMAW root. It leaves no slag, so there are no wagon tracks and no slag inclusions at restarts. The inside bead is smooth and regular, with little excess penetration, which matters for lines that carry clean fluids, that are pigged, or that are prone to erosion and corrosion at the root. The process puts in less hydrogen, which makes it suitable on steels that are sensitive to hydrogen cracking. And GTAW can weld almost every metal, so the same welder can run carbon steel, stainless and alloy roots with the same technique. The disadvantages are speed and skill: a GTAW root is slower than a cellulosic one, and it needs a steady hand, clean conditions and protection from drafts.
The filler for carbon steel GTAW roots is a solid wire, usually ER70S-2 or ER70S-6 under AWS A5.18. ER70S-2 has extra deoxidizers that tolerate a little surface contamination and give a sound root, and Hartwell's root procedures specify it. Rods are 3/32 in for most pipe roots and 1/16 in for thin wall and small bore.
Setting up for a GTAW root
The joint is prepared as in lesson 3, with a 37.5 degree bevel and a land, but GTAW roots often use a slightly thinner land, about 1/32 to 1/16 in, and a gap close to the diameter of the filler rod, about 3/32 to 1/8 in. The torch is set up as in the GTAW course: DCEN, a 3/32 in lanthanated tungsten ground to a point, a number 6 to 8 cup, often with a gas lens, and argon at about 15 to 25 cfh. Current for a carbon steel root on NPS 6 schedule 80 is about 90 to 120 amps, depending on the welder and the position. A foot pedal is used in the shop; on fixed joints in tight places, a thumb control on the torch or a fixed current with a crater fill setting is used.
Drafts are the enemy of GTAW on pipe. The inside of an open pipe acts as a chimney, drawing air through the root opening as the joint warms, and that air can disturb the shield on the root and cause porosity. Fitters cap or tape the open ends of a spool during GTAW root welding, even on carbon steel that does not need a purge, and in the field welders use shelters and keep the far ends of the line closed.
Feeding the filler
There are two common ways to add filler in a GTAW pipe root. In the first, the welder feeds the rod from the outside, dabbing it into the leading edge of the pool as in plate welding, while holding the arc in the keyhole to melt the lands. This is the usual method on the sides and top of the pipe. In the second, used at the bottom of a fixed joint and on tight gaps, the rod is laid in the gap and fed through it so that the end of the rod sits against the inside of the joint, and the arc melts the rod and both lands together. Feeding from inside the gap puts filler where the inside bead forms and helps prevent a concave root at the bottom, where gravity pulls the pool up into the joint.
Some welders use a lay-wire technique: the rod is bent to follow the joint and laid in the groove, and the arc is run over it, melting it into the root without dabbing. It gives a very even root but needs a uniform gap. Each technique has its place, and Marta has Devon learn all three before he chooses which to use on his test.
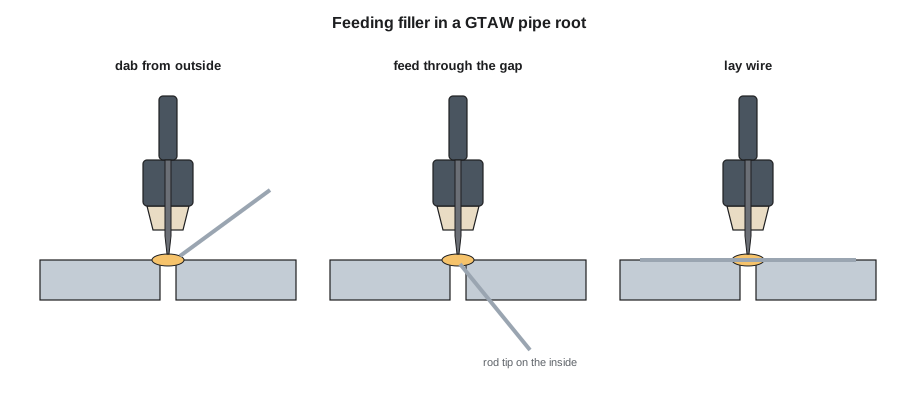
Free hand and walking the cup
A GTAW root can be run free hand, with the torch held off the work and steadied by the welder's little finger resting on the pipe, or by walking the cup, in which the edge of the ceramic cup rests in the groove and the welder rocks the torch from side to side, walking it along the joint like a pair of compasses. Walking the cup gives a very steady arc length and an even bead and is widely used on pipe, especially on heavy wall and on the fill passes of GTAW-only welds. It needs a groove deep enough to guide the cup and a cup of the right size; on a thin-wall root, the groove is too shallow to walk, and most welders run the root free hand and walk the hot pass.
Devon finds that free hand suits him at the bottom of the pipe, where he can brace his arm on the stand, and walking the cup suits him on the sides, where the motion keeps his torch angle steady. Marta says that is how most pipe welders end up working: the best technique for a joint can change around it.
Running the root around the pipe
On a 5G joint, the GTAW root is run uphill in two halves, as in lesson 5. The welder starts just past six o'clock, establishes a keyhole on the lands, feeds filler and travels up one side, keeping the torch at a small angle in the direction of travel, about 10 to 20 degrees from square. The keyhole is smaller than in a cellulosic root, often hardly more than the gap, and the welder reads penetration from the way the lands melt and the way the pool's leading edge wets into them. When the rod is added at the right rate, the pool's back edge stays flat or slightly convex; too little filler and the root thins and the inside becomes concave; too much and the pool cools and does not fuse the lands.
Stops are made by tapering the current down with the pedal or crater fill while adding a little filler, so that the crater is filled and does not crack. Restarts are made by striking on the end of the last bead, letting it melt and reopen the keyhole, and then continuing. Because there is no slag, GTAW stops do not usually need grinding, although many procedures still require a quick touch with a disc to remove any crater.
| Problem | Cause | Fix |
|---|---|---|
| Concave inside root at the bottom | Gravity pulls the pool up; not enough filler | Feed through the gap; add filler faster; shorten the arc |
| Suck-back at the top | Too much heat, wide gap | Lower current at the top; add filler; speed up |
| Lack of fusion on one land | Torch aimed at one side; hi-lo | Aim the arc at both lands; correct fit-up |
| Porosity in the root | Draft through the pipe; dirty filler or joint | Cap the pipe ends; clean filler and bevel |
| Tungsten inclusion | Tungsten touched the pool or filler | Stop, regrind the tungsten, grind out the inclusion |
Purging on pipe
Carbon steel GTAW roots are usually welded without a purge. The inside of the root oxidizes a little, giving a dull, slightly rough surface, but the oxide is thin and does not affect the strength. Some owners specify a purge on carbon steel for clean services, and most procedures for low-alloy steels with chromium above a few percent, such as P9 and P91, require one, because the chromium oxide on the inside of an unpurged root can be heavy. Stainless steel, nickel alloys and titanium are always purged, as the GTAW course explained.
On a spool, the purge can fill the whole spool or just the joint area between dams. A long spool with several branches can hold a great deal of volume and take a long time to purge, so on larger pipe the welder places soluble or inflatable dams on each side of the joint. The time saved is large: the space between two dams 12 in apart in NPS 6 pipe holds a small fraction of the volume of a 20 ft spool.
# Purge volume and time: whole spool versus dams on each side of the joint (five volume changes)
import math
ID = 5.761                 # inside diameter, in
spool = 20           # spool length, ft
dams = 1.0             # distance between dams, ft
flow = 40                # purge flow, cfh
def vol(length):
    return math.pi / 4 * ID ** 2 * length * 12 / 1728          # cu ft
for name, length in [('whole spool', spool), ('between dams', dams)]:
    v = vol(length)
    print(f"{name:<13}: {v:7.2f} cu ft, {5 * v / flow:5.1f} min to purge at {flow} cfh")
print(f"dams cut the purge to {vol(dams) / vol(spool) * 100:.0f} % of the spool volume")whole spool : 3.62 cu ft, 0.5 min to purge at 40 cfh between dams : 0.18 cu ft, 0.0 min to purge at 40 cfh dams cut the purge to 5 % of the spool volume
The spool purge would take more than half an hour; the dams bring it down to under two minutes. Dams must be placed far enough from the joint that the heat of welding does not burn them, and soluble dams must be in a part of the line that will be flushed with water before service. On the Coldwater stainless lines, Hartwell uses inflatable dams joined by a hose, with the oxygen meter on the vent, as in the GTAW course.
Consumable inserts and backing rings
Two older methods of making pipe roots are still met in some plants. A consumable insert is a ring of filler metal of a set shape that fits between the lands and is melted by the GTAW arc to form the root without added filler. It gives a very uniform root and is used in power plant and nuclear work and in automatic welding. A backing ring is a ring of steel fitted inside the joint that the root is welded onto, like the backing bar on a plate test. Backing rings make the root easy but leave a crevice inside the pipe where corrosion and debris collect, and they are not allowed on many process lines. Devon's procedures use neither; his roots are open.
From GTAW root to SMAW fill
In a combination weld, the GTAW root is followed by one or two GTAW passes, often called the hot pass and second pass, to build enough thickness that the SMAW fill will not burn through the root. Many procedures require a minimum GTAW deposit thickness, often about 3/16 in, before SMAW starts. The welder then switches to SMAW with low-hydrogen electrodes for the fill and cap, which lesson 7 covers. The changeover is a point where defects can form: the GTAW passes must be clean and free of oxide, and the first SMAW pass must be run hot enough to fuse into them and the sidewalls.
On the welder's qualification, a combination test qualifies each process separately for the thickness of weld metal it deposited, so a welder who qualifies with a GTAW root and SMAW fill can use each process for the thickness he deposited on the test. Lesson 8 explains how the ranges are worked out.
By the end of his GTAW week, Devon can run an NPS 6 carbon steel root uphill on a 5G joint with an even inside bead that Marta accepts on every coupon she cuts. The bottom is still his weakest spot, and she has him run the bottom quarter alone, six o'clock to seven thirty, a dozen times on scrap pipe, until he stops sucking the root up at the start.
Common mistakes
MistakeWelding a GTAW root with the pipe ends open in a drafty shop.
InsteadCap or tape the ends to stop the chimney effect.
MistakeAdding too little filler at the bottom.
InsteadFeed through the gap or add filler faster to prevent a concave root.
MistakeStarting SMAW fill on a thin GTAW root.
InsteadBuild the GTAW deposit to the thickness the procedure requires first.
MistakePurging a long spool when dams would do.
InsteadUse dams to cut the purge volume, placed clear of the heat.
MistakeLeaving a tungsten inclusion in the root.
InsteadStop, grind it out and regrind the tungsten.
Summary and key terms
- GTAW roots are clean, smooth and low in hydrogen, but slower than SMAW roots.
- Carbon steel roots use ER49S-2 or ER70S-2 filler; stainless and some alloys need a purge.
- Filler can be dabbed from outside, fed through the gap, or laid in the groove.
- Free hand and walking the cup both work; many welders use each where it suits.
- Dams reduce purge volume and time on large pipe.
- Combination welds build a minimum GTAW thickness before SMAW fill.
- Walking the cup
- Rocking a GTAW torch with its cup resting in the groove to move along the joint.
- Lay wire
- A GTAW technique in which the filler rod is laid in the groove and melted by the arc.
- Consumable insert
- A ring of filler metal fitted between the lands and melted to form the root.
- Combination weld
- A weld made with more than one process, such as a GTAW root and SMAW fill.
- Suck-back
- A concave inside root surface where the pool has drawn up into the joint.
Practice problems
Work each problem on paper first, then reveal the answer to check.
What is the volume between dams 1 ft apart in pipe with a 5.76 in bore?
Show answer
pi/4 x 5.76 squared x 12 = 313 cubic inches, about 0.18 cu ft.
How long is a five-volume purge of 0.18 cu ft at 40 cfh?
Show answer
5 x 0.18 / 40 = 0.0225 h, about 1.4 minutes.
Why are pipe ends capped during carbon steel GTAW roots?
Show answer
To stop air being drawn through the root and causing porosity.
Lesson quiz · 5 questions
Score 60% or more to complete this lesson.
Create a free account to save your progress, take quizzes and earn a certificate.