
VIS-101 · Lesson 4 of 12 · 28 min
Composing people: portraits, groups and the figure
People are the most common subject in photographs, films and social media, and the subject viewers scrutinize most closely. We are extraordinarily sensitive to faces, eyes, posture and the spaces between people, so small compositional choices, such as where a frame edge cuts a body, how much room is left in front of a face, or who stands higher in a group, change how a person is perceived. This lesson applies the framing tools of Lesson 3 to the human figure: framing portraits, placing eyes and heads, cropping bodies, posing and gesture, environmental portraits, groups, and the social and ethical responsibilities of photographing people.
The face and the eyes
Viewers look at faces first, and within faces at the eyes, a finding confirmed by eye-tracking studies since the 1960s (Lesson 9). In most portraits, the eyes are therefore the anchor of the composition:
- Focus on the nearer eye. If only one thing is sharp, it should be the eye closest to the camera; a portrait with sharp ears and soft eyes looks wrong even to untrained viewers.
- Place the eyes about one third of the way down the frame in head-and-shoulders portraits. This follows the rule of thirds (Lesson 3) and usually leaves appropriate headroom.
- Give the eyes light. A small reflection of the light source in each eye, called a catchlight, makes eyes look alive; eyes in deep shadow look sunken or sinister (Lesson 8).
The direction of the eyes creates an implied line (Lesson 2). A subject looking into the camera addresses the viewer directly, creating intimacy, confrontation or appeal, depending on expression. A subject looking out of the frame directs the viewer's attention elsewhere and invites curiosity about what they see. A subject looking within the frame at another person or object connects the two and tells a story.
Headroom, look room and cropping
Headroom is the space between the top of the head and the top edge of the frame. Too much headroom makes the subject seem to sink to the bottom of the frame; too little cramps them. In close-ups, it is normal and often powerful to crop into the top of the head, keeping the eyes and mouth, which carry expression, fully in frame. Look room (also called nose room or lead room) is the space in front of a face in profile or three-quarter view: leaving more space on the side the subject faces feels natural, while placing them close to the edge they face creates tension or confinement (Lesson 3).
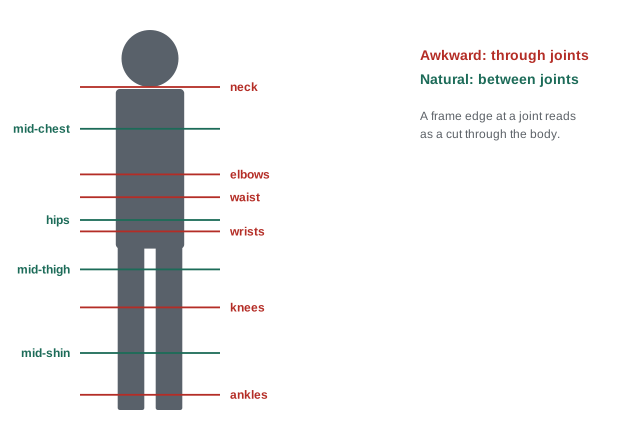
Where the frame cuts the body matters. Frame edges that fall exactly at joints, such as the neck, wrists, elbows, knees or ankles, tend to look like amputations, because the eye reads the edge as a cut through a natural division. Cropping between joints, for example mid-thigh, mid-forearm or mid-upper arm, looks more natural. Similarly, avoid cutting off hands and feet with the frame edge unless the crop is clearly deliberate.
| Shot | Crop | Typical use |
|---|---|---|
| Extreme close-up | eyes, mouth or a detail | intensity, emotion, detail of hands or objects |
| Close-up | head, top of shoulders; may crop the top of the head | emotion and expression |
| Medium close-up (head and shoulders) | mid-chest up | interviews, corporate and social media portraits |
| Medium shot | waist up | conversation, gesture, presenters |
| Medium long shot (American or cowboy shot) | mid-thigh up | body language with face still readable |
| Full shot | whole body with a little space | posture, fashion, action |
| Environmental or wide shot | figure small within the setting | context, scale, story |
Camera height and the figure
Camera height changes how a person appears (Lesson 3 introduced camera angle). At eye level, the viewer meets the subject as an equal; this is the neutral default for interviews and most portraits. From slightly above, the subject looks smaller and can appear vulnerable or approachable; a slightly high angle with the subject looking up is a flattering, common portrait angle because it defines the jaw line and minimizes a double chin. From below, the subject looks taller, more powerful and imposing, which is why low angles are used for heroes, leaders and athletes, and why they can also look threatening. Shooting children and pets from your own standing height makes them look small and diminished; crouching to their eye level enters their world.
Focal length and distance also matter (Lesson 7 explains perspective). A wide-angle lens used close to a face enlarges the nose and makes the ears recede, a distortion viewers read as unflattering or comic. A moderate telephoto (about 85 to 135 mm on full frame) used from 2 to 4 meters renders facial proportions as people see them in conversation, which is why such lenses are called portrait lenses. Phone cameras with a wide main lens make close selfies distort features; stepping back and cropping, or using the phone's telephoto lens, gives more natural results.
Worked problem
Choosing a portrait distance
A photographer wants a head-and-shoulders portrait about 50 cm tall to fill the long side of a full-frame sensor (36 mm). What focal length is needed at 1 m, and at 3 m? Which distance gives more natural facial proportions?
Show solution
- Magnification needed: \(36/500 = 0.072\).
- Using \(m \approx f/d\) for distant subjects: at 1 m, \(f \approx 0.072 \times 1{,}000 = 72\) mm; at 3 m, \(f \approx 216\) mm.
- At 1 m, the nose is about 10% closer to the camera than the ears; at 3 m, only about 3%, so relative size differences are much smaller.
Answer: About 72 mm at 1 m or about 216 mm at 3 m. The 3 m distance gives flatter, more natural proportions; a common compromise is an 85 to 135 mm lens at about 1.5 to 2.5 m, close enough to talk easily with the subject.
Posing, gesture and body language
Posing is composition applied to the body. Even for candid work, understanding what makes a pose look natural helps the photographer recognize the right moment. Some widely used principles:
- Angle the body. A body square to the camera looks broad and static; turning the shoulders 30 to 45° away from the camera, with the face turned back toward it, creates a more dynamic, slimming line.
- Shift the weight. Weight on the back foot, with the front knee slightly bent, creates an S-curve through the body, known in art history as contrapposto, which looks relaxed.
- Give hands something to do. Hands are expressive but awkward when idle: let them hold an object, rest naturally, or gesture. Show the side or edge of a hand rather than the back or palm flat to the camera.
- Create space between arms and body. A gap between the arm and the torso defines the waist and avoids a flattened outline (watch the negative space, Lesson 2).
- Watch the chin and neck. Slightly extending the head forward and down defines the jaw line.
Body language communicates attitude. Open postures, with arms uncrossed and the body facing the viewer, suggest openness and confidence; closed postures suggest defensiveness or reserve. Leaning toward the camera suggests engagement; leaning away, detachment. A good portrait aligns body language with the story: a surgeon with arms folded in front of a hospital looks authoritative, while the same surgeon leaning toward a patient looks caring.
Environmental portraits
An environmental portrait shows a person in a setting that reveals who they are: a baker in her bakery, an electrician on a job site, a farmer in a field. The setting carries as much information as the face, so composition must balance the two. Common approaches include placing the person on a third with the environment filling the rest of the frame, framing them within a doorway or window (frame within a frame, Lesson 3), using leading lines in the environment to direct attention to them, and choosing a moderate wide-angle lens (24 to 35 mm) that includes the setting without distorting the face, keeping the person away from the frame edges where wide-angle distortion is strongest. Depth of field is a choice: deep focus shows the environment in detail, while moderate blur keeps it recognizable but secondary (Lesson 7).
Composing groups
Groups add a problem of arrangement: every face should be visible and well lit, and the group should read as a unified shape rather than a line of disconnected individuals.
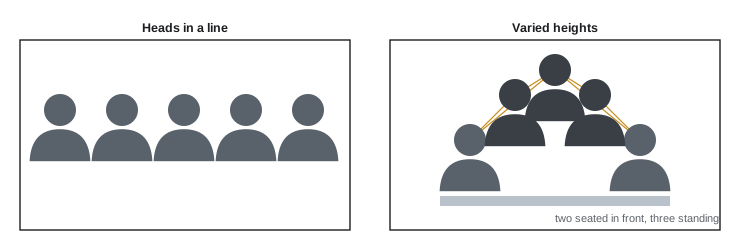
- Vary head heights. A row of heads at the same height looks static and formal. Seating some people, standing others, or using steps creates a varied, triangular or diamond arrangement that the eye moves through. Avoid placing one head directly above another (a "totem pole").
- Build implied triangles. Groups of three form a natural triangle; larger groups can be composed as several interlocking triangles (Lesson 2).
- Overlap and connect. People who overlap slightly, touch shoulders or lean toward each other look like a group; gaps between them break the unit. Shoulders angled toward the center of the group enclose it.
- Mind the depth of field. With several rows, everyone must be acceptably sharp: stop down the aperture or keep the rows close together and parallel to the sensor.
- Keep the important people prominent. In a wedding or team photo, the central figures usually go near the center or at the apex of the arrangement.
Worked problem
Arranging a team photograph
A photographer must photograph a project team of seven people for a company website, in a 16:9 banner. They are all similar heights and initially stand in a single line. How should they be arranged?
Show solution
- A single line of seven in 16:9 makes each face small and leaves dead space above and below; a two-row arrangement makes faces larger.
- Seat three in front (on stools or the edge of a desk), and stand four behind, offset so each standing person appears between two seated people.
- Place the team lead at the center of the back row or front row; angle the people at each end slightly toward the center.
- Leave space on one side of the banner if the web page will overlay a headline there.
Answer: Two staggered rows give a compact, connected group with larger faces and varied head heights, suited to the wide banner. Offsetting the rows ensures every face is visible, and angling the end figures inward encloses the group.
People in motion and candid work
In documentary, street, sports and event photography, people move and do not pose. Composition then depends on anticipation and timing: choosing a position and background first, then waiting for the subject to enter the right place in the frame, sometimes called "fishing" in street photography. Leave look room and lead room in the direction of motion (Lesson 3), capture gestures at their peak (a jump at its highest point, a speaker's emphatic gesture), and watch for interactions between people, which make the strongest candid images. Shooting a burst of frames helps capture the decisive moment, a term associated with Henri Cartier-Bresson, when form and content come together.
Ethics, consent and representation
Photographing people carries responsibilities. In Canada, photographing people in public places is generally lawful, but using their image commercially, for example in advertising, usually requires their written consent (a model release), and Quebec gives individuals stronger rights over their image under its Civil Code, so photographers there need consent to publish identifiable images in many more situations. Privacy laws restrict photographing people where they have a reasonable expectation of privacy. Beyond the law, ethical practice includes asking permission when appropriate, respecting people who decline, taking particular care with children, vulnerable people and communities with their own protocols (for example, many Indigenous communities have protocols about photographing ceremonies), and avoiding compositions that demean or stereotype. Camera angle, cropping and context can make the same person look heroic or ridiculous, powerful or pitiable; these choices should be deliberate and fair.
Representation also matters across a body of work: who appears in the center of images and who at the edges, who is shown active and who passive, and whether diverse skin tones are exposed and lit well. Historically, film stock and default camera settings were calibrated for lighter skin, and photographers must still take care that darker skin tones are exposed and rendered with full detail (VIS-110 covers exposure and color).
Common mistakes
MistakeFocusing on the tip of the nose or the ears in a portrait.
InsteadFocus on the nearer eye.
MistakeCropping at the neck, wrists, knees or ankles.
InsteadCrop between joints.
MistakeUsing a wide-angle lens close to a face for a flattering portrait.
InsteadStep back and use a moderate telephoto for natural proportions.
MistakeLining up a group with all heads at one height.
InsteadVary heights and build overlapping triangles.
MistakePublishing an identifiable person in an advertisement without consent.
InsteadObtain a model release; know local image rights, especially in Quebec.
Summary and key terms
- Viewers look at faces and eyes first; focus on the nearer eye and place the eyes near the upper third.
- Manage headroom and look room; crop between joints, not through them.
- Camera height changes perceived power; moderate telephoto lenses give natural facial proportions.
- Angled bodies, shifted weight, active hands and space between arms and torso make natural poses.
- Environmental portraits balance person and setting with framing, lines and depth of field.
- Groups need varied head heights, implied triangles, overlap and adequate depth of field.
- Photographing people requires consent where appropriate, respect for privacy and fair representation.
- Catchlight
- A small reflection of the light source in the eyes.
- Headroom
- Space between the top of the head and the frame edge.
- Look room
- Space in front of a face in the direction it faces.
- Contrapposto
- A relaxed stance with weight on one leg, giving an S-curve.
- Portrait lens
- A moderate telephoto lens giving natural facial proportions.
- Environmental portrait
- A portrait showing a person in a revealing setting.
- Totem pole
- An awkward arrangement with one head directly above another.
- Decisive moment
- The instant when form and content come together in a candid image.
- Model release
- Written consent to use a person's image.
- American shot
- A medium long shot framing a person from mid-thigh up.
Practice problems
Work each problem on paper first, then reveal the answer to check.
Where should focus fall in a three-quarter portrait?
Show answer
On the nearer eye.
Why avoid cropping at the knees?
Show answer
Crops through joints look like amputations.
What does a low camera angle suggest?
Show answer
Power, stature, sometimes threat.
Focal length for a 40 cm tall framing on a 36 mm side at 2 m?
Show answer
\(36/400 \times 2{,}000 = 180\) mm.
What is contrapposto?
Show answer
A stance with weight on one leg, creating an S-curve.
Name two ways to improve a group photo.
Show answer
Vary head heights; overlap people; angle end figures inward.
What is a catchlight?
Show answer
A reflection of the light in the eyes.
Which lens range suits environmental portraits?
Show answer
Moderate wide angle, about 24 to 35 mm.
What is "fishing" in street photography?
Show answer
Choosing a setting and waiting for a subject to enter it.
When is a model release usually needed?
Show answer
For commercial use of an identifiable person's image.
Lesson quiz · 5 questions
Score 60% or more to complete this lesson.
Create a free account to save your progress, take quizzes and earn a certificate.