
ROB-110 · Lesson 12 of 12 · 31 min
Capstone: a small mobile robot program
This lesson brings the whole course together in one project: a safe teleoperation system for a small mobile robot. A person drives the robot from a keyboard. A safety filter node sits between the keyboard and the wheels: it passes commands through, but refuses to drive forward into an obstacle detected by the laser scanner, and stops the robot entirely if either the commands or the scans stop arriving. The project uses almost everything you have learned: Linux and Git for the workspace, Python classes and timing, publishers and subscribers, quality of service, parameters, a package with an entry point, a launch file, transforms in the background, simulation and recorded data. It runs unchanged on a simulated robot in Gazebo or on a real one such as a TurtleBot.
Requirements
Professional robot software starts with written requirements, which say what the system must do and how you will know it does it. Good requirements are specific and testable: the robot shall not drive forward when an obstacle is within the stopping distance is testable; the robot shall be safe is not. For this project:
- R1. The operator drives the robot with the keyboard; commands reach the base within 100 ms.
- R2. When any obstacle is within the stop distance in a ±20° cone ahead, forward motion is set to zero, while turning and reversing remain possible.
- R3. If no command or no scan has arrived for longer than the timeout, the robot is commanded to stop.
- R4. Velocity commands are published at a steady 20 Hz so the base driver's own timeout can act if the safety filter fails.
- R5. The stop distance, timeout and rate are parameters, validated and documented.
- R6. The node publishes its state (DRIVING, BLOCKED or STALE) on a status topic.
- R7. One launch file starts the system on the real robot or in simulation, optionally recording a bag.
- R8. The decision logic has automated tests that run with colcon test.
System design
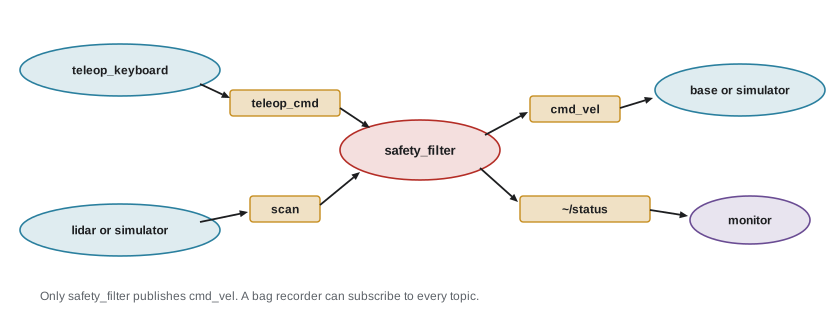
The design follows the patterns from earlier lessons. The keyboard node publishes on teleop_cmd. The safety_filter node subscribes to teleop_cmd and to scan, and publishes on cmd_vel, where the base driver or the simulator listens, and on its private status topic. All the decision logic lives in a plain Python class, SafetyFilter, in a module called logic.py, together with the front_min function from lesson 6. The ROS node is a thin layer that converts messages into calls on that class, so the logic can be tested without ROS.
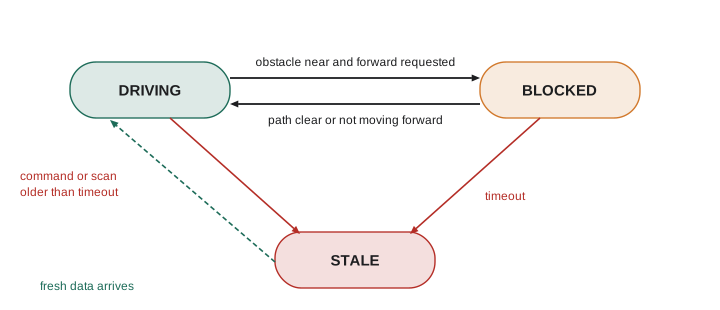
The filter has three states. In DRIVING it passes commands through unchanged. In BLOCKED, entered when an obstacle is inside the stop distance and the operator asks to go forward, it zeroes the forward speed but passes turning and reversing. In STALE, entered whenever the latest command or scan is older than the timeout, it commands a full stop. Thinking in explicit states makes the behavior easy to describe, test and display, and is the simplest form of the state machines you met in ROB-100.
The logic, tested first
Here is the core class, followed by a scenario that feeds it a sequence of scans and commands, much as a recorded bag would. Read the output against the requirements: at 1.0 s an obstacle 0.35 m ahead blocks forward motion but the turn passes through (R2); at 1.5 s reversing is allowed; and at 2.5 s, with no new messages for a second, the filter reports STALE and commands a stop (R3).
class SafetyFilter:
    """Decides the command to send; knows nothing about ROS."""

    def __init__(self, stop_distance=0.4, timeout=0.5):
        self.stop_distance = stop_distance
        self.timeout = timeout
        self.cmd, self.cmd_time = (0.0, 0.0), None
        self.front, self.scan_time = float("inf"), None

    def on_scan(self, t, front_distance):
        self.front, self.scan_time = front_distance, t

    def on_cmd(self, t, v, w):
        self.cmd, self.cmd_time = (v, w), t

    def step(self, t):
        """Return (v, w, state) to publish at time t."""
        for stamp in (self.cmd_time, self.scan_time):
            if stamp is None or t - stamp > self.timeout:
                return 0.0, 0.0, "STALE"
        v, w = self.cmd
        if v > 0.0 and self.front < self.stop_distance:
            return 0.0, w, "BLOCKED"
        return v, w, "DRIVING"


f = SafetyFilter()
events = [  # (time, kind, values)
    (0.0, "scan", 2.0), (0.0, "cmd", (0.3, 0.0)),
    (0.5, "scan", 0.9), (0.5, "cmd", (0.3, 0.0)),
    (1.0, "scan", 0.35), (1.0, "cmd", (0.3, 0.5)),
    (1.5, "scan", 0.35), (1.5, "cmd", (-0.1, 0.0)),
]
for t, kind, val in events:
    if kind == "scan":
        f.on_scan(t, val)
    else:
        f.on_cmd(t, *val)
        print(f"t={t:.1f} s ->", f.step(t))
print("t=2.5 s ->", f.step(2.5), " (no new messages)")t=0.0 s -> (0.3, 0.0, 'DRIVING') t=0.5 s -> (0.3, 0.0, 'DRIVING') t=1.0 s -> (0.0, 0.5, 'BLOCKED') t=1.5 s -> (-0.1, 0.0, 'DRIVING') t=2.5 s -> (0.0, 0.0, 'STALE') (no new messages)
Automated tests turn scenarios like this into checks that run every time the code changes. ROS 2's Python packages use pytest; a test is any function whose name starts with test_ in a file in the package's test folder, and colcon test runs them all along with the style checks that ros2 pkg create set up. Each test sets up a situation, runs the logic and asserts the expected result.
# test/test_logic.py, run with colcon test or pytest
from my_robot.logic import SafetyFilter


def test_blocks_forward_but_allows_turning():
    f = SafetyFilter(stop_distance=0.4, timeout=0.5)
    f.on_scan(0.0, 0.3)
    f.on_cmd(0.0, 0.2, 0.5)
    assert f.step(0.1) == (0.0, 0.5, 'BLOCKED')


def test_stops_when_commands_go_stale():
    f = SafetyFilter(timeout=0.5)
    f.on_scan(0.0, 2.0)
    f.on_cmd(0.0, 0.2, 0.0)
    f.on_scan(1.0, 2.0)
    assert f.step(1.0)[2] == 'STALE'
Choosing the numbers
A safety filter is only as good as its parameters. The stop distance must be larger than the distance the robot needs to stop after an obstacle appears, which has two parts: the distance traveled while the system reacts, and the braking distance. The reaction time includes up to one scan period before the obstacle is seen, the processing time and up to one command period before the new command is sent, plus the base's own response.
Worked problem
Setting the stop distance
The robot\'s top speed is 0.5 m/s and it can brake at 1.0 m/s². The scanner runs at 10 Hz, processing takes 10 ms, commands are sent at 20 Hz and the base responds within 50 ms. What is the minimum stop distance, and what would you set with a safety margin?
Show solution
- Worst-case reaction: scan period 0.1 s + processing 0.01 s + command period 0.05 s + base 0.05 s = 0.21 s.
- Distance while reacting: \( 0.5 \times 0.21 = 0.105 \) m.
- Braking distance: \( 0.5^2 / (2 \times 1.0) = 0.125 \) m.
- Total: \( 0.105 + 0.125 = 0.23 \) m, measured from the scanner to the front of the robot\'s footprint plus that distance.
- Add a margin for sensor noise, slippery floors and the robot's own length ahead of the scanner: a setting of about 0.4 to 0.5 m is reasonable.
Answer: At least 0.23 m beyond the front of the robot; 0.4 to 0.5 m is a sensible setting at 0.5 m/s. Doubling the top speed would more than double the braking part, so limit speed if you cannot increase the distance.
Worked problem
Choosing the timeout
Commands arrive at 20 Hz and scans at 10 Hz over Wi-Fi, where occasional delays of up to 150 ms occur. A timeout of 0.1 s, 0.5 s or 3 s: which is best?
Show solution
- 0.1 s is equal to one scan period, so ordinary jitter and Wi-Fi delays would trigger STALE constantly and the robot would stutter.
- 3 s means a robot at 0.5 m/s could travel 1.5 m blind after losing contact.
- 0.5 s tolerates several missed messages and Wi-Fi delays, yet limits blind travel to about 0.25 m.
Answer: 0.5 s is the best of the three: comfortably longer than normal gaps between messages, short enough to stop quickly when contact is lost.
The node, the package and the launch file
With the logic tested, the node is wiring. It declares the three parameters, creates the subscriptions and publishers, and runs a 20 Hz timer that asks the filter what to publish, so commands go out at a steady rate whether or not the operator is pressing keys (R4). It timestamps every event with the node's clock, so it works in simulated time too. Parameter validation from lesson 7 can be added in the same way as before.
import rclpy
from rclpy.node import Node
from rclpy.executors import ExternalShutdownException
from rclpy.qos import qos_profile_sensor_data
from geometry_msgs.msg import Twist
from sensor_msgs.msg import LaserScan
from std_msgs.msg import String
from my_robot.logic import SafetyFilter, front_min


class SafetyNode(Node):
    def __init__(self):
        super().__init__('safety_filter')
        self.declare_parameter('stop_distance', 0.4)
        self.declare_parameter('timeout', 0.5)
        self.declare_parameter('rate', 20.0)
        p = lambda n: self.get_parameter(n).value
        self.filter = SafetyFilter(p('stop_distance'), p('timeout'))
        self.create_subscription(LaserScan, 'scan', self.on_scan,
                                 qos_profile_sensor_data)
        self.create_subscription(Twist, 'teleop_cmd', self.on_cmd, 10)
        self.cmd_pub = self.create_publisher(Twist, 'cmd_vel', 10)
        self.status_pub = self.create_publisher(String, '~/status', 10)
        self.create_timer(1.0 / p('rate'), self.on_timer)

    def now(self):
        return self.get_clock().now().nanoseconds * 1e-9

    def on_scan(self, scan):
        d = front_min(scan.ranges, scan.angle_min, scan.angle_increment)
        self.filter.on_scan(self.now(), d)

    def on_cmd(self, cmd):
        self.filter.on_cmd(self.now(), cmd.linear.x, cmd.angular.z)

    def on_timer(self):
        v, w, state = self.filter.step(self.now())
        out = Twist()
        out.linear.x, out.angular.z = v, w
        self.cmd_pub.publish(out)
        self.status_pub.publish(String(data=state))


def main(args=None):
    rclpy.init(args=args)
    node = SafetyNode()
    try:
        rclpy.spin(node)
    except (KeyboardInterrupt, ExternalShutdownException):
        pass
    finally:
        node.destroy_node()
        rclpy.try_shutdown()
Add an entry point, safety_filter = my_robot.safety_node:main, to setup.py, and depend on rclpy, geometry_msgs, sensor_msgs and std_msgs in package.xml. The launch file starts the filter and the keyboard node, passes use_sim_time through so the same file serves simulation and hardware, and optionally starts a bag recording of every topic the filter uses (R7).
from launch import LaunchDescription
from launch.actions import DeclareLaunchArgument, ExecuteProcess
from launch.conditions import IfCondition
from launch.substitutions import LaunchConfiguration
from launch_ros.actions import Node


def generate_launch_description():
    sim = LaunchConfiguration('use_sim_time')
    record = LaunchConfiguration('record')
    return LaunchDescription([
        DeclareLaunchArgument('use_sim_time', default_value='false'),
        DeclareLaunchArgument('record', default_value='false'),
        Node(package='my_robot', executable='safety_filter',
             parameters=[{'use_sim_time': sim, 'stop_distance': 0.5}]),
        Node(package='teleop_twist_keyboard',
             executable='teleop_twist_keyboard', prefix='xterm -e',
             parameters=[{'use_sim_time': sim}],
             remappings=[('cmd_vel', 'teleop_cmd')]),
        ExecuteProcess(
            cmd=['ros2', 'bag', 'record', '/scan', '/odom', '/tf',
                 '/tf_static', '/teleop_cmd', '/cmd_vel',
                 '/safety_filter/status'],
            condition=IfCondition(record)),
    ])
Testing the whole system
Test in stages, from cheapest to most realistic, and record what you did. First, colcon test runs the unit tests. Second, replay a bag recorded from a real robot through the filter and check its status output with ros2 topic echo. Third, run in Gazebo with use_sim_time:=true, drive toward a wall and check that the robot stops short of it, that it can turn away, and that stopping the keyboard node makes it halt within the timeout. Finally, test on the real robot in a clear area at low speed, with someone ready at the emergency stop, recording a bag throughout.
| Test | Requirement | Method | Pass when |
|---|---|---|---|
| Unit tests | R2, R3, R8 | colcon test | All tests pass |
| Command rate | R4 | ros2 topic hz /cmd_vel | Steady 20 Hz with small jitter |
| Obstacle stop | R2 | Drive at a wall in simulation, then on the robot | Stops at least 0.2 m short; turning still works |
| Loss of commands | R3 | Stop the keyboard node while driving | STALE within 0.5 s and the robot stops |
| Loss of scans | R3 | Stop the laser driver or bridge | STALE within 0.5 s and the robot stops |
| Parameters | R5 | ros2 param set with valid and invalid values | Valid accepted, invalid rejected with a reason |
| Launch modes | R7 | Launch with use_sim_time true and false, record true | System starts both ways; bag contains all topics |
Keep the test results with the code: the commit you tested, recorded with git describe, the bags you recorded and any failures and fixes. A short write-up with the requirements, design diagram, test table and results is exactly the kind of portfolio piece that shows an employer or graduate supervisor you can build robot software properly, not just make a demonstration work once.
Extending the project
There are many ways to take the project further, each preparing for later courses. Scale the forward speed down smoothly as obstacles approach instead of stopping abruptly, which needs a little control theory from ROB-300. Watch behind the robot when reversing. Use the transform from laser to base_link, as in lesson 10, so the filter works whatever way the scanner is mounted. Publish a visualization marker in RViz showing the stop cone. Replace the keyboard with a joystick, or with a Nav2 navigation stack, and keep the filter as an independent safety layer. And port the node to C++ with rclcpp to compare performance.
Robotics software skills like these are in demand across the United States, in robotics companies, manufacturers, logistics and warehouse automation firms, agriculture and defense contractors, and research institutes. Pittsburgh, the Boston area, the San Francisco Bay Area, Austin and Detroit all have strong robotics communities and university labs, and many companies hire students as interns, so a well-documented ROS 2 project on GitHub is a strong start to an application. The Bureau of Labor Statistics' Occupational Outlook Handbook publishes pay and outlook data for related occupations such as software developers and mechanical and electrical engineers.
Common mistakes
MistakeWriting requirements that cannot be tested, such as the robot must be safe.
InsteadWrite specific, measurable requirements and trace each one to a test.
MistakeChoosing a stop distance without accounting for reaction time.
InsteadAdd the distance traveled during the reaction time to the braking distance, then add a margin.
MistakePublishing commands only when keys are pressed.
InsteadPublish at a steady rate from a timer so downstream timeouts work.
MistakeTesting only on the real robot.
InsteadTest the logic with unit tests and bags, then in simulation, and only then on hardware.
MistakeUsing wall-clock time inside the node.
InsteadUse the node's clock so the same code works in simulation and bag replay.
Summary and key terms
- The capstone safety filter passes keyboard commands to the base but blocks forward motion near obstacles and stops on stale data.
- Written, testable requirements guide the design and the test plan.
- Decision logic lives in a plain Python class with unit tests; the ROS 2 node is a thin wrapper.
- Three explicit states, DRIVING, BLOCKED and STALE, make the behavior easy to test and display.
- Stop distance must cover reaction distance v t plus braking distance v²/2a, with a margin.
- Timeouts should exceed normal message gaps but limit blind travel; 0.5 s suits 10 to 20 Hz data.
- Test in stages: unit tests, bag replay, simulation, then hardware with recording and an emergency stop ready.
- Requirement
- A specific, testable statement of what a system must do.
- Safety filter
- A node that checks commands against safety rules before they reach actuators.
- State machine
- A model of behavior as a set of states and the events that move between them.
- Reaction time
- The delay from an event occurring to the robot starting to respond.
- Braking distance
- The distance needed to stop from a given speed at a given deceleration.
- Timeout
- The maximum age of data before it is treated as missing.
- Unit test
- An automated test of a small piece of code in isolation.
- pytest
- The Python testing framework used by ROS 2 Python packages.
- Traceability
- Linking each requirement to the tests that verify it.
- Teleoperation
- Controlling a robot remotely by a human operator.
Practice problems
Work each problem on paper first, then reveal the answer to check.
Rewrite the requirement the robot should stop quickly as a testable requirement.
Show answer
For example: when commands stop arriving, the robot shall be commanded to stop within 0.5 s.
A robot travels at 0.8 m/s, reacts in 0.25 s and brakes at 1.6 m/s². What stop distance is needed before margin?
Show answer
0.8 × 0.25 + 0.64 / 3.2 = 0.2 + 0.2 = 0.4 m.
What state does the filter enter if scans keep arriving but commands stop?
Show answer
STALE, once the latest command is older than the timeout.
Why does the node publish on a timer instead of in on_cmd?
Show answer
So commands go out at a steady rate and downstream timeouts work even when no keys are pressed.
Name the test command for running the package's unit tests.
Show answer
colcon test, then colcon test-result --verbose.
Why is the decision logic kept in logic.py rather than inside the node class?
Show answer
So it can be unit-tested and run without ROS.
With a 0.5 s timeout and a top speed of 0.6 m/s, how far could the robot travel blind after contact is lost?
Show answer
About 0.3 m.
Which launch argument makes the same launch file work in Gazebo?
Show answer
use_sim_time:=true.
Suggest a test for requirement R4.
Show answer
Run ros2 topic hz /cmd_vel and check it shows a steady 20 Hz.
Give one extension that would make the filter work with a scanner mounted backwards.
Show answer
Look up the laser to base_link transform with tf2 and convert points before checking the cone.
Lesson quiz · 5 questions
Score 60% or more to complete this lesson.
Create a free account to save your progress, take quizzes and earn a certificate.