
RAC-220 · Lesson 4 of 12 · 17 min
TXV setup, bulb placement and troubleshooting
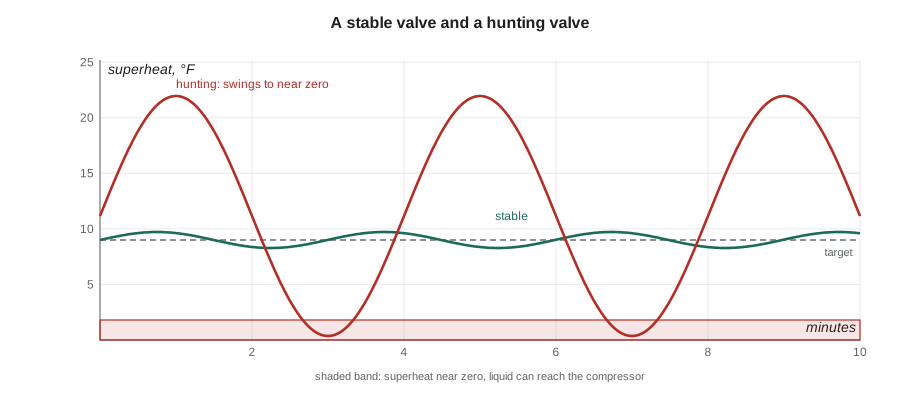
The call from the restaurant's walk-in freezer came in on a Friday afternoon: the box was holding temperature, but the compressor was cycling oddly and the evaporator's suction line was frosting all the way back to the condensing unit at times and then running bare. This was the R-448A freezer that had lost a compressor to floodback the year before, when an evaporator fan had seized. Theo connected his gauges and a pair of clamp thermometers and logged the suction line temperature at the TXV bulb every thirty seconds. The superheat swung from almost nothing to more than 22 °F and back, about every four minutes. "That's hunting," Dana said when he sent her the numbers. "Before you touch the adjusting stem, go look at how the bulb is mounted."
A thermostatic expansion valve that is correctly selected rarely needs adjusting. Most TXV complaints come from installation details, especially the bulb, or from conditions the valve cannot fix, such as flash gas in the liquid line, low head pressure or poor airflow. This lesson covers how to install and mount a TXV and its bulb, how to measure operating superheat properly, when and how to adjust a valve, and how to diagnose the classic TXV symptoms: hunting, overfeeding and starving.
Installing the valve
- Mount the valve close to the evaporator inlet or distributor, in the orientation the manufacturer allows. Some valves can be mounted in any position; others must have the power head upright.
- Braze with the valve body protected by a wet rag or heat sink, and with a nitrogen purge through the piping, so the diaphragm, seals and internal parts are not overheated and no oxide scale forms.
- Provide a liquid line drier and, where specified, a sight glass ahead of the valve, so the valve receives clean, solid liquid.
- Connect the external equalizer, if the valve has one, to the top of the suction line a short distance downstream of the bulb, never upstream, and never cap it.
- Keep the liquid line to the valve free of vertical lifts and restrictions that would cause flashing, or allow enough subcooling to cover them.
Mounting the bulb
The bulb is the valve's thermometer, and it can only control what it can sense. It must be in good thermal contact with the suction line, at a point that represents the vapor leaving the evaporator, and protected from other heat sources. The rules most manufacturers give are:
- Mount the bulb on a horizontal section of the suction line, close to the evaporator outlet, and before any trap.
- On pipes smaller than about 7/8 in, mount it on top of the pipe or slightly to one side. On larger pipes, mount it at about the four or eight o'clock position, off the bottom, so it senses the vapor rather than any oil and liquid running along the bottom or the warmer top of the pipe. Follow the valve manufacturer's figure for the pipe size.
- Clean the pipe under the bulb to bare metal, and use the straps supplied to clamp the full length of the bulb tightly. A loose strap is one of the most common causes of overfeeding and hunting.
- Insulate the bulb and the pipe around it when the bulb could be affected by warm air, such as in a walk-in where the coil discharge air blows over the suction line, or in any low-temperature application.
- Keep the bulb away from the external equalizer connection, any suction line heat exchanger and any heat source such as a hot gas defrost line.
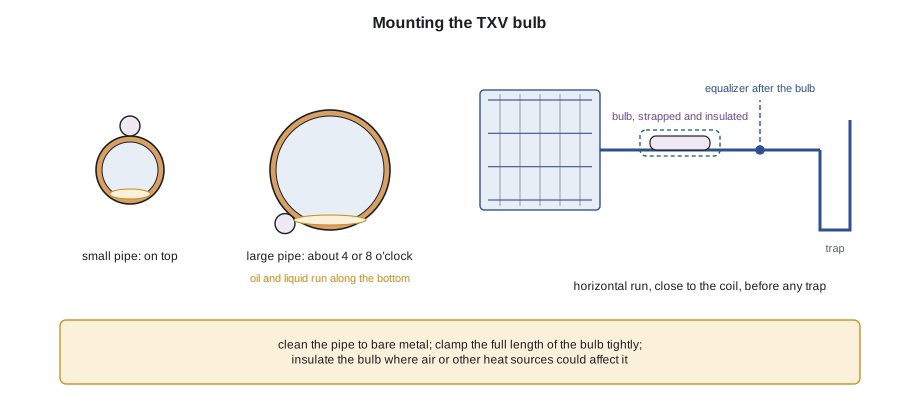
If the bulb loses contact with the pipe, it reads the surrounding air rather than the vapor. In most locations that air is warmer than the suction line, so the bulb pressure rises, the valve opens too far and the evaporator floods. In a cold freezer, the opposite can happen if the bulb sits in cold air while the suction line warms. Either way, the valve has lost its sense of the evaporator outlet.
Measuring operating superheat correctly
Superheat at a TXV is measured at the bulb location, not at the condensing unit. The measurement needs two values taken at the same point and the same time: the suction line temperature at the bulb, and the evaporator pressure at the same point, converted to its saturation temperature from the pressure-temperature chart.
- Use the access fitting at the evaporator outlet, or the external equalizer line's access fitting if there is one. If the only pressure available is at the condensing unit, add the estimated suction line pressure drop or accept that the result is only approximate.
- Use the dew-point column of the chart for blends with temperature glide, because the vapor leaving the evaporator is at its dew point when the last liquid boils away. Lesson 10 explains glide.
- Measure on clean pipe with an insulated clamp or a probe strapped and insulated under the bulb, not in the air.
- Wait until the system is stable, and for a refrigeration system, until the box is near its design temperature. During pull-down, the valve may be wide open and the superheat high for a long time, which is normal.
- Log readings for several minutes rather than taking one. A single reading on a valve that is swinging can be anywhere in the swing.
Hunting
A valve that hunts opens too far, floods the coil and cools the bulb, then closes too far, starves the coil and warms the bulb, and repeats. The superheat and suction pressure swing in a regular cycle. Mild hunting, a swing of a couple of kelvin, is common and harmless. Severe hunting, with the superheat falling to zero at the bottom of each swing, lets liquid reach the compressor and wastes capacity at the top of each swing. Common causes are:
- A loose, poorly placed or uninsulated bulb, so it responds to air or to liquid sloshing along the bottom of the pipe.
- An oversized valve, which responds to small changes with large changes in flow. Valves selected well above the evaporator's capacity are prone to hunting, especially at low load.
- Too low a superheat setting, so the valve tries to work too close to zero superheat, where the evaporator's outlet condition changes abruptly.
- Unstable liquid supply, such as flash gas in the liquid line or fluctuating head pressure from cycling condenser fans.
- Uneven feed among coil circuits from a damaged distributor, so the bulb sees a mixture of very cold and very warm streams.
# Classify a logged TXV superheat trace (readings every 30 s at the bulb, degrees F)
readings = [16.4, 10.8, 4.3, 1.1, 0.7, 5.8, 14.2, 20.9, 22.3, 16.7, 9.2, 3.2, 0.9, 1.6, 8.3, 16.9, 21.8, 21.2, 14.4, 7.0]
target = 9.0

avg = sum(readings) / len(readings)
swing = max(readings) - min(readings)
low_count = sum(1 for r in readings if r < 2.0)
crossings = sum(1 for a, b in zip(readings, readings[1:]) if (a - avg) * (b - avg) < 0)
period_min = 2 * len(readings) * 0.5 / max(crossings, 1)

print(f"average {avg:.1f} F, swing {swing:.1f} F, period about {period_min:.1f} min")
print(f"readings under 2 F: {low_count} of {len(readings)}")
if swing < 5:
    print("stable: compare the average with the target")
elif low_count:
    print("severe hunting: superheat reaches nearly zero; check bulb contact, insulation, valve size and liquid supply before adjusting")
else:
print("moderate hunting: check bulb mounting and liquid supply")average 10.9 F, swing 21.6 F, period about 4.0 min readings under 2 F: 4 of 20 severe hunting: superheat reaches nearly zero; check bulb contact, insulation, valve size and liquid supply before adjusting
Overfeeding and starving
A valve that overfeeds gives low or zero superheat that stays low. Before blaming the valve, check for a loose or misplaced bulb, a bulb sensing warm air, an equalizer line that is capped, blocked or connected upstream of the bulb, or too low an evaporator load, such as a blocked air filter, an iced coil or a failed fan, which makes the superheat fall even with a good valve. A valve that is stuck open from debris under its seat, or that has a wrong, oversized element, overfeeds at all loads.
A valve that starves gives high superheat and low suction pressure. Check first that the valve is getting solid liquid: measure subcooling at the valve inlet and look at the sight glass. Then check for a restricted strainer at the valve inlet, a plugged drier, ice or wax at the valve port, too low a head pressure in cold weather, an internally equalized valve on a coil with a big pressure drop, an equalizer line connected downstream of a restriction such as an evaporator pressure regulator, or a power head that has lost its charge. A power head that has lost its charge closes the valve, because no pressure acts to open it; holding the bulb in a warm hand then makes no difference to the suction pressure.
| Symptom | Check first | Then check |
|---|---|---|
| Severe hunting | Bulb contact, position and insulation | Valve size, superheat setting, liquid supply, distributor |
| Low superheat, steady | Bulb contact, equalizer connection, evaporator airflow and load | Valve stuck open, wrong element |
| High superheat, low suction | Subcooling at the valve, sight glass, drier and inlet strainer | Head pressure, equalizer type and location, lost bulb charge |
| Normal superheat, poor capacity | Airflow and coil condition | Valve undersized for the load |
Adjusting a TXV
When installation, supply and load have all been checked and the operating superheat is still outside the manufacturer's range, an adjustable valve can be reset. Remove the cap from the adjusting stem, note its starting position by marking it, and turn it in small steps, typically a quarter to a half turn at a time. On most valves, turning clockwise compresses the spring and raises the superheat; counterclockwise lowers it. The manufacturer's literature states the direction and roughly how much superheat each full turn changes. After each step, wait at least ten to fifteen minutes for the system to settle before reading again; refrigeration systems may need longer. Replace the cap with its seal, and record the final setting and superheat.
Adjusting a valve to fix a problem it did not cause makes things worse. Raising the superheat on a valve that is starving because of flash gas starves it further; lowering the superheat on a valve that is hunting because of a loose bulb makes the floodback worse. The rule of thumb at Northfield is the one Raj taught every apprentice: check the bulb, check the liquid, check the load, then touch the stem.
The freezer valve
Theo opened the freezer's evaporator housing. The bulb was strapped to the suction line at the right place, but one strap had loosened and the insulation had slipped away, so the bulb was half in the cold discharge air and half on the pipe. He cleaned the pipe, reclamped the bulb at the correct position for the pipe size, and wrapped it with closed-cell insulation tape. After twenty minutes, his log showed the superheat steady at about 7 °F with a swing of less than 2 °F, inside the manufacturer's range for a low-temperature coil. He did not touch the adjusting stem. In the service record, he noted the bulb correction and recommended that the next visit include an oil acid test, given the system's floodback history.
Common mistakes
MistakeAdjusting the stem before checking the bulb, liquid supply and load.
InsteadRule out installation and supply problems first.
MistakeMeasuring superheat with the pressure at the condensing unit and the temperature at the coil.
InsteadTake both readings at the bulb location, or allow for the suction line pressure drop.
MistakeStrapping the bulb to the bottom of a large pipe.
InsteadMount it at about four or eight o'clock on large pipes, on top on small ones.
MistakeLeaving the bulb uninsulated in a walk-in's air stream.
InsteadInsulate the bulb and the surrounding pipe.
MistakeReading superheat from a single snapshot on a valve that swings.
InsteadLog several minutes of readings and look at the average and the swing.
Summary and key terms
- Install the valve close to the coil with heat protection and a nitrogen purge, and provide clean, solid liquid.
- Clamp the bulb tightly on clean pipe, on a horizontal run before any trap, at the position recommended for the pipe size, and insulate it.
- Measure operating superheat at the bulb, using pressure at the same point and the dew point for blends.
- Hunting usually comes from bulb mounting, oversizing, a low setting or an unstable liquid supply.
- Overfeeding and starving have common causes outside the valve; check them before adjusting.
- Adjust in small steps, wait for the system to settle and record the result.
- Hunting
- A cyclic swing of superheat and suction pressure as a TXV alternately overfeeds and starves.
- Overfeeding
- A valve supplying more refrigerant than the evaporator can boil, giving low superheat.
- Starving
- A valve supplying too little refrigerant, giving high superheat and low suction pressure.
- Power head
- The diaphragm assembly of a TXV with its capillary and bulb.
- Inlet strainer
- A fine screen at a TXV inlet that catches debris.
- Adjusting stem
- The screw that changes a TXV's spring force and static superheat.
Practice problems
Work each problem on paper first, then reveal the answer to check.
A TXV's bulb is strapped to the bottom of a 1-3/8 in suction line. What problem may result, and where should it go?
Show answer
It may sense oil and liquid along the bottom and hunt; mount it at about four or eight o'clock.
Superheat at the bulb is 27 °F, suction is low and subcooling at the valve inlet is 0 °F. What do you suspect?
Show answer
Flash gas in the liquid line from low charge or a restriction; the valve is not getting solid liquid.
You hold the bulb in your hand and the suction pressure does not change. What does that suggest?
Show answer
The power head has lost its charge or the valve is stuck.
How long should you wait after a quarter-turn adjustment?
Show answer
At least 10 to 15 minutes, longer for refrigeration, before reading again.
Lesson quiz · 5 questions
Score 60% or more to complete this lesson.
Create a free account to save your progress, take quizzes and earn a certificate.