
RAC-210 · Lesson 11 of 12 · 18 min
Replacing compressors and coils, and burnout cleanup
In level one, Theo had watched Raj trace the arena snack-bar ice machine's tripping breaker to a compressor winding shorted to the shell. The arena had approved a replacement, and now Theo was doing the job with Raj beside him. Before touching a tool, Raj made him check the evidence again. The megohmmeter still read almost zero from one terminal to ground. Theo recovered a little refrigerant from the low side into a clean, evacuated cylinder for the purpose and caught the smell immediately: sharp and acrid. When they cut the compressor's suction line, the oil that dripped out was black. "That's a burnout, not just a ground," Raj said. "The compressor is the easy part. The cleanup is what decides whether the new one lives."
This lesson describes how to replace a hermetic compressor and a coil properly: confirming the failure, choosing the replacement, recovering the charge and removing the old component, judging the severity of a burnout, installing the new component, and the cleanup and follow-up that keep the contamination from killing the replacement. Brazing and pressure testing, which are part of every replacement, are covered in lesson 12; evacuation and charging in detail in RAC-220.
Before any replacement
- Confirm the failure. A compressor is condemned only after electrical tests, as in RAC-130, and refrigerant-side checks, as in lesson 10, show it has failed: an open or shorted winding on a cool compressor, a winding grounded to the shell on a megohmmeter, a locked rotor that does not free with a hard-start test where appropriate, or a measured failure to pump that is not explained by external causes.
- Find the cause. Every failed compressor is asked the question from lesson 5: what killed it? Floodback, slugging, flooded starts, overheating, oil loss and electrical faults need different fixes. The fix must be part of the job.
- Get the right replacement. Match the model or an approved equivalent: same refrigerant, voltage, phase, capacity at the actual conditions, application range and oil type. Replace start components, run capacitor and contactor where they are worn or were stressed by the failure, and check whether the manufacturer requires a new drier, crankcase heater or other parts with the warranty.
- Plan the refrigerant work. The charge must be recovered and handled under the rules in RAC-120. Refrigerant from a burnout is usually not reused in the system; it goes to recovery cylinders for reclaim.
- Gather the parts and paperwork. A liquid line filter-drier, a suction filter-drier for a burnout, metering device screens or a new metering device if contaminated, brazing supplies, nitrogen, a vacuum pump and micron gauge, a scale, an acid test kit and the refrigerant records.
Mild and severe burnouts
When a hermetic motor burns, the electrical arc and heat break down the oil and insulation. The products, carbon, sludge and acids, can spread through the whole system. How far they spread depends on how long the motor burned and whether the compressor kept running.
| Mild burnout | Severe burnout | |
|---|---|---|
| Odor when opened | Little or none | Strong, sharp, acrid |
| Oil color | Near normal or slightly dark | Black, often with sludge or carbon particles |
| Acid test | Low or near the threshold | Well above the threshold |
| Contamination | Mostly in the compressor | Spread to the discharge line, condenser, liquid line and sometimes the evaporator |
| Typical cleanup | Replace compressor and liquid line drier; acid test after start-up | Suction filter-drier, oversized liquid drier, metering screens or valve, possibly flushing, repeated core changes and acid tests |
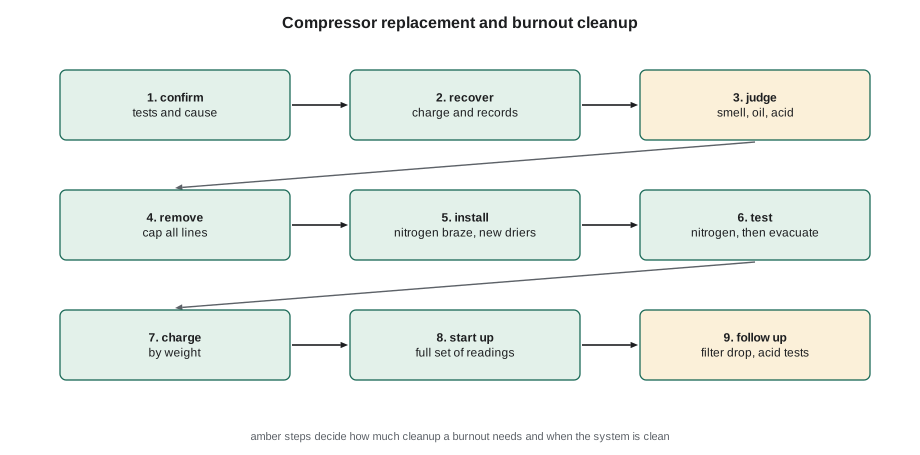
Sludge and carbon can block metering device screens, capillary tubes and TXV ports, and acids attack the new motor's insulation. Small systems with capillary tubes, like many ice machines and reach-ins, often have the capillary tube and drier replaced together after a severe burnout, because cleaning a capillary is unreliable. Parts that cannot be cleaned, such as some accumulators, are replaced.
Flushing a system with an approved flushing agent is used where the contamination is heavy and in parts of the system the suction filter-drier cannot protect, such as the discharge line and condenser on some systems. Flushing agents must be compatible with the refrigerant and oil, used with the right equipment, and completely removed with nitrogen and evacuation, because residual solvent can harm the new compressor. Many manufacturers now prefer the suction filter-drier method for most cleanups and reserve flushing for special cases. Some older practices, such as flushing with refrigerants, are no longer permitted under refrigerant rules.
Removing the old compressor
- Lock out and tag out the electrical supply, verify zero voltage at the compressor terminals, and remove the wiring, noting each connection.
- Recover the refrigerant to the required level for the equipment type, using the methods in RAC-120, and record the amount.
- Open the system only when it is at or slightly above atmospheric pressure. Use a tubing cutter rather than a saw where possible to keep chips out of the piping; if lines are unbrazed, do so with a gentle flame and nitrogen flowing to sweep out vapor, keeping the heat off nearby components and wiring.
- Drain a little oil from the old compressor for the acid test and to judge the burnout, using gloves and eye protection.
- Cap all open lines immediately to keep air and moisture out, especially with POE oil.
- Tag the old compressor with the failure details if it is going back for warranty or to the boneyard, and handle it as the manufacturer and local rules require.
Installing the replacement
A new compressor arrives sealed, often with a holding charge of dry nitrogen and rubber plugs. Leave the plugs in until the compressor is in place and the piping is ready, then remove them, the suction plug first so the holding charge does not blow oil out of the discharge. Check the oil level where there is a sight glass, and add the correct oil if the manufacturer calls for it on a system with a larger charge or long lines.
- Set the compressor on its mounts with the correct grommets or springs, and remove any shipping blocks or tighten mounting bolts as the instructions say.
- Braze the suction and discharge connections with a nitrogen flow, as lesson 12 explains, keeping heat away from terminals and internal components. Compressor connections may be copper-plated steel, which needs a silver-bearing alloy and sometimes flux.
- Install a new liquid line filter-drier sized for the system, and for a burnout, one with a high acid capacity. Install a suction filter-drier with pressure taps ahead of the compressor where the cleanup procedure calls for it.
- Replace metering device screens or the metering device where contaminated.
- Pressure-test with dry nitrogen and leak-check every joint, then evacuate. For a contaminated system, many technicians use triple evacuation: evacuating to a moderate vacuum, breaking it with dry nitrogen, and repeating before a final deep evacuation with a vacuum decay test. RAC-220 covers evacuation targets and decay testing in detail.
- Charge by weight to the nameplate or manufacturer's specification, adjusted for any line set or component changes, using new or reclaimed refrigerant of the right type.
- Reconnect the wiring, checking that every connection is tight and correct, the terminal cover is in place, and the electrical components are sound. On three-phase scrolls, confirm rotation.
Start-up and follow-up
Start-up after a compressor change is a test, not just a switch-on. With the system running and stable, record voltage and current, suction and discharge pressures, superheat at the compressor, subcooling, discharge line temperature, and air or water temperature splits, and compare them with the manufacturer's data and the pre-failure records. On an ice machine, check the freeze and harvest cycle times and the ice slab. On a burnout, the follow-up visits are as important as the installation.
- Within the first hours, measure the pressure drop across the suction filter-drier. A rising drop means it is catching acid and debris. Change the core or the drier if the drop exceeds the manufacturer's limit, commonly a few psi, and lower for low-temperature systems.
- After a day or two of running, take an oil sample and run an acid test. If acid remains, change the driers again and retest after a further period.
- When tests show the system is clean, remove the suction filter-drier or replace it with a clean suction filter if the instructions allow it to stay, and record the final readings.
- Check the moisture indicator in the sight glass, which should show dry once the system has stabilized.
# What does the suction filter-drier's pressure drop cost? (R-404A ice machine, approximate table)
import math
table = [(-20, 17), (-10, 24), (0, 33), (10, 43), (20, 55), (30, 69)]  # F, psig
P_ATM = 14.7

def sat_temp(psig):
    p_abs = psig + P_ATM
    for (t1, g1), (t2, g2) in zip(table, table[1:]):
        p1, p2 = g1 + P_ATM, g2 + P_ATM
        if p1 <= p_abs <= p2:
            f = (math.log(p_abs) - math.log(p1)) / (math.log(p2) - math.log(p1))
            return t1 + f * (t2 - t1)
    raise ValueError("outside table")

p_evap = 33.0           # psig at the evaporator outlet late in the freeze cycle
loss_per_f = 0.022      # about 2.2 % compressor capacity per F of lower suction temperature (illustrative)
limit_psi = 2.0         # illustrative maximum drop from a drier maker's instructions
for hours, drop in [(1, 0.7), (6, 1.7), (24, 2.8), (26, 0.6)]:
    t_evap = sat_temp(p_evap)
    t_comp = sat_temp(p_evap - drop)
    df = t_evap - t_comp
    flag = "-> change core" if drop > limit_psi else ""
    print(f"{hours:3d} h: drop {drop:3.1f} psi, suction saturation {t_evap:5.1f} -> {t_comp:5.1f} F "
f"({df:3.1f} F), capacity about -{df * loss_per_f:4.0%} {flag}")1 h: drop 0.7 psi, suction saturation 0.0 -> -0.7 F (0.7 F), capacity about - 2% 6 h: drop 1.7 psi, suction saturation 0.0 -> -1.7 F (1.7 F), capacity about - 4% 24 h: drop 2.8 psi, suction saturation 0.0 -> -2.9 F (2.9 F), capacity about - 6% -> change core 26 h: drop 0.6 psi, suction saturation 0.0 -> -0.6 F (0.6 F), capacity about - 1%
The output shows why the suction filter-drier is watched closely. A clean filter costs little, but as it loads with acid and carbon its pressure drop rises, the compressor sees a lower suction pressure than the evaporator, and capacity and compressor cooling suffer. The core change at 24 hours restores the drop. The limit and capacity figures here are illustrative; the drier and compressor manufacturers' instructions give the real ones.
Replacing coils
Evaporator and condenser coils are replaced when they leak and cannot be repaired, when corrosion has destroyed fins and tubes, or when physical damage is too great. Common causes of coil leaks include formicary corrosion, a pinhole corrosion of copper tubes caused by organic acids from household chemicals and building materials, vibration rubbing tubes against supports, and corrosion of aluminum coils in coastal or chemical environments.
- Replace with the same or an approved coil, matched for capacity, circuiting, refrigerant and, for an indoor coil, the outdoor unit it is paired with. A mismatched coil can change the system's capacity and efficiency ratings and the warranty.
- Recover, lock out and remove the old coil as for a compressor. Transfer or replace the metering device as the new coil requires.
- Braze with nitrogen flowing, install a new liquid line drier, pressure-test, evacuate and charge by weight with any adjustment the manufacturer gives.
- Check airflow, drainage and the condensate trap on indoor coils, and the condenser clearances and fan on outdoor coils, before start-up.
- Record the leak repair, refrigerant added and verification test where the regulations require it, as RAC-120 covered.
The ice machine job
Raj judged the arena ice machine a severe burnout. The R-404A was recovered into a cylinder marked for reclaim. Theo removed the compressor, cut out the drier and the capillary tube, and installed a new compressor, a new capillary tube and drier as a kit from the manufacturer, and a temporary suction filter-drier with taps. He replaced the contactor, whose contacts were pitted from the short. After brazing with nitrogen, a nitrogen pressure test, triple evacuation and a final evacuation that held well below the target, he weighed in the nameplate charge. The machine ran its freeze and harvest cycles normally. The next morning the suction filter's drop was above the limit, so he changed its core. Two days later the acid test was below the threshold, and a week later he removed the suction filter-drier, retested the oil and wrote up the job, including the recovered refrigerant in the arena's records. The cause, Raj concluded from the burnt winding and the machine's history, was a failed condenser fan motor that had let the compressor overheat repeatedly; the fan motor had been replaced with the compressor.
Common mistakes
MistakeReplacing a burnt compressor without a suction filter-drier or acid testing.
InsteadAcids and carbon left in the system will attack the new motor; follow a cleanup procedure and test.
MistakeRemoving the new compressor's plugs long before brazing.
InsteadKeep it sealed until ready, especially with POE oil, and remove the suction plug first.
MistakeReusing refrigerant from a severe burnout in the repaired system.
InsteadRecover it for reclaim and charge with new or reclaimed refrigerant.
MistakeLeaving a heavily loaded suction filter-drier in place.
InsteadMeasure the drop and change cores when it exceeds the limit.
MistakeIgnoring the cause of the failure.
InsteadFind and fix the floodback, overheating or electrical cause, or the replacement will fail.
Summary and key terms
- Confirm the failure and its cause before replacing a compressor or coil.
- Match replacements for refrigerant, voltage, capacity, application range and oil.
- Burnouts range from mild to severe; odor, oil color and acid tests judge severity.
- Recover the charge, keep systems sealed, braze with nitrogen, replace driers and contaminated metering parts.
- Pressure-test, evacuate, charge by weight and start up with a full set of readings.
- After a burnout, watch the suction filter-drier's pressure drop and acid-test until the system is clean.
- Burnout
- A motor failure inside a hermetic compressor that breaks down oil and insulation.
- Mild burnout
- A burnout with contamination largely confined to the compressor.
- Severe burnout
- A burnout with acid and carbon spread through the system.
- Suction filter-drier
- A drier with high acid capacity installed before the compressor during cleanup.
- Holding charge
- Dry nitrogen sealed in a new compressor or component for shipping.
- Triple evacuation
- Evacuating, breaking the vacuum with dry nitrogen and repeating before a final evacuation.
- Flushing agent
- An approved solvent used to remove contamination from piping and coils.
- Formicary corrosion
- Pinhole corrosion of copper tubes caused by organic acids.
- Matched coil
- An indoor coil approved by the manufacturer for use with a particular outdoor unit.
- Charge by weight
- Charging the exact amount of refrigerant specified, weighed on a scale.
Practice problems
Work each problem on paper first, then reveal the answer to check.
Name three signs that a burnout is severe.
Show answer
Strong acrid odor, black oil with sludge, and an acid test well above the threshold.
Why are capillary tubes often replaced after a severe burnout?
Show answer
Sludge and carbon can block them, and they cannot be cleaned reliably.
Which plug should be removed first from a new compressor, and why?
Show answer
The suction plug, so the holding charge does not blow oil out of the discharge.
What two follow-up checks are made after a burnout cleanup?
Show answer
Pressure drop across the suction filter-drier, and acid tests on the oil.
Lesson quiz · 5 questions
Score 60% or more to complete this lesson.
Create a free account to save your progress, take quizzes and earn a certificate.