
PHOT-240 · Lesson 8 of 12 · 25 min
The darkroom, the enlarger and contact sheets
The darkroom is where negatives become photographs. It is a workshop with its own logic: a dry side where negatives are handled and paper exposed, a wet side where prints are processed in trays, safelights that let the printer see without fogging the paper, and the enlarger at the center, projecting the negative onto light-sensitive paper. Understanding the darkroom's layout, the enlarger and its components, and the first printing task, the contact sheet, prepares you to make fine prints. This lesson covers the darkroom space, light-tightness and ventilation, safelights and testing them, enlarger types and light sources, enlarging lenses, the easel, timer and grain focuser, aligning and cleaning, contact sheets, and darkroom etiquette in shared spaces.
The darkroom space
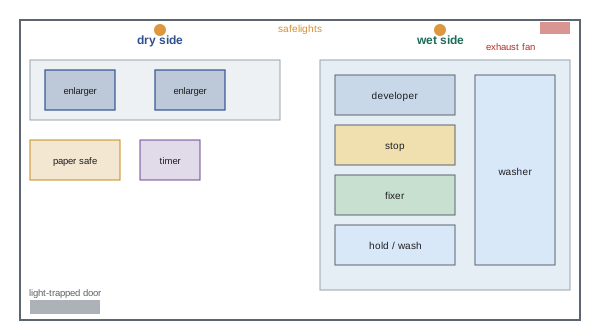
A darkroom needs to be light-tight, well ventilated, supplied with water and electricity, and organized to separate dry and wet work. The dry side holds the enlarger, paper storage, negatives and the printing timer, kept free of chemical splashes; the wet side holds a sink with processing trays arranged in sequence: developer, stop bath, fixer and a holding tray or wash. Moving consistently from dry to wet, and drying hands before touching negatives or paper, prevents contamination that causes stains and spots. Many home darkrooms are temporary, set up in bathrooms or laundry rooms, with blackout materials over windows and doors; permanent darkrooms in schools and community spaces have dedicated sinks and ventilation. Community darkrooms in many Canadian and US cities offer memberships with access to enlargers and chemistry, a good option for those without space at home.
Light-tightness and ventilation
To test light-tightness, close the door, turn off all lights including safelights, and wait about five minutes for your eyes to adapt to the darkness; any light visible around doors, windows, vents or fixtures must be sealed with tape, blackout cloth or weatherstripping. Small leaks that seem harmless can fog paper over the minutes it lies on the easel and in trays. Ventilation is equally important: darkroom chemicals release vapors, particularly acetic acid stop bath and some fixers, and long sessions in a closed room can cause headaches, irritation and sensitization. A darkroom should have an exhaust fan drawing air away from the sink area, ideally at the level of the trays, and a light-trapped intake for fresh air. Lesson 12 discusses ventilation and safety in more detail.
Safelights
Black-and-white printing papers are sensitive to blue and green light but not to red and amber, so they can be handled under safelights of the right color, usually amber (such as Ilford 902 or Kodak OC) or red filters, at a safe distance and brightness. Film, which is panchromatic, must never be exposed to safelights. Even a correct safelight fogs paper if it is too bright, too close or used for too long, and the fog appears first in highlights as a slight gray veil that reduces brilliance. LED safelights designed for darkroom use are common; generic colored LEDs may emit wavelengths that fog paper.
A safelight test reveals whether your safelights are safe for your paper. Expose a sheet of paper under the enlarger to produce a light gray tone, which makes the paper more sensitive to further exposure. Then, under the safelights, place coins on the paper and cover progressive sections with card at intervals, such as 1, 2, 4, 8 and 16 minutes, before processing normally. If the outline of the coins becomes visible in sections exposed for less than your normal handling time, the safelight is fogging the paper and should be moved farther away, dimmed, replaced or used for less time.
Worked problem
Interpreting a safelight test
A safelight test shows no visible coin outlines at 1, 2 and 4 minutes, a faint outline at 8 minutes, and a clear outline at 16 minutes. Prints usually spend about 3 minutes on the easel and in the developer. Is the safelight safe?
Show solution
- Fogging first appears between 4 and 8 minutes of safelight exposure.
- Normal handling of about 3 minutes falls within the safe period.
- For long sessions with dodging and burning, test strips and split-grade printing, which keep paper out longer, consider dimming or moving the safelight to extend the margin.
Answer: Safe for normal handling of about 3 minutes, with limited margin; dim or move the safelight for longer manipulations.
Enlargers
An enlarger is a vertical projector. A lamp illuminates the negative held flat in a negative carrier; a lens focuses the image onto a baseboard where an easel holds the paper; the head moves up and down a column to set the print size, and a focusing control adjusts the lens-to-negative distance. Enlargers are designed for particular maximum formats, such as 35 mm, 6 × 7 medium format or 4 × 5 large format; larger enlargers can print smaller formats with appropriate carriers and lenses.
Enlargers differ in their light source:
- Condenser enlargers use lenses to focus light through the negative, producing crisp, contrasty prints that emphasize grain, dust and scratches.
- Diffusion enlargers scatter light through a mixing chamber, producing softer contrast and suppressing dust and scratches; color heads and many variable-contrast heads use diffusion.
- Color heads include adjustable cyan, magenta and yellow filters, usable for color printing and, with magenta and yellow, for variable-contrast black-and-white printing.
- Variable-contrast heads, such as Ilford Multigrade heads, provide dialled-in contrast grades; LED heads offer stable light, cool operation and precise control.
The same negative prints with higher contrast in a condenser enlarger than in a diffusion enlarger, roughly by one paper grade, which is why film development targets differ slightly (Lesson 2).
Enlarging lenses
Enlarging lenses are optimized for flat-field projection at close distances, and quality matters as much as in camera lenses. Typical focal lengths match the format diagonal: 50 mm for 35 mm, 80 mm for 6 × 6 and 645, 90 to 105 mm for 6 × 7 and 6 × 9, and 135 to 150 mm for 4 × 5. A longer lens than standard gives smaller maximum print sizes for a given column height but even illumination; a shorter lens may vignette the corners. Enlarging lenses perform best stopped down two or three stops from maximum, typically around f/8 to f/11, balancing sharpness and exposure time; stopping down too far causes diffraction softening and very long exposures. Premium lenses from Schneider, Rodenstock, Nikon and El-Nikkor ranges are widely available used.
Easel, timer and grain focuser
An enlarging easel holds the paper flat and in position, with adjustable blades that create white borders. A timer controls exposure precisely; digital enlarging timers allow repeatable exposures in tenths of a second, test strip modes in time increments or f-stop increments, and memory for dodging and burning sequences. A grain focuser, or focus finder, magnifies a small part of the projected image so that the printer can focus on the film grain itself, ensuring maximum sharpness, an essential tool since focusing by eye on the projected image alone is rarely precise. A footswitch frees both hands for dodging.
Aligning and cleaning
For sharp prints across the frame, the negative carrier, lens and baseboard must be parallel; misalignment causes one side of the print to be sharp and the other soft. Alignment tools, such as laser or mirror alignment devices, help adjust enlargers. Cleanliness is essential: dust on the negative, the carrier glass or the condensers prints as white specks. Clean negatives with a soft brush, an anti-static cloth or a blower before printing, keep the darkroom free of dust, and use glassless carriers when possible to avoid additional surfaces, though glass carriers keep larger negatives flat. Hold negatives by their edges, emulsion side down toward the paper.
Contact sheets
A contact sheet is a print of a whole roll of negatives placed directly on a sheet of paper, usually 8 × 10 inches, under a sheet of glass or in a contact printing frame, and exposed under the enlarger. It shows every frame at the size of the negative, allowing the photographer to see the roll as positive images, evaluate exposure and composition, and select frames for printing. To make a good contact sheet, raise the enlarger head so that its light covers the whole sheet evenly, set the lens to about f/8, and make a test strip to find the minimum exposure that renders the clear film base, visible between frames, as maximum black on the paper, known as proper proof or the minimum time for maximum black. At this exposure, well-exposed negatives produce good proof prints, thin negatives appear dark and dense negatives appear light, giving an honest view of exposure. Mark selected frames with a grease pencil, and file the contact sheet with the negatives.
| Contact sheet appearance | Negative condition |
|---|---|
| Dark, murky frames at standard proof time | Thin, underexposed or underdeveloped negatives |
| Pale, washed-out frames at standard proof time | Dense, overexposed or overdeveloped negatives |
| Good tonal range at standard proof time | Well-exposed and developed negatives |
| Gray film rebate between frames | Proof time too short |
Darkroom etiquette
In shared darkrooms, good habits protect everyone's work. Never open a door or turn on white light without warning; many darkrooms use signs or interlocks. Keep trays in the agreed order and never return a print from the fixer to the developer. Use tongs or separate gloved hands for each tray to avoid contamination. Clean up spills immediately, rinse trays after sessions, label chemistry with dates, and log when chemistry is mixed or exhausted. Turn off enlarger lamps and safelights when leaving, and leave dust covers on enlargers. Respect booking schedules and others' negatives and paper.
Building a home darkroom
A home darkroom can be set up in a bathroom, laundry room, basement or spare room. Essentials include complete darkness, which can be achieved with blackout fabric, magnetic window covers and door seals; a sturdy surface for the enlarger that does not vibrate; access to water, though prints can be collected in a holding tray of water and washed later elsewhere; an electrical supply safe for wet environments, with ground-fault protection near water; and ventilation. Arrange trays on a waterproof surface, such as a large plastic tray or sink cover, and keep the enlarger well away from splashes. Many photographers develop film at home and print at a community darkroom, or set up a temporary home darkroom for printing sessions.
Electrical safety near water
Darkrooms combine water and electricity, so electrical safety matters. Use outlets protected by ground-fault circuit interrupters (GFCIs), which cut power quickly if current leaks to ground, as required near sinks by electrical codes in both Canada and the United States. Keep cords and power bars off wet floors and away from trays, dry hands before touching enlarger switches and timers, and never use extension cords in standing water. Enlarger lamps run hot; keep them clear of paper and fabric, and turn them off when not in use.
Negative carriers and cropping
Negative carriers hold the film flat and mask its edges. Glassless carriers sandwich the film between two metal plates with an opening the size of the frame, while glass carriers press the film flat between sheets of glass, keeping large negatives flat but adding surfaces that attract dust and can produce Newton's rings, irregular rainbow-like patterns where glass touches film. Anti-Newton glass, with a slightly textured surface, prevents them. Adjustable masking carriers allow cropping in the carrier, which reduces flare from light spilling around the image and improves contrast. Always check that the carrier is clean before inserting a negative, and keep spare carriers for each format you print.
Common mistakes
MistakeAssuming a red light is always safe.
InsteadRun a safelight test with your paper.
MistakeMixing dry and wet work.
InsteadDry hands and keep chemicals off the dry side.
MistakeFocusing by eye without a grain focuser.
InsteadFocus on the grain with a focus finder.
MistakePrinting dusty negatives.
InsteadClean negatives and carriers before printing.
MistakeMaking contact sheets at arbitrary times.
InsteadUse the minimum time for maximum black.
Summary and key terms
- Darkrooms separate dry and wet work, with trays in sequence.
- Test light-tightness and provide good ventilation.
- Safelights must be the correct color, distance and brightness; test them.
- Condenser enlargers give more contrast than diffusion enlargers.
- Enlarging lenses match the format and perform best around f/8 to f/11.
- Easels, timers and grain focusers make prints precise and repeatable.
- Contact sheets at the minimum time for maximum black give honest proofs.
- Dry side
- Area for negatives, enlarger and unexposed paper.
- Wet side
- Area for processing trays and washing.
- Safelight
- Light of a color to which paper is insensitive.
- Safelight test
- Test for fogging under safelight conditions.
- Enlarger
- Projector that prints negatives onto paper.
- Condenser enlarger
- Enlarger focusing light through condensers.
- Diffusion enlarger
- Enlarger with scattered, even light.
- Grain focuser
- Magnifier for focusing the projected grain.
- Contact sheet
- Print of a roll of negatives at actual size.
- Minimum time for maximum black
- Shortest exposure making clear film base print black.
Practice problems
Work each problem on paper first, then reveal the answer to check.
What order are trays arranged in?
Show answer
Developer, stop, fixer, wash.
How do you test a darkroom for light leaks?
Show answer
Wait about five minutes in darkness and look for light.
Why must film never see a safelight?
Show answer
It is panchromatic.
Why pre-expose paper in a safelight test?
Show answer
It increases sensitivity to fog.
Which enlarger gives more contrast?
Show answer
A condenser enlarger.
Standard enlarging lens for 35 mm?
Show answer
50 mm.
Best aperture range for enlarging lenses?
Show answer
About f/8 to f/11.
What does a grain focuser do?
Show answer
Magnifies the projected grain for precise focus.
What exposure is used for contact sheets?
Show answer
Minimum time for maximum black.
Name two etiquette rules.
Show answer
No white light without warning, keep tray order, clean up, label chemistry.
Lesson quiz · 5 questions
Score 60% or more to complete this lesson.
Create a free account to save your progress, take quizzes and earn a certificate.