
PHOT-101 · Lesson 10 of 12 · 28 min
Files, raw processing and workflow
Pressing the shutter is the middle of the photographic process, not the end. The data the sensor records must be turned into an image, adjusted, selected, named, stored safely and delivered in the right form for a screen or a print. Decisions here, starting with whether the camera saves JPEG or raw files, determine how much you can correct and improve later, and whether your pictures will still exist in ten years. This lesson explains image files and bit depth, the difference between JPEG and raw, the steps of raw processing in a sensible order, non-destructive editing and catalogs, culling and rating, metadata and keywords, backup, and exporting for screens and print. PHOT-202 develops editing and retouching in depth; this lesson builds a sound workflow.
Pixels and bit depth
A digital image is a grid of pixels, each storing numbers for red, green and blue. The number of bits per channel, the bit depth, sets how many distinct levels each channel can hold:
- 8 bits: 2⁸ = 256 levels per channel, about 16.7 million colors in total. JPEG files are 8-bit.
- 12 bits: 4,096 levels; 14 bits: 16,384 levels. Most camera sensors record raw data at 12 or 14 bits.
- 16 bits: 65,536 levels, used by editing software and TIFF files to avoid rounding errors during heavy adjustments.
More levels do not make an image look different straight out of the camera. They matter when you edit: brightening shadows or stretching contrast spreads the existing levels apart, and with too few levels, smooth gradients such as skies break into visible bands (posterization).
Worked problem
Where the levels are
A raw file records light linearly in 14 bits (16,384 levels). How many levels describe the brightest stop of the image, and how many the sixth stop down?
Show solution
- Linear data: the brightest stop covers the top half of the values, 8,192 to 16,383: 8,192 levels.
- Each stop down has half as many: 4,096, 2,048, 1,024, 512, 256.
- The sixth stop down therefore has 256 levels.
Answer: About 8,192 levels in the brightest stop and only 256 in the sixth stop down, with fewer still in deeper shadows. This is why underexposed images, whose content sits in the lower stops, posterize and show noise when brightened, and why exposing to the right (Lesson 6) gives smoother shadows. JPEG files avoid wasting levels on the highlights by applying gamma encoding, which spreads the 256 levels more evenly across the perceived brightness range.
JPEG and raw
A camera can save each picture as a JPEG, a raw file, or both:
- A JPEG is a finished image: the camera has demosaiced the sensor data (Lesson 1), applied white balance, picture style, contrast, sharpening, noise reduction and lens corrections, converted it to 8 bits and a color space (usually sRGB), and compressed it. JPEGs are small, universally readable and ready to share, but most of the original data has been discarded, so large corrections afterward degrade quality.
- A raw file stores the sensor's data almost as recorded, with the camera's settings attached as notes. Nothing is baked in: white balance, exposure, color and noise reduction are decided later, losslessly, with the full bit depth and dynamic range. Raw files are larger, need processing software, and each manufacturer uses its own format (such as .CR3, .NEF, .ARW, .RAF), though the open DNG format is widely supported.
HEIF/HEIC, used by many phones and some cameras, is a modern alternative to JPEG with better compression and 10-bit support.
| JPEG | Raw | |
|---|---|---|
| Bit depth | 8 bits per channel | 12–14 bits per channel |
| White balance, picture style | Applied in camera | Adjustable later |
| Highlight and shadow recovery | Limited | Typically 1–3 stops more |
| File size (24 MP) | About 8–12 MB | About 25–50 MB |
| Ready to share | Yes | No; needs processing |
For learning and for any important work, shoot raw (or raw plus JPEG): it forgives exposure and white balance errors and gives the most quality. JPEG suits situations that need immediate delivery and high volume, such as news and some events, where the camera's processing is set up carefully in advance.
Raw processing in order
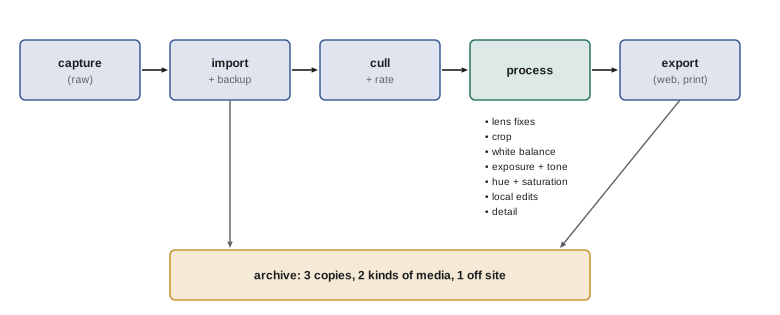
Raw processing software (such as Lightroom, Capture One, darktable, RawTherapee or the manufacturers' own programs) presents adjustments in roughly the order in which it makes sense to apply them:
- Lens corrections: apply the lens profile to correct distortion, vignetting and chromatic aberration (Lesson 2).
- Crop and straighten: level horizons and verticals, and refine the composition. Keep enough pixels for the intended use.
- White balance: set temperature and tint, by eye or with the eyedropper on a neutral area (Lesson 8).
- Exposure: set the overall brightness, checking the histogram.
- Tone: adjust highlights and shadows to recover detail at the ends, set white and black points, and shape contrast with a tone curve.
- Presence and color: clarity and texture for midtone contrast, vibrance and saturation, and adjustments to individual hues.
- Local adjustments: brighten, darken, warm or cool specific areas with brushes, gradients and AI-generated masks of the sky, subject or background, the digital equivalent of the darkroom's dodging and burning.
- Detail: noise reduction and sharpening, judged at 100 % magnification (Lesson 5).
Work from the general to the specific, make big decisions before small ones, and step away before final judgments: tired eyes over-saturate and over-sharpen. Compare with the original from time to time to make sure the edit has improved the picture rather than just changed it.
Non-destructive editing and catalogs
Modern raw processors are non-destructive: they never change the original file. Instead they store a list of instructions, the edits, in a database (catalog) or in a small sidecar file next to the image (such as an .xmp file), and apply them when displaying or exporting. You can return to any image years later and change or undo every adjustment, create several versions of the same picture, and copy settings from one image to many. A catalog also lets you search a whole collection by date, rating, keywords, camera settings or location in seconds.
Destructive editing, changing the pixels of a file directly, as in pixel-level retouching and compositing (PHOT-202), should always be done on a copy, ideally in layers, never on the original.
Culling, rating and metadata
Most shoots produce many more frames than will ever be used. Culling, choosing the best and rejecting the rest, is a skill. Do a first fast pass, flagging obvious rejects (blurred, closed eyes, missed moments) and possible keepers, then compare similar frames side by side and keep the strongest. Use star ratings and color labels consistently, for example: 1 star = possible, 3 stars = good, 5 stars = portfolio. Deleting rejects keeps the collection manageable, but some photographers keep everything because a rejected frame sometimes becomes useful later.
Every image carries metadata: EXIF data recorded by the camera (date, time, camera, lens, settings, and often GPS location) and IPTC data that you add (title, caption, keywords, creator, copyright notice and contact details). Adding your name and copyright notice on import, keywords for subjects and places, and captions for important images makes pictures findable and protects their attribution when shared. Be aware that GPS location in shared images can reveal where you live or where vulnerable people or species are; remove it when sharing such pictures.
File naming and folders
A consistent system saves endless searching. A common approach is folders by year and date or event (2026/2026-10-18_Harvest-Festival) and file names that include the date and a sequence number (20261018_0142.CR3), which stay unique and sort in order. Rename on import, not later. Decide on a system, write it down and apply it to every shoot.
Backup
Memory cards fail, hard drives fail, laptops are stolen and houses burn. The standard rule is 3-2-1: keep at least three copies of every important file, on at least two different kinds of storage, with at least one copy off site (another building or a cloud service). Cameras with two card slots can record to both cards at once for an immediate second copy, a common practice at weddings and other unrepeatable events. Back up before formatting cards (Lesson 1), test that backups can actually be restored, and replace drives before they get old.
Worked problem
Planning storage
A student photographs about 600 raw frames a week, each about 30 MB, for a 14-week term, and keeps about a third after culling. How much storage is needed for the term, and for 3-2-1 backup?
Show solution
- Shot: 600 × 30 MB × 14 = 252,000 MB ≈ 252 GB.
- Kept after culling: about 84 GB, plus some for edited exports, say 100 GB.
- Three copies (working drive, external backup drive, cloud): about 300 GB in total across the three, if rejects are deleted after culling.
Answer: About 250 GB for the raw take, about 100 GB to keep, and roughly 300 GB of total backup capacity across three locations. Storage is cheap compared with lost work, so most photographers size drives with ample room to grow.
Exporting for screens and print
Export settings depend on where the picture will go:
- For the web and social media: sRGB color space (Lesson 8), JPEG at good quality, and a size suited to the platform, often 2,000 to 4,000 pixels on the long edge. Apply output sharpening for screens. Remove sensitive metadata if needed.
- For print: the needed pixel count depends on print size and resolution. A typical standard for quality prints viewed close up is 300 pixels per inch (about 118 pixels per centimeter), though large prints viewed from a distance look excellent at 150 to 200 ppi. Export as high-quality JPEG or TIFF in the color space and profile the printer requires (PHOT-301).
Worked problem
How large can I print?
A 24-megapixel image is 6,000 × 4,000 pixels. How large can it be printed at 300 ppi and at 150 ppi?
Show solution
- At 300 ppi: 6,000/300 = 20 in by 4,000/300 = 13.3 in, about 51 × 34 cm.
- At 150 ppi: 40 × 26.7 in, about 102 × 68 cm.
Answer: About 51 × 34 cm at 300 ppi, suitable for close viewing, and about 1 m wide at 150 ppi for a poster viewed from a few meters. A heavy crop that keeps only a quarter of the pixels halves these dimensions. Upscaling software, including machine-learning tools, can enlarge further with good results, but cannot invent real detail.
Editing honestly
VIS-101 discussed the ethics of editing. In practice, the standard depends on context: news and documentary photography allows only adjustments that do not change the content (exposure, color, contrast, modest cropping), whereas commercial and artistic work may use any technique, ideally disclosed when it changes what the picture appears to show. Keep originals, so you can always show what the camera recorded, and be honest about composites and generated elements.
Common mistakes
MistakeShooting only JPEG for important work.
InsteadShoot raw (or raw plus JPEG) for maximum quality and flexibility.
MistakeEditing originals destructively.
InsteadUse non-destructive editors and work on copies for pixel edits.
MistakeKeeping files in one place.
InsteadFollow 3-2-1 backup and test restores.
MistakeUploading wide-gamut or huge files to the web.
InsteadExport sRGB at a suitable size.
MistakeSharing images with GPS data from sensitive places.
InsteadStrip location metadata when it could cause harm.
Summary and key terms
- Bit depth sets levels per channel: 8-bit JPEG has 256; 12–14-bit raw has 4,096–16,384.
- Linear raw data puts half its levels in the brightest stop; shadows have few, so they posterize when pushed.
- JPEGs are finished, compressed images; raw files keep sensor data for lossless decisions later.
- Process raw from general to specific: lens corrections, crop, white balance, exposure, tone, color, local adjustments, detail.
- Non-destructive editing stores instructions, not pixel changes.
- Cull and rate consistently; add copyright, captions and keywords; manage location metadata.
- Back up 3-2-1; export sRGB for screens and enough pixels for print.
- Bit depth
- The number of bits used per color channel per pixel.
- Posterization
- Visible banding where too few levels describe a smooth gradient.
- JPEG
- A compressed 8-bit image format processed in the camera.
- Raw file
- A file storing sensor data with minimal processing.
- Gamma encoding
- A non-linear mapping that spreads levels across perceived brightness.
- Non-destructive editing
- Editing by stored instructions without altering the original.
- Catalog
- A database of images, edits and metadata.
- EXIF
- Camera-recorded metadata such as date, settings and location.
- IPTC
- User-added metadata such as captions, keywords and copyright.
- 3-2-1 backup
- Three copies, two kinds of media, one off site.
Practice problems
Work each problem on paper first, then reveal the answer to check.
How many levels per channel does a 12-bit file have?
Show answer
4,096.
Why do brightened shadows posterize more than highlights in linear raw data?
Show answer
Each lower stop holds half as many levels.
Name three things a camera applies when making a JPEG.
Show answer
For example: demosaicing, white balance, picture style, sharpening, noise reduction, compression.
Why shoot raw for a learning assignment?
Show answer
It allows lossless correction of white balance and exposure and shows what the sensor captured.
Put these steps in a sensible order: noise reduction, white balance, crop, local adjustments.
Show answer
Crop, white balance, local adjustments, noise reduction.
What does a sidecar .xmp file contain?
Show answer
Edit instructions and metadata for a raw file.
Give a file name that sorts by date for frame 37 shot on 4 March 2026.
Show answer
For example 20260304_0037.ARW.
Describe a 3-2-1 backup using a laptop.
Show answer
Laptop drive, an external drive, and a cloud copy.
What pixel dimensions does a 25 × 20 cm print need at 300 ppi?
Show answer
About 2,950 × 2,360 pixels (9.8 × 7.9 in).
Which color space and format suit a portfolio website?
Show answer
sRGB JPEG.
Lesson quiz · 5 questions
Score 60% or more to complete this lesson.
Create a free account to save your progress, take quizzes and earn a certificate.