
HSE-380 · Lesson 3 of 12 · 18 min
Knives and cut prevention
▶ Video coming soon A video version of this lesson is on the way.
Cuts are the most common injury in restaurant kitchens. Most are small, and a bandage and a glove send the cook back to the board. But a knife can also sever a tendon or a nerve in a fraction of a second, and a hand injury can end a cooking career. At Juniper Street, cuts made up 19 of the 41 first-aid entries in Aisha's review, and Luis's stitches were one of the year's four serious injuries. This lesson covers how kitchen cuts happen and the habits, tools and gloves that prevent them. Powered slicers and other machines are covered in Lesson 4.
How kitchen cuts happen
When Aisha sorted the 19 cut entries by cause, a pattern appeared that matches what kitchens everywhere report.
- The guiding hand. Most knife cuts are to the hand holding the food, not the hand holding the knife, usually the tip of the index or middle finger or the side of the thumb.
- Dull knives. A dull blade needs more force, slips sideways off the skin of an onion or a tomato, and goes wherever the force sends it.
- Unstable boards. A cutting board that slides on a steel table moves at the worst moment.
- Round and awkward food. Onions, potatoes, citrus, bagels and squash roll unless they are first given a flat side.
- Knives in the wrong place. Knives left in a sink full of soapy water, under a towel, on the edge of a table, or carried point forward through a crowd.
- Mandolines and graters. Fingertip injuries from the last few centimeters of a vegetable pushed by hand.
- Hidden sharps. Broken glass in dish water, can lids, the serrated edge of a plastic wrap box, oyster shells and box cutters on delivery days.
- Rushing and fatigue. Cuts cluster at the end of a long prep list and during the rush.
Luis's injury had three of these causes at once: a knife that was due for sharpening, a board that slid on the table, and a rushed Saturday prep list after a delivery arrived late. The fixes were just as specific.
A sharp knife is a safe knife
Every cook has heard this saying, and it is true. A sharp knife cuts with little force, goes where it is aimed and stays on the food. A dull knife must be pushed and rocked, and when it slips it slips with force behind it. Juniper keeps knives sharp with two steps.
- Honing straightens the edge, which rolls over in use. A cook hones a knife on a steel or ceramic rod at the start of a shift and whenever it starts to drag. Honing is quick and safe if done slowly with the rod pointed down onto a towel on the table rather than held in the air.
- Sharpening grinds a new edge. At Juniper only Luis and Tomás sharpen, on whetstones, every two weeks for the house knives. Pull-through sharpeners and electric sharpeners are allowed only for serrated bread knives, following the maker's instructions. OSHA's restaurant eTool also recommends that only trained workers sharpen knives.
A knife is due for honing when it slides off a tomato skin instead of biting into it, and due for sharpening when honing no longer fixes that. Cooks who bring their own knives must keep them to the same standard and store them in a closed roll or case, not loose in a bag.
The right knife for the job
Using one knife for everything means sometimes using the wrong one. A chef's knife for dicing, a paring knife for small work in the hand, a serrated knife for bread and tomatoes, a boning knife for meat and a cleaver for bones each reduce force and awkward angles. The worst substitutes are a knife used as a can opener, a pry bar or a screwdriver, and a paring knife pulled back in the hand in the direction of the thumb, which is the classic cause of thumb lacerations. If a task needs a knife that the kitchen does not have, the fix is to buy it, not to make do.
Cutting technique
- Stabilize the board. Put a damp towel or a non-slip mat under every cutting board. Juniper went from one shared roll of shelf liner to a stack of rubber board mats at every station after Luis's injury.
- Make round things flat. Cut a thin slice off an onion, potato or squash to give it a flat side, and put the flat side down before cutting further.
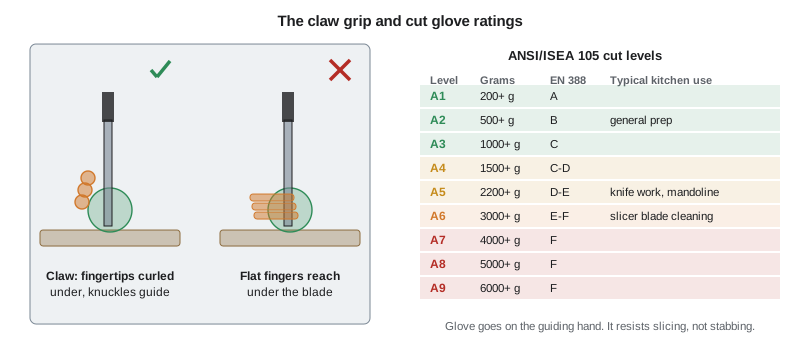
- Use the claw. Curl the fingertips of the guiding hand under, with the thumb tucked behind them, so the knuckles guide the side of the blade and the fingertips are out of its path.
- Use the bridge for halving. For round items like tomatoes or rolls, make a bridge over the food with the thumb and fingers on either side and cut through the gap, keeping the blade away from both.
- Cut away from yourself. When peeling or trimming in the hand, push the blade away from the body and the holding hand, or better, do it on the board.
- Keep your eyes on the knife. Stop cutting to talk, look up or turn around. OSHA's eTool lists not talking while cutting as a basic control.
- Never try to catch a falling knife. Step back and let it fall.
Carrying, passing, storing and washing knives
Many kitchen cuts happen when nobody is cutting at all. Juniper's knife rules are short and the same for everyone.
- Carry a knife point down, blade facing back, held close to the side of your leg, and call out sharp or knife behind when passing people.
- Never hand a knife to someone. Put it down on the board, and let the other person pick it up by the handle.
- Put knives down flat, away from the edge of the table, with the blade facing away from you. Never leave one under a towel, a pile of trimmings or a sheet of plastic wrap.
- Store knives on a magnetic strip, in a knife block or in blade guards, not loose in a drawer.
- Never put a knife in a sink of water. The dish pit has a separate knife tray beside the sink, and knives are washed, rinsed, sanitized and dried right away, one at a time, wiping from the spine to the edge.
The last rule protects the dishwasher, who is the person most likely to be cut by a knife someone else left behind. Ethan, at 15, does not wash knives at Juniper at all; the cook who used the knife washes it at the knife tray.
Cut-resistant gloves
A cut-resistant glove made of high-performance fibers or steel mesh can prevent or reduce many cuts to the guiding hand. It is worn on the hand that holds the food, not the knife hand, and it is not stab-proof: a pointed blade can still go through the knit. Gloves are personal protective equipment, the last line in the hierarchy of controls, so they back up sharp knives and good technique rather than replacing them. HSE-104 covers how to select and care for protective equipment in general.
Cut gloves are rated by standard tests. The US standard, ANSI/ISEA 105, uses a machine test that measures how many grams of force a blade needs to cut through the material in a set distance, and sorts gloves into nine levels from A1 to A9. The European standard, EN 388, uses a similar test in its 2016 edition and reports a letter from A to F, and many gloves carry both ratings. As a rough guide, A2 or A3 is enough for general prep, A4 to A6 suits knife work, mandolines and oyster shucking, and A6 or higher is used for cleaning slicer blades. OSHA's hand protection standard, 29 CFR 1910.138, requires employers to select gloves based on the hazards of the task.
For food safety, a cut glove used on ready-to-eat food must be covered with a single-use food handling glove, or be a glove designed for food contact and washed and sanitized like any other utensil. Juniper's prep cooks wear an A5 knit glove on the guiding hand with a nitrile glove over it, changed between tasks. HSE-381 covers glove use for food safety.
Choosing a glove is a matching exercise: the task sets the minimum level, and the glove must also fit and allow enough grip to be worn all shift. The program below matches Juniper's tasks to the lowest glove level that meets the house standard and shows the gloves the restaurant should stock.
# Match kitchen tasks to minimum cut glove levels (ANSI/ISEA 105 A1-A9).
house_minimum = {
    "general prep": 3,
    "knife work": 5,
    "mandoline": 5,
    "oyster shucking": 5,
    "slicer blade cleaning": 6,
    "box cutter on deliveries": 4,
}
stock = {"A3 knit": 3, "A5 knit": 5, "A6 knit with grip": 6, "A9 steel mesh": 9}

for task, need in house_minimum.items():
    # pick the lowest-rated glove that still meets the minimum
    choice = min((lvl, name) for name, lvl in stock.items() if lvl >= need)
    print(f"{task:26s} needs A{need} or higher -> {choice[1]}")
used = {min((l, n) for n, l in stock.items() if l >= need)[1] for need in house_minimum.values()}
print("Gloves to keep in stock:", ", ".join(sorted(used)))general prep needs A3 or higher -> A3 knit knife work needs A5 or higher -> A5 knit mandoline needs A5 or higher -> A5 knit oyster shucking needs A5 or higher -> A5 knit slicer blade cleaning needs A6 or higher -> A6 knit with grip box cutter on deliveries needs A4 or higher -> A5 knit Gloves to keep in stock: A3 knit, A5 knit, A6 knit with grip
The result shows that Juniper needs three glove types, not four: the steel mesh glove is not needed for any task on the list, although some kitchens use one for breaking down large fish or opening many oysters. The A6 glove with a grip coating is used for slicer cleaning, which only adults do at Juniper.
Mandolines, graters and peelers
Mandolines are among the worst offenders for deep fingertip injuries because the blade is fixed and the food is pushed across it by hand. The rule at Juniper is simple: the food holder or hand guard that came with the mandoline is always used, a cut glove is always worn, and the last piece of vegetable that is too small for the holder is used for stock rather than pushed across the blade with bare fingers. The same idea applies to box graters. Vegetable peelers are safer when used away from the body on a board.
Other sharps in a restaurant
- Broken glass. Pick up large pieces with a dustpan and broom, and small pieces with a damp paper towel, never with bare hands. Broken glass goes in a marked rigid container, not the garbage bag, so the person taking out the trash is not cut through the bag. Broken glass in a sink of dish water means draining the sink before reaching in. Lesson 10 covers glass in the dish pit and bar.
- Can openers and lids. Use a mounted can opener that leaves a smooth edge where possible, and push loose lids into the can before discarding.
- Box cutters. Use a safety cutter with a self-retracting blade on delivery days, cut away from the body, and never leave an open blade on a shelf. HSE-340 covers box cutters in detail.
- Oysters and shellfish. Hold the oyster in a folded towel on the board, wear a cut glove on the holding hand, and use a proper oyster knife with a guard.
- Plastic wrap and foil boxes. The serrated strip on the box cuts fingers; a wrap dispenser with a covered slide cutter is safer.
First aid for cuts
Every Juniper station has a first-aid kit with blue, metal-detectable bandages that are easy to see if one falls into food. For a small cut, the cook washes the cut, applies pressure until it stops bleeding, covers it with a bandage and puts a glove over it before going back to work. Any food or surface that blood has touched is discarded or cleaned and sanitized. A cut that gapes, keeps bleeding after ten minutes of firm pressure, is deep enough to see fat or deeper tissue, or causes numbness or loss of movement in a finger needs medical care; the injured person should not drive themselves. Severe bleeding is a call for emergency services. HSE-110 covers first aid in detail, and every cut, however small, goes in the first-aid log.
For supervisors: building a cut prevention program
- Set a knife sharpening schedule and keep a simple log by the whetstones.
- Stock board mats, cut gloves in several sizes, knife guards and a knife tray at the dish pit, and check them weekly.
- Teach the claw, the bridge and the carrying rules on every new cook's first shift, and watch them cut before leaving them alone on a prep list.
- Look at the first-aid log by station. Three cuts at the same station in a month means a problem with that station's knives, boards, lighting or workload.
- Plan prep so the biggest knife jobs are not crammed into the last hour before service.
Summary and key terms
- Most kitchen knife cuts are to the guiding hand and are caused by dull knives, unstable boards, round food, poor technique, misplaced knives and rushing.
- Sharp knives, honed each shift and sharpened by trained workers, are safer than dull ones.
- Stabilize the board, give round food a flat side, use the claw and the bridge, cut away from yourself and never catch a falling knife.
- Carry knives point down and call them out, never hand them over, and never leave them in a sink of water.
- Cut-resistant gloves rated by ANSI/ISEA 105 or EN 388 are matched to the task and worn on the guiding hand as a backup to good technique.
- Honing
- Straightening the edge of a knife on a rod without removing much metal.
- Sharpening
- Grinding a new edge onto a knife, usually on a whetstone.
- Claw grip
- Holding food with the fingertips curled under so the knuckles guide the blade.
- Bridge grip
- Holding a round item with the thumb and fingers on either side and cutting through the gap between them.
- Cut level
- A rating of a glove material resistance to cutting, such as A1 to A9 under ANSI/ISEA 105.
Common mistakes
MistakeA dull knife is safer because it cannot cut you as badly.
InsteadA dull knife needs more force and slips more often, so it causes more cuts, and the cuts can be just as deep.
MistakeWear the cut glove on the knife hand.
InsteadThe cut glove goes on the guiding hand, which is the hand most often cut.
MistakeA cut-resistant glove will stop a knife point.
InsteadCut gloves resist slicing, not stabbing; a pointed blade can still go through.
Practice problems
Work each problem on paper first, then reveal the answer to check.
A cook is halving cherry tomatoes and they keep rolling. What should change?
Show answer
Use the bridge grip or cut them between two plastic lids, on a board stabilized with a damp towel or mat.
Where should a cook put a used chef knife during service?
Show answer
Flat on the board with the blade away, or in the knife tray at the dish pit for washing, never in the sink.
A prep cook wants to buy an A2 glove for the mandoline. Is that enough at Juniper?
Show answer
No. Juniper sets A5 as the minimum for mandoline work, along with always using the hand guard.
Lesson quiz · 5 questions
Score 60% or more to complete this lesson.
Create a free account to save your progress, take quizzes and earn a certificate.