
ELV-120 · Lesson 9 of 12 · 18 min
Counterweight frame and fillers; first look at the car sling
Once the rails are aligned and the pit equipment is in, the hoistway has a track but nothing to run on it. The next stage of the installation puts the two moving masses on their rails: the counterweight, built from a frame and a stack of filler weights, and the car, starting with its structural frame, the sling, and the platform the passengers will stand on. This lesson covers how the counterweight is built and filled, how the number of fillers is worked out, the hazards of handling and stacking heavy weights, and a first look at the car sling and platform. Hanging the ropes and the machine that drives them belongs to ELV-230, and the car safeties to ELV-320.
Why there is a counterweight
A traction elevator's counterweight balances the weight of the car and part of the rated load, so that the machine only has to lift the difference. ELV-110 introduced the idea. The counterweight is usually made equal to the weight of the empty car plus a fraction of the rated load called the overbalance, typically 40 to 50 percent. With the car half loaded, the system is nearly in balance; with the car empty, the counterweight is heavier; with the car full, the car is heavier. For the Quayside passenger cars, with a car of 3,300 lb, a rated load of 3,500 lb and an overbalance of 45 percent, the counterweight is about 4,875 lb.
Here W stands for weight, q for the overbalance fraction, and Q for the rated load. The car weight in this formula is the finished car, with its enclosure, doors, fixtures and traveling cable, not just the sling and platform. Because the car is finished long after the counterweight is built, the counterweight is filled in stages, and its final balance is set by test once the car is complete.
The counterweight frame
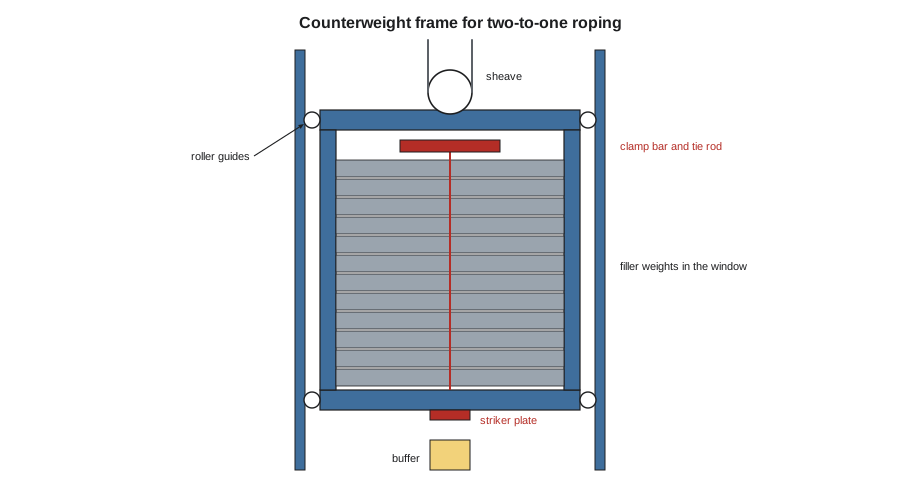
The counterweight frame is a rectangular steel frame that runs between the two counterweight rails. Its parts are a top member and a bottom member, two uprights, and the guide shoes or roller guides at the top and bottom of each upright that run on the rail blades. On a machine-room-less elevator with two-to-one roping like Quayside's, a sheave sits at the top of the frame and the ropes pass under it; on one-to-one roping, the ropes hitch directly to the top member. Under the bottom member is the striker plate that meets the counterweight buffer.
The space inside the frame between the uprights is the filler window, and the filler weights stack in it. Fillers are cast iron or steel plates cut to fit between the uprights, with notches or slots that locate them. Once the stack is in, it is held down by tie rods through the fillers or by a clamp bar across the top, so that no filler can lift or slide out if the counterweight is jolted, for example when it strikes its buffer or the safeties set on a counterweight safety. In seismic regions like Seattle and Seattle, the frame also carries retainer plates or brackets that keep it on its rails if the guides are damaged, and the fillers are restrained as the code requires.
Working out the fillers
The number of fillers comes from the target counterweight weight, less the weight of the frame with its sheave, guides and hardware, divided by the weight of one filler. The frame weight is on the manufacturer's data, and the filler weight is stamped or cast on each filler or given on the packing list. Because the fillers come in whole units, the count is rounded, and many installations use some half-thickness or lighter fillers to fine-tune the balance. The stack must also fit in the filler window, with room for the clamp bar.
# Counterweight fillers for a Quayside passenger car
import math
car, rated, q = 3300, 3500, 0.45      # lb and overbalance fraction
frame = 750                           # frame with sheave, guides and hardware, lb
full, half = 66, 33               # mass of a full and a half filler, lb
full_t, half_t = 1, 0.5               # thickness of each, in
window = 65                            # filler window height left for fillers, in
target = car + q * rated
need = target - frame
n_full = math.floor(need / full)
n_half = 1 if need - n_full * full > half / 2 else 0
total = frame + n_full * full + n_half * half
stack = n_full * full_t + n_half * half_t
print(f"target counterweight: {target:,.0f} lb")
print(f"fillers: {n_full} full + {n_half} half, giving {total:,.0f} lb ({total - target:+.0f} lb)")
print(f"stack height: {stack:,.1f} in in a {window:,} in window -> {'fits' if stack <= window else 'DOES NOT FIT'}")target counterweight: 4,875 lb fillers: 62 full + 1 half, giving 4,875 lb (+0 lb) stack height: 62.5 in in a 65 in window -> fits
The count is a starting point, not the final answer. The car's finished weight is rarely exactly the estimate, and the overbalance is confirmed by a balance test once the car is complete and roped: the car is run with a known load and the machine current or torque is compared in the up and down directions. Fillers are then added or removed to bring the balance to the specified overbalance. Tamsin records the number of fillers of each kind in the frame at every stage, so that the balance test starts from a known count.
Building and filling the counterweight safely
The counterweight frame is usually built at the bottom of the hoistway, between its rails, standing on its buffer with cribbing, or on a timber stand in the pit. The guides are fitted to the rails as the frame is assembled, the uprights are checked plumb, and the frame is fastened together with the bolts torqued as specified. At this stage the frame is not hanging from anything, and it is held up by the cribbing or stand beneath it.
Filling the counterweight is heavy, repetitive work in a pit, and it is where many hand and back injuries in the trade happen. A Quayside full filler weighs 66 lb, and a frame needs about sixty of them. Fillers are lowered into the pit in a filler cradle or on a pallet with the hoist, not carried down the ladder, and placed into the frame by two people or with a small lifting aid. Fingers stay off the top face of the stack as each filler is lowered onto it. Each layer is pushed fully into its locating notches before the next goes on. Gloves with good grip, safety boots and eye protection are worn.
- Fill only to the stage planned. A counterweight with more fillers than the car can balance is a hazard once the ropes go on, because with the brake released it will pull the car up. The installation manual sets how many fillers go in before roping, and Ray follows it.
- Restrain as you go. The tie rods or clamp bar go on before anyone leaves the pit, even partway through filling.
- Never under it. Once the counterweight is hung on its ropes, nobody stands or works under it, and when the elevator is out of service for pit work, it rests on its buffer or on blocking.
- Guard the path. The pit counterweight guard is fitted before the counterweight is in service.
The car sling
The car sling is the structural frame that carries the car. It has a crosshead across the top, two uprights or stiles down the sides, and a plank across the bottom. On a two-to-one roped car like Quayside's, sheaves under the plank or on the crosshead carry the ropes; on one-to-one roping, the ropes hitch to the crosshead. The car safeties are built into the plank or mounted on it, and the guide shoes or roller guides are fixed at the top and bottom of each stile, running on the car rails. Brace rods run from the plank to the platform corners. The car enclosure, its doors and its fixtures are built on top of the platform later.
The sling is assembled at the bottom of the hoistway, standing on cribbing or a stand on the buffers or pit floor, or at the lowest landing on a temporary platform, as the installation manual describes. The rails are the reference. The guides are fitted to the rails first, then the stiles are bolted to the plank and the crosshead, and the sling is squared and plumbed to the rails. A sling that is out of square puts the guides at an angle to the rails, which wears them unevenly and makes the ride rough. The check is the same as for the hoistway in Lesson 3: equal diagonals.
# Is the car 2 sling square? Diagonals measured corner to corner of the sling (in)
d1, d2 = 164.62, 164.75          # crosshead left to plank right, crosshead right to plank left
tol = 0.08                  # allowed difference (illustrative, from the installation manual)
diff = abs(d1 - d2)
print(f"diagonals {d1} and {d2} in: difference {diff:.2f} in -> {'square' if diff <= tol else 'rack the sling and remeasure'}")
stiles = {"left stile": 0.02, "right stile": -0.04}   # out of plumb over the stile height, in
for name, off in stiles.items():
print(f"{name}: {off:+.2f} in out of plumb -> {'ok' if abs(off) <= tol else 'adjust'}")diagonals 164.62 and 164.75 in: difference 0.13 in -> rack the sling and remeasure left stile: +0.02 in out of plumb -> ok right stile: -0.04 in out of plumb -> ok
Here the sling is racked: one diagonal is longer than the other by more than the allowance, although both stiles are close to plumb. Ray loosens the crosshead bolts, eases the sling over with a come-along until the diagonals match, retightens and remeasures. Only once the sling is square are the brace rods tightened, because tightening them first would lock the rack in.
The platform
The car platform is the floor of the car: a steel frame with a floor surface, sitting on the plank and supported at the corners by the brace rods. On many passenger cars it sits on rubber isolation pads that cut the transmission of noise and vibration from the sling into the car, and on some cars a load-weighing device under the platform measures the load in the car. The platform is set level in both directions, with its front edge, the car sill, parallel to the front wall line and at the running clearance from the landing sills that the layout gives. That clearance is checked at the bottom landing with the platform built, and later at every landing as the car runs.
The platform guard, or toe guard, hangs below the car sill. It closes the gap between the car and the hoistway wall when the car is stopped above a landing, so that a person getting out of a car stopped partway cannot fall into the hoistway below the car. It is fitted when the platform is built, and it is checked when the bottom runby and pit clearances are confirmed, because it must not strike anything in the pit when the car is on its compressed buffer.
Who is in the hoistway now
With a counterweight and a car frame in the hoistway, the crew is no longer working in an empty shaft. Two heavy masses sit on their rails, held up by cribbing until the ropes go on. The access log records their positions, and the crew treats them like any other stored energy from ELV-110: they can fall, and they are blocked so that they cannot. The next stage, hanging the machine and the ropes, turns the hoistway into an elevator, and from then on the lockout of the machine is part of every entry.
Counterweight guards and adjacent cars
In Quayside's common hoistway, each counterweight runs close to the next car's path. The layout places a screen between them where the code requires it, and the screens are fixed to the separator beams before either car runs. When the counterweight frame is built, the crew checks its clearance to the screen and to the adjacent car's rails at the pit, at mid-height and at the top, because a counterweight that touches a screen is noisy at best and a hazard at worst.
Common mistakes
MistakeFilling the counterweight completely before roping.
InsteadFill to the stage the installation manual sets; an overfilled counterweight pulls the car up once the brake is released.
MistakeLeaving the clamp bar off until the end of filling.
InsteadRestrain the stack before anyone leaves the pit.
MistakeCarrying fillers down the pit ladder.
InsteadLower them in a cradle or on a pallet with the hoist.
MistakeTightening the brace rods before the sling is square.
InsteadSquare and plumb the sling to the rails first, then tighten the brace rods.
MistakeAssuming the calculated filler count is final.
InsteadConfirm the overbalance by a balance test once the car is finished and roped.
Summary and key terms
- The counterweight equals the car weight plus an overbalance fraction of the rated load, often 40 to 50 percent.
- The counterweight frame runs on its rails and holds a stack of fillers restrained by tie rods or a clamp bar.
- Fillers needed = (target - frame) / filler mass, rounded, and the stack must fit the window.
- Final balance is set by test after the car is complete.
- Fillers are lowered with the hoist, placed carefully and restrained; nobody works under a hung counterweight.
- The car sling and platform are built square, plumb and level to the rails.
- Counterweight frame
- The steel frame that runs on the counterweight rails and holds the fillers.
- Filler weight
- A cast iron or steel plate stacked in the counterweight frame.
- Overbalance
- The fraction of the rated load added to the car weight to set the counterweight.
- Car sling
- The structural frame of the car: crosshead, stiles and plank.
- Platform
- The floor of the car, carried on the plank.
- Platform guard
- The guard below the car sill that closes the gap when the car is above a landing.
Practice problems
Work each problem on paper first, then reveal the answer to check.
A car weighs 2,600 lb, the rated load is 2,500 lb and the overbalance is 40 percent. What is the counterweight?
Show answer
3,600 lb.
With a 740 lb frame and 55 lb fillers, how many full fillers make up 3,600 lb?
Show answer
52 fillers.
Why are the brace rods tightened last?
Show answer
So they do not lock in a rack before the sling is squared.
What does the platform guard do?
Show answer
It closes the gap below the car sill so a person leaving a car stopped above a landing cannot fall into the hoistway.
Lesson quiz · 5 questions
Score 60% or more to complete this lesson.
Create a free account to save your progress, take quizzes and earn a certificate.