
ELV-120 · Lesson 12 of 12 · 19 min
Capstone: the rail installation checklist for Quayside car 2
By the end of the rail stage, the car 2 hoistway at Quayside has a full set of rails from the pit to the 22nd floor, brackets at every row, buffers and pit equipment in the pit, a counterweight frame partly filled on its rails, and a car sling squared at the bottom. Before the crew moves on, and before the work is covered up by the car, the ropes and the entrances, Ray and Tamsin run the installation checklist: a systematic check of everything the rail stage produced, against the layout and the manufacturer's tolerances, with a written record. This capstone walks through that checklist, the problems it found, how they were corrected, and the record that went into the job file.
The checklist brings together every lesson in the course. It is also the first real piece of quality control Tamsin has led, with Ray checking her work. On an elevator job, the people who installed the work check it themselves before anyone else does; the inspector's acceptance at the end is the last check, not the first.
Why a checklist
A checklist does three things that memory cannot. It makes sure nothing is skipped, which matters on a job with hundreds of brackets and more than a thousand anchor holes in the group. It records what was found, so that a problem found and corrected is visible to the next person, and a reading that is good today can be compared with the recheck in two years. And it separates checking from building: the crew stops installing, picks up the checklist, and looks at the work as a critic rather than as its author. Northcrest's checklist for the rail stage is a two-page form, adapted for each job from the manufacturer's installation quality checklist, with a line for each item, the method, the tolerance, the result, and the initials and date of the person who checked it.
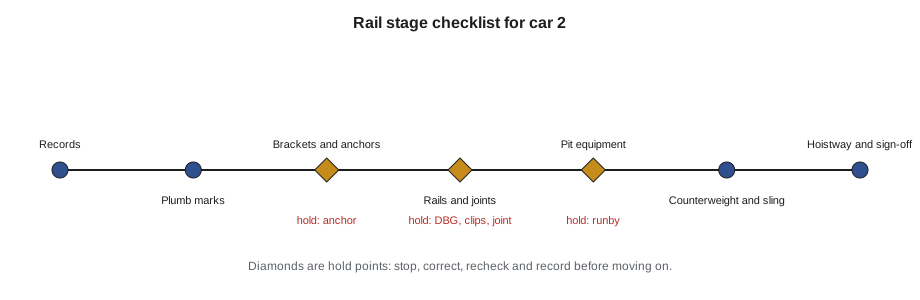
Group 1: records and drawings
The checklist starts at the gang box, not in the hoistway. The first items confirm that the work was built to the right information: the layout on site is the current approved revision, the survey report and its follow-up items are closed, and the plumbing record shows the line positions and the shift applied. For car 2, the survey had found the patch at floor 18, which the general contractor had ground back, and the shift of the line set 7/16 in to the right. Both were in the file with dates and photographs. One item was open: the insert type at floors 3 and 4 had not matched the details sheet, and the engineer's written acceptance of the inserts installed was still to come. Lena chased it that afternoon, and it arrived the next morning.
Group 2: plumb lines and reference marks
The plumb lines for car 2 had been taken down when the rails went in, after their positions were transferred to the brackets. The checklist confirms that the transfer marks are still on every bracket row and that the as-built record of the line set is complete. For the passenger cars, the line set was shared by the four cars, so Tamsin also checked the distance from car 2's rail lines to car 1's and car 3's at the pit, floor 11 and floor 22, using the same marks. All three matched the plan within the tolerance.
Group 3: brackets and anchors
Every bracket row is visited. At each, the crew checks the bracket type against the details, the anchors or insert bolts are all present and torque-marked, the bracket bolts are tight and marked, and the bracket is not cracked, bent or bearing on anything it should not. The anchor proof-test record is checked against the sampling the specification requires. At floor 9, Tamsin found one anchor on the right car rail bracket without a paint mark. She and Ray put the calibrated torque wrench on it: it turned before reaching the specified torque, then held. That anchor was marked, the other anchors on that floor were re-torqued to be sure, and the finding was written up. A single unmarked anchor is not a disaster, but it shows that the torque-and-mark routine slipped for at least one hole, which is why every anchor is checked rather than a sample.
Group 4: rails, joints and clips
The rails are checked at every bracket row and every joint. At each row, the distance between guides is measured with the rail gauge, and the position of each rail relative to its transfer mark is checked. At each joint, the straightedge goes on the blade tip and both faces, and the fishplate bolts are checked tight and marked. The clip type at each bracket is checked against the details: fixed at the bottom, sliding above. The top gap is not yet set for car 2, because the rails stop at floor 22 for now, but the top of the run is checked to be clamped temporarily and protected.
Most of the readings were well inside tolerance, but the checklist found three things. At floor 20, the DBG was 0.05 in wide. At floor 12, the left car rail bracket had fixed clips instead of sliding clips: the wrong box had been opened when that row was clipped. And the joint between floors 16 and 17 on the right rail had a step just over the limit. The code below runs the readings for the problem area against the tolerances, as the checklist sheet does, and lists what needs correcting.
# Car 2 checklist: rails and clips, floors 11 to 22 (illustrative tolerances, in)
DBG_NOM, DBG_TOL, STEP_MAX = 90.5, 0.04, 0.002
dbg = {11: 90.512, 12: 90.484, 14: 90.516, 16: 90.508, 18: 90.496, 20: 90.551, 22: 90.520}
steps = {"L 13-14": 0.001, "R 16-17": 0.0025, "L 18-19": 0.001, "R 20-21": 0.0015}
clips = {11: "sliding", 12: "fixed", 13: "sliding", 14: "sliding"}   # left rail, from the walk-down
actions = []
for f, d in dbg.items():
    if abs(d - DBG_NOM) > DBG_TOL:
        actions.append(f"floor {f}: DBG {d} (nominal {DBG_NOM}) - re-align bracket")
for j, s in steps.items():
    if s > STEP_MAX:
        actions.append(f"joint {j}: step {s} - check bracket, then file")
for f, c in clips.items():
    if c != "sliding":
        actions.append(f"floor {f}: {c} clips on left rail - replace with sliding clips")
print(f"checked {len(dbg)} rows, {len(steps)} joints, {len(clips)} clip sets")
print("\n".join(actions) if actions else "no corrections needed")checked 7 rows, 4 joints, 4 clip sets floor 20: DBG 90.551 (nominal 90.5) - re-align bracket joint R 16-17: step 0.0025 - check bracket, then file floor 12: fixed clips on left rail - replace with sliding clips
The three corrections are hold points: the crew stops, corrects, rechecks and records before signing the group off. At floor 20, the right rail bracket was found a little out of position, as the reading suggested; Ray and Tamsin reset it to its transfer mark, re-torqued it and remeasured the DBG at floors 19, 20 and 21. At floor 12, the fixed clips were replaced with sliding clips and torqued to the specified value. Replacing them was not optional: with the building still to add eight floors and years of creep, a fixed clip at floor 12 would have taken load as the walls shortened. At the joint between floors 16 and 17, the bracket was checked first, and was correct, so the high side was dressed with a file and the straightedge reading rechecked.
Group 5: pit equipment
In the pit, the checklist covers the buffers and everything around them. Each buffer's nameplate data is checked against the layout: stroke, load rating and oil type. The buffers are checked centered on their striker positions from the rails, plumb, anchored and torque-marked, with oil to the level mark and the plunger fully extended. The car and counterweight runbys are measured from the landing benchmark with allowances for the parts not yet installed. The governor tension sheave bracket, the pit stop switch, the light and receptacle, the ladder and the counterweight guard are checked present and fixed.
The counterweight runby, worked out from the support height and the counterweight frame position, came out 3/4 in more than the layout. Tracing it, Tamsin found that the counterweight buffer support had been set on an extra shim that had been used to level it on an uneven patch of the pit floor. The shim was thicker than the leveling needed. The support was reset with the correct shim, the buffer rechecked plumb, and the runby remeasured within tolerance. Too much counterweight runby would have let the car travel higher than designed before the counterweight landed on its buffer, eating into the top clearance and refuge space that the overhead was designed around.
| Pit item | Check | Car 2 result |
|---|---|---|
| Car buffer | Nameplate stroke and load; centered, plumb, anchored; oil level | Correct; oil at mark |
| Counterweight buffer | As above | Correct after support reset |
| Car runby | From benchmark, with allowance for car not yet complete | Within tolerance |
| Counterweight runby | From benchmark and frame position | 3/4 in over; corrected and rechecked |
| Governor tension sheave bracket | Position from the governor drop | Correct |
| Pit stop switch, light, receptacle | Present, reachable from access, fixed | Correct |
| Ladder and counterweight guard | Present, fixed, clear of moving parts | Correct |
Group 6: counterweight and sling
The counterweight frame is checked for guides correctly fitted to the rails, frame bolts torque-marked, retainer plates fitted, and the filler stack restrained by its tie rods or clamp bar. The number of full and half fillers in the frame is counted and recorded, because the balance test after roping starts from this count. The car sling is checked square by its diagonals, its stiles plumb, its guides on the rails, and its brace rods tight. Both the counterweight and the sling are checked to be supported on their cribbing or stands as the installation manual requires, because neither is hung yet. Everything in this group was correct, and Tamsin recorded the filler count: the stage-one fill set by the installation manual, well short of the full calculated count.
Group 7: the hoistway and sign-off
The last group is about the hoistway as a workplace. The barricades are checked at every landing, the access log is up to date, the work platform's inspection record is current, the lifelines and anchors are tagged as inspected, and the hoistway is clean, with no tools, offcuts or packing left on brackets or in the pit. Debris left on a bracket at floor 15 is a falling object waiting for the first car run. Tamsin found a box of fishplate bolts on the bracket at floor 7 and a roll of tape on a separator beam at floor 14, and both came down.
The checklist is then signed. Tamsin signs as the person who checked, Ray as the mechanic responsible, and Lena reviews it before the next stage starts. Corrections are written on the sheet with what was found, what was done and the recheck reading, not erased. The completed checklist goes into the job file with the survey report, the plumbing record and the anchor records, and a copy goes to the adjusting crew who will commission the car.
Hours and lessons for the next car
The rail stage estimate from Lesson 1 can now be compared with what happened. Tamsin's daily log has the actual crew-hours for each task. The comparison is not an exercise in blame. It shows which estimates were optimistic and which problems cost time, so that cars 3 and 4, which the second crew is starting, and the upper floors of all four cars can be planned better.
# Rail stage for car 2 to floor 22: estimate against actual crew-hours
tasks = {   # task: (estimate, actual)
    "hoistway survey and as-built check": (12, 14),
    "templates and plumb lines": (10, 13),
    "rail brackets": (64, 90),
    "rail stacking and fishplates": (48, 46),
    "rail alignment and final check": (40, 47),
    "pit equipment and buffers": (16, 18),
    "checklist and corrections": (0, 11),
}
est = sum(e for e, _ in tasks.values()); act = sum(a for _, a in tasks.values())
for name, (e, a) in tasks.items():
    print(f"{name:36s} est {e:3d}  actual {a:3d}  {a - e:+4d}")
print(f"{'total':36s} est {est:3d}  actual {act:3d}  {act - est:+4d} ({(act / est - 1) * 100:+.0f} %)")
worst = max(tasks, key=lambda k: tasks[k][1] - tasks[k][0])
print(f"largest overrun: {worst}")hoistway survey and as-built check est 12 actual 14 +2 templates and plumb lines est 10 actual 13 +3 rail brackets est 64 actual 90 +26 rail stacking and fishplates est 48 actual 46 -2 rail alignment and final check est 40 actual 47 +7 pit equipment and buffers est 16 actual 18 +2 checklist and corrections est 0 actual 11 +11 total est 190 actual 239 +49 (+26 %) largest overrun: rail brackets
The rail stage ran about a quarter over its estimate, and more than half of the overrun was in brackets, where the inserts cast out of position on four floors meant drilling and anchoring instead of bolting. The estimate also had no line for the checklist and its corrections, which took eleven crew-hours. Ray's notes for the next cars were short: add a checklist line to every estimate; check insert positions floor by floor as soon as the walls are stripped, before the crew needs them; keep the clip boxes for fixed and sliding clips in separate, labeled bins on the platform; and set buffer supports with measured shims, not whatever is at hand.
What Tamsin learned
Tamsin's field log for the rail stage ends with a page she wrote for herself. The hoistway is never where the drawing says, so measure from references, not walls. Plumb lines are the elevator before the elevator exists, so check them every shift. Every anchor and every bolt is torqued and marked as it goes in, because marking later is guessing. Fix the bracket before filing the joint. Building compression is real even when it cannot be seen, so the clips matter. The checklist is not paperwork: on car 2 it found an anchor, a clip set, a DBG, a joint and a runby that would each have been harder to fix later, and two tool boxes that could have fallen. And the safety rules from ELV-110 were the ones that mattered every day: tie off at every height, nothing below other work, and plan every lift.
Common mistakes
MistakeChecking a sample of anchors because most were fine.
InsteadCheck every anchor's mark; one unmarked anchor shows the routine slipped.
MistakeErasing a reading that was out and writing the corrected value.
InsteadRecord what was found, what was done and the recheck reading.
MistakeFiling the joint at floor 16 without checking the bracket.
InsteadCheck the bracket first; file only when the bracket is right.
MistakeLeaving fixed clips at floor 12 because the rail is aligned.
InsteadFixed clips above the bottom defeat the compression design; replace them.
MistakeLeaving packing or tools on brackets.
InsteadClear every bracket and the pit before sign-off; debris becomes a falling object.
Summary and key terms
- The installation checklist checks the rail stage against the layout and tolerances before the work is covered.
- It covers records, plumb marks, brackets and anchors, rails and joints, pit equipment, counterweight and sling, and the hoistway.
- Corrections are hold points: stop, correct, recheck and record.
- Car 2's checklist found an unmarked anchor, fixed clips, a DBG and a joint out, an over-long runby, and debris.
- Estimate against actual crew-hours shows where planning should change for the next cars.
- The checklist is signed by the checker and the mechanic and reviewed by the superintendent.
- Installation checklist
- A form listing each item to check, its method and tolerance, with results and sign-off.
- Hold point
- A checklist item at which work stops until a correction is made and rechecked.
- Transfer mark
- A mark on a bracket recording the plumb line position after the lines are removed.
- Walk-down
- A systematic visit of every item in the work being checked.
- Stage-one fill
- The number of counterweight fillers installed before roping, set by the installation manual.
- Recheck reading
- The measurement taken after a correction to show it is within tolerance.
Practice problems
Work each problem on paper first, then reveal the answer to check.
Why is every anchor's mark checked rather than a sample?
Show answer
One unmarked anchor shows the torque-and-mark routine slipped; any anchor could be loose.
Why were the fixed clips at floor 12 replaced even though the rail was aligned?
Show answer
As the building shortens, fixed clips would load the rail and bracket; sliding clips are required above the bottom.
What was the effect of the extra shim under the counterweight buffer?
Show answer
It made the counterweight runby too long, which would let the car rise too far before the counterweight landed, reducing the top clearance.
The estimate was 190 crew-hours and the actual 239. What is the overrun in percent?
Show answer
About 26 percent.
Lesson quiz · 5 questions
Score 60% or more to complete this lesson.
Create a free account to save your progress, take quizzes and earn a certificate.