
ELV-120 · Lesson 7 of 12 · 18 min
Setting and aligning car and counterweight rails
With the brackets in, the crew sets the rails. The work has two parts. Stacking is getting each rail length into the hoistway, standing it on the length below, joining it and clipping it loosely to the brackets. Alignment is moving every length onto the plumb lines and the distance between guides, squaring the rails to each other, making the joints smooth, and tightening everything down. Stacking is heavy, careful work with lifts at every length. Alignment is patient, precise work with gauges and a straightedge. Ray describes alignment as the part of the job the passengers will feel every day the elevator runs.
This lesson also covers something a mechanic on a low-rise job may never think about: the building getting shorter. A concrete tower like Quayside shortens for years after it is built, and the rails have to let it.
Stacking the rails
Rails are stacked from the bottom up. The first length of each run stands on the rail base plate or on the pit floor at the position the layout gives, leveled with steel shims so it stands upright, and is clipped to the pit bracket. Each length above it is lifted up the hoistway, lowered onto the length below with the tongue entering the groove, joined with its fishplate, and clipped to its brackets. The clips are snugged, not tightened, so that the rail can still be moved during alignment. Because the cut length goes at the top, every joint position is set by the bottom length, and the crew checks the first joint height against the layout before stacking further.
At Quayside, the rails are lifted with a small hoist on the hoist beam at the top of the hoistway, with the crew on the work platform guiding each length into place. The lift plan is agreed before stacking starts, and the details of rigging are covered in ELV-130. Some rules apply to every length. Nobody is below the rail as it travels. Hands stay off the rail ends and away from the joint as the tongue enters the groove, because a rail that drops even a fraction of an inch there takes fingers. The new length is clipped to at least one bracket and the fishplate bolted before the hoist releases it. And the platform is kept clear of the plumb lines throughout.
| Step | Check before moving on |
|---|---|
| Set first length on base plate or pit floor | Position from the layout; upright; joint height correct |
| Lift next length | Lift plan; nobody below; tag line on the bottom end |
| Enter tongue into groove | Hands clear of the joint; joint faces clean |
| Fit fishplate and bolts | Fishplate and back of rail clean; bolts in all holes; torque as specified |
| Clip to brackets | Clips snug, not tight; correct clip type for the bracket |
| Release hoist | Length held by clips and fishplate |
Aligning to the plumb lines
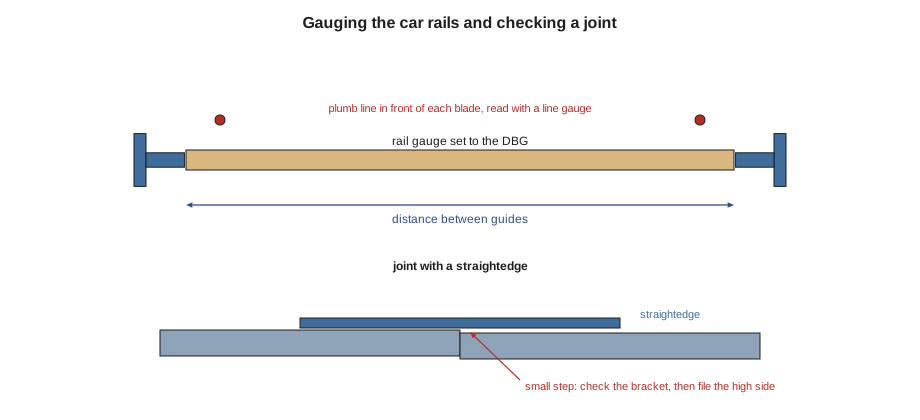
Alignment starts at the bottom bracket and works up, one bracket row at a time. At each row, the rail is brought onto its plumb line in two directions. Front to back, the blade tip is set at the distance from the line that the plumbing method uses. Side to side, the line must be centered on the blade. A plumb line gauge, a small block or caliper made for the purpose, is placed against the blade and read against the line. The bracket is adjusted in its slots until both readings are right, and the bracket bolts are then tightened.
With both car rails on their lines at a row, the distance between the blades is checked with a rail gauge or a distance board set to the car DBG. The gauge is also a check that the two rails face each other squarely. If one rail is twisted on its bracket, its blade faces are not parallel to the other rail's, and the gauge will not seat on both. A separate distance board is used for the counterweight rails, because their DBG is different, and mixing the two up is a common mistake. Once a row is right, the clips are tightened to torque, and the crew moves up to the next row.
Joints and straightness
Between bracket rows, the rail has to be straight, and at the joints, the step from one length to the next has to be as small as possible. Each joint is checked with a steel straightedge at least 3 ft long laid along the blade tip and both faces, with feeler gauges used to read any gap. If one length stands proud of the next, the high side is dressed with a long, flat file in long, smooth strokes along the blade until the straightedge sits flat. Filing is done carefully and only on the high side, because a rail filed too thin at a joint cannot be put back. A joint that cannot be brought within tolerance by filing usually means something is wrong underneath: a burr behind the fishplate, a tongue not fully seated, or a bracket out of position.
Tolerances for alignment come from the manufacturer of the elevator and are usually tighter for high-speed cars, because the faster the car, the more a small step or kink is felt. The code below checks a set of readings from car 2 against illustrative job tolerances, the sort found on an installation checklist. The readings are taken at each bracket row from floor 6 to floor 10, and at the joints in that section.
# Car 2 alignment readings, floors 6 to 10 (illustrative tolerances, in)
DBG_NOM, DBG_TOL = 90.5, 0.04      # car distance between guides and tolerance
LINE_TOL = 0.02                     # rail face from its plumb line, plus or minus
STEP_MAX = 0.002                     # largest step allowed at a joint after filing
rows = {    # floor: (DBG reading, left rail off line, right rail off line)
    6: (90.508, 0.004, -0.008), 7: (90.524, 0.012, 0.008), 8: (90.555, 0.035, 0.016), 9: (90.492, -0.004, 0.0), 10: (90.504, 0.008, -0.004),
}
joints = {"left, floor 7 to 8": 0.005, "right, floor 8 to 9": 0.001}   # step measured at each joint
for f, (dbg, left, right) in rows.items():
    bad = []
    if abs(dbg - DBG_NOM) > DBG_TOL: bad.append(f"DBG {dbg}")
    if abs(left) > LINE_TOL: bad.append(f"left {left:+}")
    if abs(right) > LINE_TOL: bad.append(f"right {right:+}")
    print(f"floor {f:2d}: " + ("ok" if not bad else "adjust " + ", ".join(bad)))
for j, step in joints.items():
print(f"joint {j}: step {step} -> {'ok' if step <= STEP_MAX else 'file and recheck'}")floor 6: ok floor 7: ok floor 8: adjust DBG 90.555, left +0.035 floor 9: ok floor 10: ok joint left, floor 7 to 8: step 0.005 -> file and recheck joint right, floor 8 to 9: step 0.001 -> ok
Floor 8 is out on the DBG and on the left rail's line, and both point to the same cause: the left rail at floor 8 has been set too far from the center of the car. The joint between floors 7 and 8 on the left rail has a step well over the limit, which fits the same story, because a bracket set out of line pulls the joint with it. Ray's rule is to fix the bracket first, then recheck the joint, and to file only what is left. Filing a joint to make up for a bracket out of line leaves a rail that is smooth but in the wrong place.
Counterweight rails
Counterweight rails are aligned the same way, with their own lines and their own distance board. The tolerances may be looser, because no passengers ride the counterweight, but a counterweight running on poorly aligned rails is noisy, wears its guides quickly, and puts uneven forces into the brackets. On a car with a counterweight safety, which is required where there is occupied space below the hoistway, the counterweight rails take safety forces too and are aligned and checked as carefully as the car rails. In a multi-car hoistway, the counterweight rails and the separator beams also set the clearance between one car's counterweight and the next car, so their position on the plan is checked at every row.
Building compression
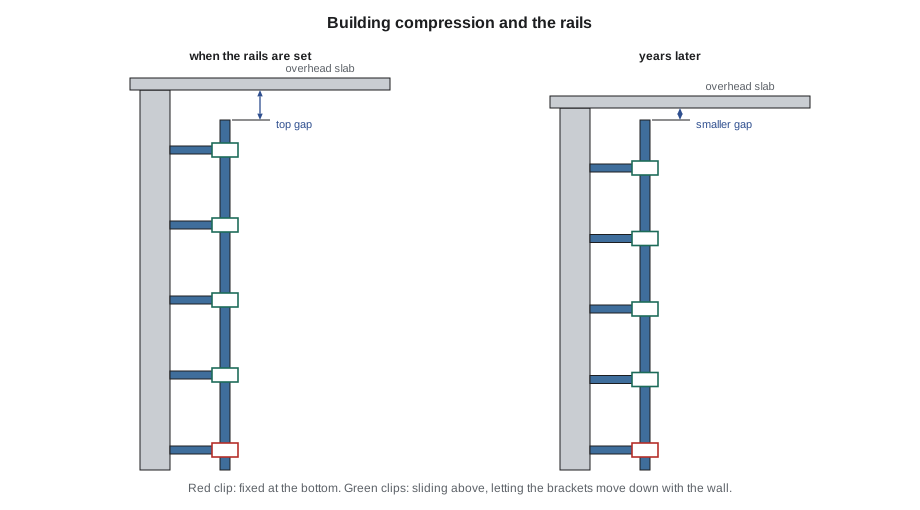
A concrete building shortens over time. When the floors above are built, the walls and columns below are squeezed by the added weight and shorten elastically. Then, under that sustained load, the concrete continues to shorten slowly for years through creep, and it also shrinks as it dries. In a tall concrete tower, the total shortening of the hoistway walls after the rails are installed can amount to an inch or more over the full height. Steel rails do not shorten with the building. If the rails were clamped tight to every bracket, the shortening walls would try to shorten the rails, loading them in compression until they bowed between brackets, pulled the brackets, or cracked the fastenings.
The guiding system is designed to let the building move. The bottom of each rail run rests on the pit floor or its base plate, and the bottom bracket uses fixed clips. Every bracket above it uses sliding clips, which hold the rail firmly side to side and front to back but let it slide vertically as the bracket moves down with the wall. At the top, the rail stops short of the overhead slab by the gap shown on the layout, so that as the slab comes down, it does not land on the rails. The gap is sized by the engineer from an estimate of the building's shortening; the mechanic sets it exactly as drawn and records it.
The shortening of a height H is its strain ε times the height. The engineer's estimate of the strain still to come after the rails are set, for the hoistway walls at Quayside, is used below to check the top gap and the slide the clips must allow, with a margin. The strain value is illustrative; real values come from the structural engineer.
# Building compression allowance for car 2 (illustrative strain from the engineer)
strain = 0.00030                 # shortening still to come after the rails are set
height = 307.5                 # pit floor to the top of the rail run, ft
margin = 1.5                 # factor applied to the estimate
top_gap = 6.0                # gap left below the overhead slab, in
clip_slide = 2.5            # vertical slide each sliding clip allows, in
short = strain * height * 12    # expected shortening, in
need = short * margin
print(f"expected shortening over the run: {short:.2f} in")
print(f"with margin x{margin}: {need:.2f} in")
print(f"top gap {top_gap} in: {'enough' if top_gap >= need else 'TOO SMALL'}")
print(f"top clip moves the most, about {need:.2f} in; clip slide {clip_slide} in: "
f"{'enough' if clip_slide >= need else 'TOO SMALL'}")expected shortening over the run: 1.11 in with margin x1.5: 1.66 in top gap 6.0 in: enough top clip moves the most, about 1.66 in; clip slide 2.5 in: enough
The expected shortening is an inch or two, well inside the top gap. The top bracket moves the most, because it is carried down by the shortening of the whole wall below it; the brackets near the pit barely move. Sliding clips that seize, from paint, rust or a clip bolt tightened beyond its specification, defeat the design. That is why the clip type at each bracket is checked against the details, and why the clip bolts are tightened to the specified torque and no more.
Building compression has one more consequence. Because the walls keep shortening after the rails are aligned, the alignment changes a little over the first years, and on a tall concrete building the contractor may plan a recheck of the rails before the end of the warranty period. Tamsin's alignment readings are the baseline for that recheck.
Safety during setting and alignment
Alignment puts the crew on the work platform for long periods, close to the walls and brackets, with heavy tools. Everyone stays tied off to the lifeline. Tools are tethered, and files, gauges and feeler gauges are kept in a tool bucket fixed to the platform rail. The platform is moved only by the crew on it, under its own controls, with the plumb lines watched as it passes. Filing produces sharp steel filings, and safety glasses and gloves are worn. Nobody works below the platform while rails are being stacked or aligned above, in keeping with the branch's no-work-below-other-work rule.
Common mistakes
MistakeTightening clips fully as each length is stacked.
InsteadSnug the clips while stacking; tighten to torque only after the row is aligned.
MistakeUsing the car distance board on the counterweight rails.
InsteadKeep a separate, labeled distance board for each DBG.
MistakeFiling a joint to make up for a bracket out of line.
InsteadCorrect the bracket first, then recheck and file only what remains.
MistakeUsing fixed clips throughout a concrete high-rise.
InsteadFixed clips at the bottom only; sliding clips above, as the details show.
MistakeLetting the rails run up to the overhead slab.
InsteadLeave the top gap the layout shows so the building can shorten.
Summary and key terms
- Rails are stacked from the pit up, with each length joined and clipped before the hoist releases it.
- Alignment works up row by row: onto the plumb line in two directions, then DBG and squareness, then torque.
- Joints are checked with a straightedge and filed only on the high side after the brackets are right.
- Counterweight rails get their own lines and distance board.
- Concrete buildings shorten from load, creep and shrinkage; sliding clips and a top gap let the rails stay straight.
- Alignment readings are the baseline for later rechecks.
- Stacking
- Lifting, joining and loosely clipping rail lengths from the pit up.
- Alignment
- Bringing each rail onto its plumb line and DBG and tightening it there.
- Distance board
- A gauge set to the distance between guides, used to check a pair of rails.
- Joint step
- The offset between two rail lengths at a joint.
- Building compression
- The shortening of a building over time from load, creep and shrinkage.
- Sliding clip
- A rail clip that holds the rail sideways but lets it slide vertically.
Practice problems
Work each problem on paper first, then reveal the answer to check.
Why are clips only snugged while stacking?
Show answer
So the rail can still be moved during alignment.
The DBG is out and the left rail is off its line at the same row. What is the likely cause?
Show answer
The left rail's bracket at that row is out of position.
A wall 300 ft high shortens by a strain of 0.0004. How much does it shorten?
Show answer
1.44 in.
Why does the top bracket move more than the bottom one?
Show answer
It is carried down by the shortening of the whole wall below it.
Lesson quiz · 5 questions
Score 60% or more to complete this lesson.
Create a free account to save your progress, take quizzes and earn a certificate.