
CINE-401 · Lesson 5 of 12 · 27 min
Shot design, blocking and coverage
Shot design is where the breakdown and the look become specific camera positions, lenses and moves. The DP and director decide how each scene will be staged (blocking), what shots will capture it (coverage) and in what order those shots will be made. These decisions drive almost everything else on the shooting day: the lighting plan, the equipment, the crew size and the schedule. This lesson covers the tools of shot design: shot lists, overhead diagrams and storyboards; the screen direction rules that keep geography clear; common coverage strategies from the classic master-and-singles pattern to the single continuous take; and how to choose lenses and camera positions for real spaces.
Blocking first, coverage second
Blocking is the movement of actors through the scene: where they enter, where they stand, when they sit, cross or leave. Coverage is how the camera records that blocking. In theory blocking comes first and the camera follows. In practice, the director, DP and actors negotiate: a cross that looks natural may put an actor in front of a window the DP cannot light, or a position that is easy to light may feel static.
- Rehearse the blocking before lighting, ideally with the actors in the real space, so the DP sees where light and camera need to be.
- When actors are not available in prep, block with stand-ins or with the director walking the space.
- Mark key positions with tape so camera assistants can measure focus and grips can plan dolly track.
- Expect changes on the day. A shot list is a plan, not a contract.
Shot lists, overheads and storyboards
Three documents communicate shot design.
- Shot list: a numbered list of every planned shot in a scene, with size, angle, lens, movement, equipment and notes. It is the working tool for the camera department and first AD.
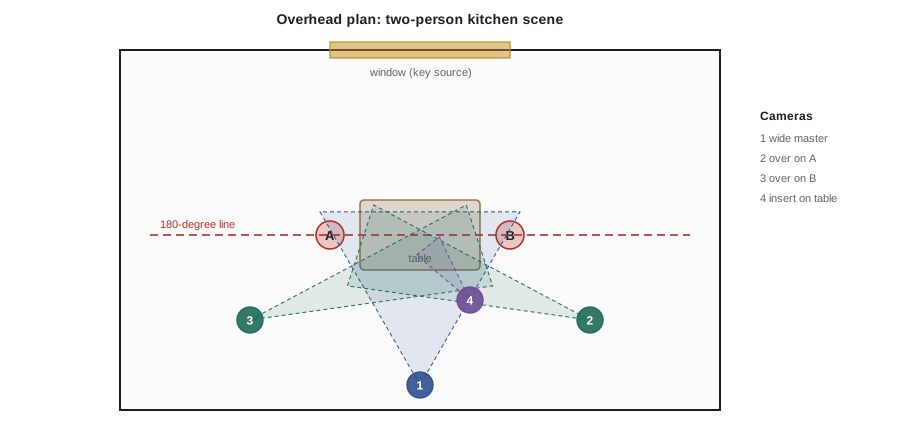
- Overhead (floor plan) diagram: a bird's-eye drawing of the set showing walls, doors, windows, furniture, actor positions and movements, camera positions with lens direction, and often light positions. Overheads reveal problems a list cannot, such as two cameras seeing each other or a light stand in a planned dolly path.
- Storyboards: drawings of each shot as it will appear on screen. Common for action, VFX and complex sequences; optional for simple dialogue.
Many productions also use previsualization (previs): 3-D animatics that block cameras and actors in a digital model of the set. Previs is common for action and VFX, and simple tools now make it practical on smaller shows.
Screen direction and the 180-degree rule
Audiences understand geography from consistent screen direction. When two characters face each other, an imaginary line runs between them. If every camera stays on one side of that line, character A always looks screen right and character B always looks screen left, and the cuts feel natural.
- Crossing the line flips screen direction and can confuse the audience, making characters appear to look the same way.
- The line can be crossed deliberately with a moving shot that carries the audience across, a cut to a neutral shot straight down the line, or a character's movement that redraws the line.
- Directors sometimes break the rule on purpose to disorient the audience at a moment of conflict or confusion.
- Movement direction also matters: a character traveling left to right should keep traveling that way across cuts unless the story turns them around.
Eyelines matter too. In matching close-ups, each actor should look just off the side of the lens, at a consistent distance from it, so their eyes appear to meet across the cut. The camera assistant or script supervisor tracks eyeline marks.
Classic coverage
The most common pattern for dialogue is sometimes called the master and coverage approach.
- Master: a wide shot that covers the whole scene, establishing geography and giving the editor a safety net.
- Medium two-shot: closer, keeping both characters in frame.
- Over-the-shoulder shots (overs): one character seen past the shoulder of the other, one in each direction.
- Clean singles and close-ups: one character without the other in frame, getting tighter for emotional beats.
- Inserts and cutaways: objects, hands, details and reactions.
This pattern gives the editor many choices but takes time: each new size or direction is a new set-up. A typical simple two-person dialogue scene might take six to ten set-ups shot this way.
Other coverage strategies
| Strategy | How it works | Strengths | Costs |
|---|---|---|---|
| Master and coverage | Wide master, then progressively tighter angles | Maximum editorial choice | Most set-ups; can feel generic |
| Two-camera cross-coverage | Two cameras shoot both actors' singles at once | Saves time; overlapping dialogue and improvisation match | Lighting must work for both directions; harder to light faces beautifully |
| Developing shot (plan-scene) | One moving shot that reframes from wide to close as the scene unfolds | Elegant, efficient once rehearsed; strong authorship | Little editorial choice; needs rehearsal and precise focus |
| Single take (oner) | The entire scene in one unbroken shot | Immersion, tension, virtuoso effect | High risk; a mistake late in the take means starting again |
| Selective or minimal coverage | Only the shots the director knows they need | Very fast; distinctive style | No safety net; requires a confident director |
The choice should come from the breakdown. A scene where timing between characters matters, such as an argument with overlapping lines, may suit cross-coverage. A scene about a character trapped in a situation may suit a long, unbroken developing shot.
Worked problem
Choosing a lens to fit a room
A living room is 16 ft wide. The camera can be placed against the opposite wall, 20 ft from the far wall, and the director wants the master to show the full width of the far wall. The camera has a Super 35 sensor about 25 mm wide. What is the longest focal length that will fit the wall in frame?
Show solution
- By similar triangles, the scene width W at distance D relates to sensor width w and focal length f: \( \frac{W}{D} = \frac{w}{f} \), so \( f = \frac{w \times D}{W} \).
- Convert to the same units: 16 ft = 4,877 mm and 20 ft = 6,096 mm. \( f = \frac{25 \times 6096}{4877} \approx 31 \) mm. Use a 29 mm or 27 mm prime to leave a little room.
- Check the horizontal field of view: \( 2\arctan\left(\frac{25}{2 \times 29}\right) \approx 46^\circ \).
Answer: About 30 mm is the longest lens that fits the wall; in practice a 27 mm or 29 mm prime gives a small margin. If the director wants a longer lens for compression, the camera must move back, perhaps outside a doorway or window.
Choosing focal length and camera position
Focal length and camera distance together control perspective. From a fixed camera position, changing focal length only crops or widens the frame. Changing camera distance changes perspective: the relative sizes of near and far objects and how compressed the space feels.
- Wide lenses close to the subject exaggerate depth, make rooms feel larger and faces more distorted at very close distances.
- Long lenses from far away compress depth, flatten faces flatteringly and isolate subjects from backgrounds.
- For close-ups, many DPs work between about 40 mm and 85 mm on Super 35 for natural facial proportions, but deliberate choices outside that range can be powerful.
- Camera height carries meaning: eye level feels neutral; low angles can make a character feel powerful or threatening; high angles can make them feel small or observed.
Shooting order
Coverage is rarely shot in story order. The usual principle is to shoot all the shots that share a lighting direction and set dressing before turning around.
- Shoot the master first so the scene's blocking and continuity are established, unless the master is the least important shot.
- Then shoot all coverage facing one direction (for example, everything favoring character A, looking toward one wall), then turn around and shoot the reverse.
- Shoot inserts and cutaways at the end or with a second unit, unless an actor's hands are needed.
- Consider performance: some actors give their best early, so the director may want their close-up first. The DP should know this and plan lighting so the close-up can be shot early if needed.
Each turnaround means relighting, moving equipment and resetting background action, which often takes 30 to 60 minutes. Minimizing turnarounds is one of the most effective ways to save time.
Worked problem
Set-ups and turnarounds
A dialogue scene has a master, two overs, two clean singles, two close-ups and two inserts. Lighting a new direction (a turnaround) takes 45 minutes; a new set-up in the same direction takes 15 minutes; shooting takes about 15 minutes per set-up. Compare shooting the coverage alternating between directions with grouping by direction.
Show solution
- Set-ups: 1 master + 2 overs + 2 singles + 2 close-ups + 2 inserts = 9.
- Grouped plan: master (direction A), then A over, A single, A close-up, A-side insert: 1 lighting set-up of 45 min for the master, 4 small moves of 15 min. Turn around once (45 min), then B over, single, close-up, insert (1 turnaround plus 3 small moves). Lighting time: 45 + 4 × 15 + 45 + 3 × 15 = 195 minutes.
- Alternating plan: if every shot after the master switched direction, there would be 8 turnarounds: 45 + 8 × 45 = 405 minutes.
- Shooting time is the same in both: 9 × 15 = 135 minutes.
Answer: Grouping by direction needs about 195 + 135 = 330 minutes (5.5 hours); alternating needs about 405 + 135 = 540 minutes (9 hours). Grouping saves about 3.5 hours, nearly a third of a shooting day.
Coverage for performance and editing
The editor needs options that serve performance, not only geography.
- Overlap action between shots so the editor can cut on movement: if an actor stands at the end of the master, start the close-up before they stand.
- Get reactions as well as lines. In many scenes the listener's face carries the story.
- Provide clean entrances and exits, and hold at the end of takes so the editor has room.
- Shoot cutaways that give the editor a way to compress time or fix performance.
- Check eyelines and screen direction for every set-up with the script supervisor.
Two cameras and multiple cameras
Many productions shoot with two cameras routinely: an A camera and a B camera. A second camera can shoot a wider and tighter size at once, cover both actors in cross-coverage, or catch a different angle on action and stunts.
- Benefits: more coverage per take, matching performances, and fewer takes for stunts, children or difficult effects.
- Costs: lighting must work from two positions, often flattening the light; microphones are harder to place when one camera is wide; the second camera needs its own operator and assistants.
- A common compromise is stacking: putting both cameras on the same side and axis, one wide and one tight, so the lighting suits both.
When the plan meets the location
On the day, the real location often differs from the scout: furniture moved, weather changed, an actor proposes a different cross. The DP's job is to adapt the shot list while protecting the essentials: the beats and story moments the scene must deliver. Mark the shot list with priorities (must, should, could) so that when time runs short, the DP and director know which shots to drop or combine.
Common mistakes
MistakeTreating the shot list as a fixed contract
InsteadTreat it as a plan, with priorities marked so it can adapt on the day
MistakeCrossing the line without a reason or a bridging shot
InsteadKeep cameras on one side of the line unless crossing deliberately with a move, a neutral shot or blocking
MistakeChanging focal length to change perspective
InsteadChange camera distance to change perspective; focal length only changes framing
MistakeAlternating lighting directions shot by shot
InsteadGroup all shots in one direction before turning around
MistakeShooting only the person speaking
InsteadCover reactions and overlap action so the editor can shape performance
Summary and key terms
- Blocking is how actors move; coverage is how the camera records them; both are negotiated in rehearsal.
- Shot lists, overheads, storyboards and previs communicate shot design to the crew.
- The 180-degree rule and consistent eyelines keep screen geography clear.
- Coverage strategies range from master and coverage to cross-coverage, developing shots and single takes, each with trade-offs.
- The longest lens that fits a space follows from \( f = wD/W \).
- Grouping shots by lighting direction and minimizing turnarounds saves hours.
- Coverage must serve performance and editing, with reactions, overlaps and priorities.
- Blocking
- The movement and positions of actors in a scene
- Overhead
- A bird's-eye floor plan showing actors, cameras and lights
- 180-degree rule
- Keeping cameras on one side of the line between characters to preserve screen direction
- Master
- A wide shot that covers an entire scene
- Over-the-shoulder
- A shot of one character seen past the shoulder of another
- Cross-coverage
- Two cameras shooting opposite characters at the same time
- Developing shot
- A moving shot that reframes from wide to close as the scene unfolds
- Oner
- A scene filmed in a single continuous take
- Turnaround (camera)
- Reversing the camera direction and relighting for the reverse coverage
- Previs
- 3-D animated previsualization of shots and blocking
Practice problems
Work each problem on paper first, then reveal the answer to check.
A wall 4 m wide is 5 m from the camera, with a 25 mm wide sensor. What is the longest lens to fit it?
Show answer
f = 25 × 5000 ÷ 4000 ≈ 31 mm
Why might a director break the 180-degree rule on purpose?
Show answer
To disorient the audience at a moment of conflict or confusion
What is stacking two cameras?
Show answer
Placing both cameras on the same axis, one wide and one tight, so the lighting suits both
Why shoot the master first?
Show answer
It establishes blocking and continuity and gives the editor a safety net
What does changing camera distance do that changing focal length does not?
Show answer
It changes perspective: the relative sizes of near and far objects
Ten set-ups grouped in two directions with one turnaround of 40 min and set-up moves of 15 min: estimate lighting time.
Show answer
Roughly 40 + 4 × 15 + 40 + 4 × 15 = 200 minutes, depending on the split
Name two risks of a single-take scene.
Show answer
A late mistake means starting again; little editorial control; heavy rehearsal and focus demands
What is overlapping action?
Show answer
Repeating movement at the boundaries of shots so the editor can cut on movement
Why mark shot priorities as must, should and could?
Show answer
So shots can be dropped or combined quickly when time runs short
What does an overhead reveal that a shot list does not?
Show answer
Spatial problems, such as cameras seeing each other or equipment in a dolly path
Lesson quiz · 5 questions
Score 60% or more to complete this lesson.
Create a free account to save your progress, take quizzes and earn a certificate.