
CINE-302 · Lesson 10 of 12 · 29 min
LED volumes and in-camera VFX
An LED volume is a stage surrounded by large walls, and often a ceiling, of LED display panels that show a digital environment around the actors and set. A real-time engine renders the environment from the camera's point of view, updated continuously as a tracking system reports where the camera is, so that the background on the wall shows correct perspective and parallax through the lens. The result, called in-camera visual effects (ICVFX), captures final or near-final backgrounds on the day, with the environment also lighting the actors and appearing in reflections. Popularized by productions such as The Mandalorian (2019), LED volumes have become a significant tool for features, series and commercials. This lesson covers how volumes work: panels and processors, the inner and outer frustum, camera tracking and latency, pixel pitch and moiré, synchronization and genlock, brightness and exposure, the physical set and the floor, and when a volume is or is not the right choice. Lesson 11 covers lighting and color in volumes.
How a volume works
A typical ICVFX system has several parts working together:
- LED panels, often around 50 cm square, mounted on curved or flat structures to form walls and ceilings tens of meters across.
- LED processors, which receive video signals and drive the panels, controlling brightness, color, refresh rate and synchronization.
- A cluster of render nodes running a real-time engine, most commonly Unreal Engine with its nDisplay system, which renders the environment across the panels.
- A camera tracking system, optical or inside-out, that reports the camera's position and orientation many times per second, plus lens encoders for focus, iris and zoom (Lesson 6).
- A virtual art department and engine operators who build the environments in advance and adjust them on set, often called the brain bar.
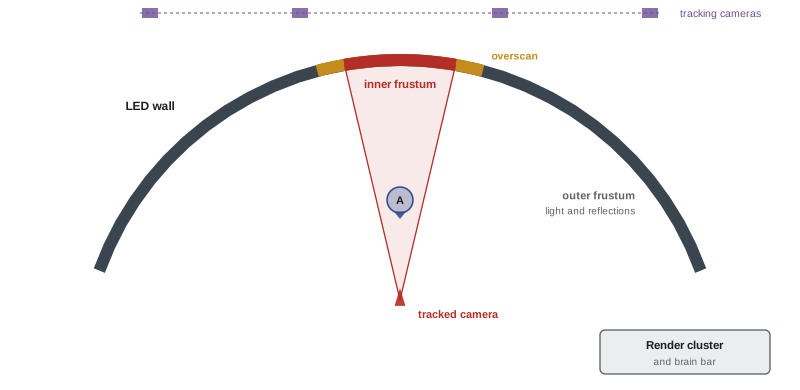
The engine renders two kinds of image on the wall. The inner frustum is the area of the wall seen by the camera, rendered from the tracked camera's exact perspective with correct parallax; it moves across the wall as the camera moves. The outer frustum is the rest of the wall, rendered from a fixed or approximate viewpoint to provide light and reflections. Because the inner frustum is correct only for one camera position, a volume normally supports one tracked camera at a time with full perspective; multiple cameras can be accommodated with compromises, such as separate frustums shown on alternate frames or time-sliced displays, at a cost in brightness and complexity.
Field of view and the inner frustum
The inner frustum's size on the wall depends on the lens and the distance from the camera to the wall. As with green screens (Lesson 3), the width covered is:
The engine adds overscan around the inner frustum, a margin that hides the edge of the correctly rendered area when the camera moves faster than the system can update. With wider lenses or the camera close to the wall, the inner frustum grows and may spread over a curved section of the wall, which the engine handles by projecting the image correctly onto the wall geometry.
Worked problem
Inner frustum size
A camera with a Super 35 sensor (24.9 mm wide) uses a 35 mm lens 6 m from an LED wall. How wide is the inner frustum on the wall, and how wide with 15 % overscan on each side?
Show solution
- Width: \(W = 6 \times 24.9 / 35 \approx 4.3\) m.
- With 15 % overscan each side: 4.3 × 1.3 ≈ 5.6 m.
Answer: About 4.3 m, or about 5.6 m including overscan.
Tracking and latency
The time between the camera moving and the wall showing the updated perspective is the system latency: tracking, rendering, video processing and panel display each add delay, typically adding up to several frames. If the camera pans quickly, the rendered inner frustum lags behind where the lens is pointing; overscan hides small lags, but fast moves can reveal the edge of the frustum or a slight swimming of the background against the foreground. Operators and cinematographers learn to work within the system's limits, avoiding very fast whip pans in the volume, or switching the background to a blur or out-of-focus state during fast moves. Latency can be measured on set and should be known before shooting.
Here \(\omega\) is the pan speed in degrees per second and \(n_{\text{frames}}\) the latency in frames. For example, a pan at 30° per second with 5 frames of latency at 24 fps lags by \(30 \times 5/24 \approx 6.3°\), so the overscan must cover more than 6° on each side of the lens's field of view.
Pixel pitch and moiré
Pixel pitch is the distance between the centers of adjacent LED pixels on a panel, commonly from about 1.5 mm to 2.8 mm for film and television volumes, with finer pitches used for close-up work and coarser pitches for distant walls and ceilings. If the camera focuses on the wall and the pixel grid is imaged at a scale close to the camera sensor's photosite spacing, the two grids interfere, producing moiré: shimmering colored patterns across the image. The image of one LED pixel on the sensor has a size of about:
where \(p\) is the pixel pitch, \(f\) the focal length and \(d\) the distance to the wall. Moiré is avoided mainly by keeping the wall out of focus, so that defocus blur spreads each pixel over many photosites. Practical rules include keeping the actors and set well in front of the wall, choosing apertures and focal lengths that keep the wall soft, and avoiding focus pulls onto the wall. Volume operators test the combination of camera, lens and wall before shooting and know the minimum distances for each setup.
Worked problem
Checking moiré risk
A volume uses 2.6 mm pixel pitch. The camera uses a 35 mm lens at T2.8, focused on an actor 3 m away, with the wall 6 m from the camera. The camera's photosites are about 6 µm. Is moiré likely?
Show solution
- Image of one LED pixel on the sensor: \(2.6 \times 35 / (6000 - 35) \approx 0.0153\) mm, about 15 µm, a few photosites wide.
- Defocus blur of the wall: \(c = \frac{f^2}{N} \cdot \frac{|d - s|}{d (s - f)} = \frac{1225}{2.8} \cdot \frac{3000}{6000 \times 2965} \approx 0.074\) mm, about 74 µm.
- The blur (about 74 µm) is roughly five times the pixel image size (about 15 µm), so the pixel grid is smoothed away.
- If focus were pulled to the wall, the 15 µm pixel images would be resolved by 6 µm photosites and moiré would be likely.
Answer: With focus on the actor, moiré is unlikely; with focus on the wall, it would be likely.
Synchronization, refresh and genlock
LED panels display images by switching LEDs on and off rapidly, controlled by pulse-width modulation at high refresh rates, often several thousand times per second. To avoid flicker, banding and scan-line artifacts in the camera, the panels, processors, render nodes and cameras must be synchronized to a common reference signal, called genlock, so that each camera frame captures complete wall refresh cycles. Shutter angle and frame rate interact with refresh; volume engineers specify which combinations are safe, and some advanced systems use frame remapping or multiple refresh phases to show different images to different cameras or to provide a green screen for one camera while showing the environment to another. Timecode and genlock are distributed from a master clock, connecting camera, sound, engine and tracking (CINE-201 Lesson 3).
Brightness and exposure
LED panels used in volumes can reach peak brightness of over 1,000 nits, but they are usually run well below their maximum, because the camera needs only modest luminance for correct exposure. The luminance needed for a mid-gray area of the background follows from the reflected light exposure equation:
where \(L\) is luminance in nits, \(N\) the T-stop, \(S\) the ISO or EI, \(t\) the exposure time and \(K\) a meter constant of about 12.5.
Worked problem
How bright must the wall be?
A cinematographer shoots at T2.8, EI 800 and 1/48 s. What luminance should a mid-gray area of the wall show? How bright is a sky 2.5 stops above mid-gray?
Show solution
- Mid-gray: \(L = 12.5 \times 2.8^2 / (800 / 48) = 98 / 16.7 \approx 5.9\) nits.
- A sky 2.5 stops above: \(5.9 \times 2^{2.5} \approx 5.9 \times 5.66 \approx 33\) nits.
- Panels capable of over 1,000 nits therefore have large headroom for bright highlights such as the sun or practical light sources, and for lighting the set.
Answer: About 6 nits for mid-gray and about 33 nits for the sky; walls usually run far below their peak brightness.
Running the wall dimmer also reduces heat and power, but very low levels can reduce color bit depth on some processors, causing banding in dark gradients. Exposure in a volume is set by adjusting the wall brightness in the engine or processor as well as by the lens and lighting, so the cinematographer works closely with the engine operators to balance the background against the foreground.
| Parameter | Typical range or practice | Why it matters |
|---|---|---|
| Pixel pitch | About 1.5–2.8 mm | Moiré and minimum camera distance |
| Peak brightness | Often 1,000 nits or more | Headroom for highlights and lighting |
| Refresh and genlock | High refresh, synced to camera | Avoids flicker and banding |
| Latency | Several frames end to end | Limits fast camera moves |
| Viewing angle | Color and brightness shift off-axis | Camera position relative to curved walls |
| Bit depth | Processor-dependent | Smooth gradients at low brightness |
The set, the floor and the seam
Most volumes combine the LED wall with a physical set in the foreground: real ground, props, furniture or vehicles that blend into the digital environment behind them. The seam between the physical floor and the wall is a critical area: the color, texture, light and perspective of the floor must flow into the digital ground on the wall without a visible line. Art departments dress the floor with materials matching the digital environment, and engine operators adjust the content where it meets the floor. Camera height and angle influence how visible the seam is; low angles looking up hide the floor, while high angles reveal it. Reflections of the wall in the floor, set pieces and actors' eyes add realism but must be considered, since bright walls reflect in glossy floors.
When to use a volume
Volumes suit scenes with environments that are expensive or impossible to visit; scenes where reflections matter, such as cars, helmets, glass and water; scenes that need controllable time of day, such as perpetual magic hour; and productions that benefit from final backgrounds on the day, letting actors see their environment and directors judge composition. Volumes are less suited to wide shots with large floor areas, scenes with fast camera movement or extreme close focus on backgrounds, scenes requiring hard, high-intensity sunlight over large areas, and productions whose environments are not finalized before shooting, since content must be complete and approved before the shoot. The heavy front-loading of creative decisions into pre-production is the most important practical change: in a volume, much of the VFX work happens before principal photography.
Testing a volume before the shoot
Before principal photography, cinematographers test the volume with the production's camera, lenses and key costumes. A test day typically checks moiré at the planned focus distances and stops, color and skin rendering under the wall's light, the visibility of the floor seam at the planned camera heights, latency during typical moves, and the safe combinations of frame rate and shutter angle.
Common mistakes
MistakeFocusing on the LED wall.
InsteadKeep the wall soft to avoid moiré.
MistakeFast whip pans beyond the system's latency.
InsteadKnow the latency and overscan, and adapt moves.
MistakeRunning the wall at full brightness.
InsteadSet luminance for exposure and use headroom for highlights.
MistakeIgnoring genlock and shutter combinations.
InsteadUse tested frame rate and shutter settings.
MistakeArriving with unfinished environments.
InsteadFinalize and approve content before the shoot.
Summary and key terms
- LED volumes show real-time rendered environments tracked to the camera.
- The inner frustum follows the camera; the outer frustum lights and reflects.
- Latency limits fast moves; overscan hides small lags.
- Pixel pitch and focus determine moiré risk; keep the wall soft.
- Genlock synchronizes panels, engine and cameras.
- Walls run far below peak brightness for exposure, leaving headroom.
- Floors, seams and finished content are as important as the wall.
- LED volume
- Stage enclosed by LED display walls and ceilings.
- ICVFX
- In-camera visual effects captured on set.
- Inner frustum
- Camera-perspective area rendered on the wall.
- Outer frustum
- Rest of the wall used for light and reflections.
- Overscan
- Extra margin around the inner frustum.
- Latency
- Delay between camera movement and wall update.
- Pixel pitch
- Distance between adjacent LED pixel centers.
- Moiré
- Interference pattern between wall pixels and sensor photosites.
- Genlock
- Shared synchronization signal for devices.
- Brain bar
- Engine and volume control team on set.
Practice problems
Work each problem on paper first, then reveal the answer to check.
What does the inner frustum show?
Show answer
The environment from the tracked camera's perspective.
Inner frustum width at 5 m with a 50 mm lens on 24.9 mm?
Show answer
About 2.5 m.
Lag for a 20°/s pan with 6 frames latency at 24 fps?
Show answer
5°.
Typical volume pixel pitch?
Show answer
About 1.5–2.8 mm.
How is moiré mainly avoided?
Show answer
Keeping the wall out of focus.
What is genlock for?
Show answer
Synchronizing panels, engine and cameras.
Mid-gray luminance at T4, EI 800, 1/48 s?
Show answer
About 12 nits.
Why run walls below peak brightness?
Show answer
Exposure needs only modest luminance; headroom for highlights.
What is the seam?
Show answer
Where the physical floor meets the wall image.
Name a scene poorly suited to a volume.
Show answer
Wide floor shots, fast moves, hard sun over large areas, unfinished content.
Lesson quiz · 5 questions
Score 60% or more to complete this lesson.
Create a free account to save your progress, take quizzes and earn a certificate.