
CINE-202 · Lesson 5 of 12 · 24 min
Dynamic range and latitude
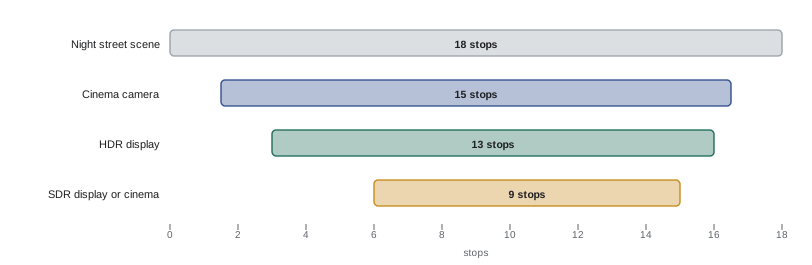
The range of brightness in the world often exceeds what any camera or display can capture or reproduce. A sunlit exterior seen through a window from a dim room might span 15 or 20 stops; a night street with bright signs and dark alleys, even more. Cinematographers must decide how to fit the scene into the camera's range, which parts to protect and which to sacrifice, and how much room to leave for grading. This lesson covers scene dynamic range, camera dynamic range and how it is measured, latitude above and below middle gray, highlight roll-off and clipping, the noise floor, display dynamic range, how lighting controls scene range, and strategies for scenes that exceed the camera's capability.
Scene dynamic range
The dynamic range of a scene is the ratio between its brightest and darkest important areas, usually expressed in stops. Typical scenes vary widely:
| Scene | Approximate range |
|---|---|
| Overcast exterior, no sky | 5–7 stops |
| Interior, soft window light, window out of frame | 6–8 stops |
| Sunny exterior with shadows | 10–12 stops |
| Interior with bright window in frame | 12–16 stops |
| Night street with lights and dark areas | 15–20 stops |
| Sun in frame | More than 20 stops |
What counts as "important" is a creative decision. In a night scene, it may be acceptable for street lamps to clip and for some shadows to fall to black, as long as faces and key details hold. Measuring the scene with a spot meter, or reading it on a log waveform, tells you the range of the parts you care about.
Camera dynamic range
A camera's dynamic range is the ratio between the brightest signal it can record before clipping and the darkest signal distinguishable from noise. CINE-201 described the engineering dynamic range set by full-well capacity and read noise. In practice, manufacturers and testers measure usable dynamic range from test charts or step wedges, counting the stops between clipping and a noise threshold, for example a signal-to-noise ratio of 2:1 or 1:1. Different thresholds give different answers, which is why published figures vary: a camera might measure 14 stops with a generous threshold and 12 with a strict one. Current high-end digital cinema cameras, such as the ARRI ALEXA 35, claim around 17 stops, while many others offer 13 to 16 stops in their best modes. Dynamic range also changes with exposure index, codec and processing, and some cameras offer extended range only in certain recording modes.
More useful than the headline figure is knowing how the range is distributed around middle gray, because that determines how much room there is for overexposure and underexposure.
Latitude above and below middle gray
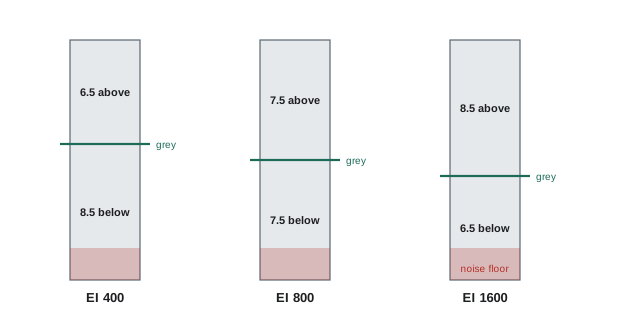
Latitude is the room available to place a scene's tones within the camera's range. It is described as the number of stops above middle gray before clipping (highlight latitude) and below middle gray before the noise floor (shadow latitude). A camera with 15 stops of dynamic range might, at its base EI, record about 7.5 stops above gray and 7.5 below. Raising the exposure index moves middle gray lower in the recorded range, giving more stops above gray and fewer below; lowering it does the opposite. ARRI, for example, publishes tables showing how the stops above and below middle gray change with EI on each camera. Knowing these numbers lets cinematographers choose an EI that protects the highlights in a bright scene or the shadows in a dark one (Lesson 7).
Worked problem
Fitting a scene into the camera's latitude
A camera at EI 800 records 7.5 stops above and 6.5 usable stops below middle gray. A scene has a window measured 6 stops above the key-lit face, which is exposed one stop above middle gray, and dark corners 5 stops below middle gray. Will the scene fit? What if the window were 8 stops above the face?
Show solution
- Window relative to gray: face at +1, window at +1 + 6 = +7 stops, which is within the 7.5 stops above gray.
- Dark corners at −5 stops are within the 6.5 usable stops below gray.
- The scene fits, with little highlight headroom.
- With the window at +8 stops relative to the face, it would sit at +9 stops above gray, exceeding 7.5 stops: it would clip by about 1.5 stops unless exposure, EI or lighting changes.
Answer: The first scene fits; the brighter window would clip by about 1.5 stops unless the window is reduced with ND, more light is added inside, or EI and exposure are adjusted.
Highlight roll-off and clipping
How a camera handles the brightest tones has a large effect on the look of the image. At the sensor's saturation point, the signal simply stops increasing: highlights clip, losing all detail and color. Below that point, cameras differ in how they render the approach to clipping. Film negative, and digital cameras designed with film-like responses, compress highlights gradually, a smooth roll-off in which bright areas lose contrast and saturation progressively before reaching white, so skies, windows and lights look natural. Cameras or encodings with abrupt clipping show hard edges where highlights end, and colors may shift or become flat as one channel clips before others. Much of this behavior comes from the display transform rather than the sensor: a well-designed LUT or output transform compresses highlights smoothly from data that remains unclipped in the log recording. Cinematographers value cameras with generous highlight latitude because clipped highlights look distinctly digital, and many expose to keep important highlights a little below the clip point.
The noise floor
At the dark end, the limit is noise rather than a hard clip. As exposure decreases, the signal approaches the noise floor, where read noise and shot noise dominate and detail disappears into grain, colored speckles and, in some cameras, fixed patterns. Unlike clipping, the noise floor is gradual, and how much noise is acceptable depends on the look, the delivery format and the size of the screen: a film for a cinema screen demands cleaner shadows than a social media clip. Shadows that are well above the noise floor can be graded freely; shadows near it can be darkened safely but not lifted much. A principle many cinematographers follow is to expose so that the darkest areas that must show detail sit a few stops above the noise floor, then grade them down to the desired darkness, which reduces visible noise.
Display dynamic range
Displays have their own dynamic range. Standard dynamic range (SDR) television and online video, mastered to Rec.709 or sRGB at a reference white of about 100 nits, can show only about 6 to 10 stops of scene range attractively, depending on the display and viewing environment. Cinema projection at 48 nits (14 foot-lamberts) in a dark room has a similar range with deeper blacks. High dynamic range (HDR) displays, mastered at 1,000 nits or more with very dark blacks, can show substantially more range, particularly in specular highlights (Lesson 11). Because the camera captures far more range than an SDR display can show, the display transform must compress the scene into the display range, deciding how highlights roll off and how shadows are rendered. Capturing more range than the display shows is still valuable: it allows the colorist to choose which parts to show, recover a sky or open up a shadow, and produce HDR and SDR versions from the same footage.
Controlling scene range with light
When a scene exceeds the camera's range, the cinematographer can change the scene rather than the camera. Lighting tools that reduce the brightness range include:
- Adding light to shadows and dark areas, raising them toward the middle of the range.
- Reducing light on bright areas: ND gel or scrims on windows, dimming practical lamps, flagging hot spots on walls, or using a silk overhead to soften and reduce sun on actors.
- Choosing angles and times of day that keep the brightest elements, such as the sun or a white sky, out of frame or behind the subject.
- Using production design: darker or lighter costumes and set finishes that avoid extremes, or reducing reflectivity with dulling spray.
These approaches take time and equipment but produce images with better quality than relying on the grade, especially for SDR delivery where highlights must be compressed heavily.
Embracing clipping and black
Not every scene needs every tone preserved. A window that blooms to white can feel natural, conveying a bright world outside; a practical bulb that clips looks like a light; deep blacks create mystery and focus attention. The key is that clipping and crushing should be decisions rather than accidents. Clipping skin, faces or key story details is almost always undesirable, and clipped areas should be large and smooth enough to look intentional rather than showing ragged edges. Graded footage that includes some true black and some specular highlights often looks more natural and vivid than footage in which everything has been preserved in gray midtones.
Measuring your camera's latitude
Published figures are a starting point; testing your own camera, codec and pipeline is more reliable. A simple latitude test involves lighting a subject, such as a person with a gray card and a color chart, to a correct exposure, then shooting a series of takes at one-stop intervals from about five stops under to five stops over, either by changing light or by changing shutter or ND rather than EI. In grading, each take is normalized back to the correct exposure, and the results are compared for noise in underexposure, highlight clipping and color shifts in overexposure. The test reveals how far the camera can be pushed in each direction for a given look and delivery format, and which EI best suits the production. Lesson 12 discusses camera tests further.
Dynamic range and codecs
A camera's dynamic range in practice depends on how the signal is recorded. Raw and high-quality log codecs preserve the sensor's full range, but heavily compressed codecs, low bit depths and display-referred recording modes can reduce the usable range considerably. Compression artifacts and noise reduction in compressed codecs can smear fine shadow detail, effectively raising the noise floor, while 8-bit recording limits how far shadows and highlights can be graded before banding appears. Some cameras also offer different dynamic range in different sensor modes, for example when cropping the sensor for higher frame rates or using electronic shutter modes. Testing the specific modes and codecs planned for production gives the true usable range.
Contrast ratio and perception
The perceived contrast of an image depends not only on its dynamic range but on how tones are distributed. Two images with the same black and white points can look very different: one with most tones in the midtones looks flat, while one with a strong separation of shadows and highlights looks punchy. Grading tools shape this distribution, but the raw material comes from lighting and exposure. Cinematographers often think of contrast in two layers: the lighting contrast within faces and sets, controlled on set, and the tonal contrast of the final image, shaped in grading. A low-contrast lighting setup gives the colorist more freedom; a high-contrast setup commits to a look early.
Common mistakes
MistakeTrusting headline dynamic range figures without context.
InsteadKnow the measurement threshold and test your own pipeline.
MistakeIgnoring how latitude splits around middle gray.
InsteadUse manufacturer tables and choose EI accordingly.
MistakeLifting shadows near the noise floor.
InsteadExpose shadows higher and grade them down.
MistakeFixing every high-contrast scene only in the grade.
InsteadControl scene range with light and ND gels.
MistakeAccidental clipping of faces and key details.
InsteadClip only deliberately and in appropriate areas.
Summary and key terms
- Scene ranges vary from about 5 to more than 20 stops.
- Camera dynamic range depends on measurement thresholds, EI and codec.
- Latitude is the split of stops above and below middle gray.
- Highlight roll-off shapes how bright tones approach clipping.
- The noise floor limits shadow detail gradually.
- Displays show less range than cameras record; transforms compress it.
- Lighting, ND gels and design control scene range; clipping should be deliberate.
- Dynamic range
- Ratio of brightest to darkest usable signal.
- Latitude
- Room for tones above and below middle gray.
- Highlight headroom
- Stops available above a key tone before clipping.
- Roll-off
- Gradual compression of tones approaching clipping.
- Clipping
- Loss of detail at maximum signal.
- Noise floor
- Level where noise overwhelms detail.
- SDR
- Standard dynamic range display and mastering.
- HDR
- High dynamic range display and mastering.
- Scrim
- Material that reduces light intensity.
- Latitude test
- Test of exposure tolerance across stops.
Practice problems
Work each problem on paper first, then reveal the answer to check.
Approximate range of a sunny exterior with shadows?
Show answer
10–12 stops.
Why do published dynamic range figures vary?
Show answer
Different noise thresholds and test methods.
What does raising EI do to latitude?
Show answer
More stops above gray, fewer below.
A face at +1 and a window 7 stops brighter: where is the window?
Show answer
+8 stops above gray.
What is highlight roll-off?
Show answer
Gradual compression of tones before clipping.
Why expose shadows above the noise floor and grade down?
Show answer
It reduces visible noise.
Reference white for SDR?
Show answer
About 100 nits.
Name two ways to reduce scene range with light.
Show answer
Add fill, ND gel on windows, dim practicals, silks.
When is clipping acceptable?
Show answer
When deliberate, in areas such as lamps or bright windows.
How is a latitude test performed?
Show answer
Shoot at one-stop intervals over and under, then normalize and compare.
Lesson quiz · 5 questions
Score 60% or more to complete this lesson.
Create a free account to save your progress, take quizzes and earn a certificate.