
CINE-101 · Lesson 8 of 12 · 24 min
Recording usable sound
Audiences will watch a slightly soft or poorly lit image if the story holds them, but they quickly abandon a video in which they cannot hear the dialogue clearly. Good sound is not mainly a matter of expensive equipment: it comes from putting the right microphone close to the source, controlling noise, setting levels correctly and listening carefully. Problems that take seconds to fix on set can take hours, or prove impossible, to fix in post-production. This lesson covers how microphones work and which to choose, boom and lavalier technique, wireless systems, recording levels and formats, separate sound recording and synchronization, and the habits that make location sound usable: monitoring, noise control, room tone and wild lines. Advanced production sound and mixing are taught in a later sound course.
Distance is everything
The most important rule in location sound is to get the microphone close to the source. Sound, like light, falls off with distance: in open space, the sound level from a voice drops by about 6 dB each time the distance doubles. Room reflections and background noise, by contrast, stay roughly constant across the room. Moving the microphone closer therefore improves the ratio of voice to noise and reverberation.
Worked problem
Why the camera microphone sounds bad
A camera with a built-in microphone sits 3 m from a speaking subject. A boom microphone can be placed 0.4 m from the subject's mouth. Assuming the background noise and room reverberation at both positions are the same, how much better is the voice-to-noise ratio at the boom?
Show solution
- Ratio of distances: 3 / 0.4 = 7.5.
- Level difference: 20 log₁₀(7.5) ≈ 17.5 dB more voice at the boom.
- With the noise unchanged, the voice-to-noise ratio improves by about 17.5 dB.
Answer: The boom position gives about 17.5 dB more voice relative to noise and room echo, the difference between a voice that sounds present and clear and one that sounds distant and hollow. No amount of post-production can fully restore a voice recorded from across the room.
Microphone types and polar patterns
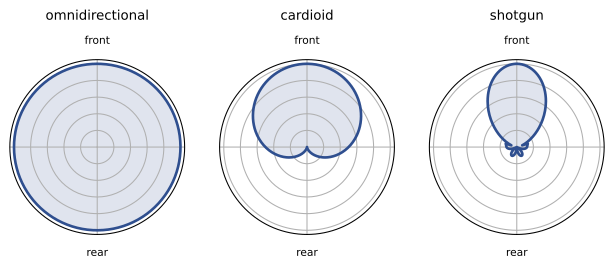
Microphones differ in how they convert sound to electricity and in the directions they pick up sound from (their polar pattern):
- Dynamic microphones are rugged and handle loud sources; they are common for reporters' handheld interviews and music, but less sensitive for quiet dialogue at a distance.
- Condenser microphones are more sensitive and detailed, and need power (phantom power from the recorder or a battery). Most film dialogue microphones are condensers.
- Omnidirectional microphones pick up equally from all directions; lavaliers are often omni because the mouth is close and their orientation on clothing varies.
- Cardioid and supercardioid microphones favor sound from the front and reject sound from the rear; they are good indoors on a boom, where shotgun microphones can sound hollow from room reflections.
- Shotgun (hypercardioid or lobar) microphones are highly directional, rejecting sound from the sides; they are the standard outdoor boom microphone.
A directional microphone still picks up whatever is behind the subject in the direction it points, so a boom aimed down at a speaker from above picks up the floor (usually quiet) rather than traffic behind them.
Booming
The boom operator holds the microphone on a pole just outside the frame, usually above the actor, pointed at the mouth. Overhead booming is preferred because the microphone points down toward the ground rather than toward background noise, and because the top of the frame is usually easier to keep clear than the bottom. Key techniques:
- Find the frame line: ask the camera operator for the frame edge, lower the microphone into frame until it is seen, then raise it just out. Watch for the boom's shadow, especially with hard light.
- Aim at the mouth, following the actor's head as they turn and moving between actors as they speak in turn.
- Keep the microphone as close as the frame allows; in a close-up, the boom can be very close, while in a wide shot it may be farther or replaced by lavaliers.
- Hold the pole steadily, without touching the cable or rubbing the pole, since handling noise travels to the microphone. A shock mount isolates the microphone from the pole.
Booming is physically demanding; operators rest the pole on the head between takes and hold it close to the body during long takes.
Lavalier microphones
A lavalier (lav) is a tiny microphone clipped to clothing or hidden under it, usually on the chest about 15 to 25 cm below the mouth. Lavs give consistent close sound when the boom cannot get close (wide shots, moving subjects, noisy locations) and are standard for interviews. Their challenges are clothing rustle, which is the most common lav problem, and the slightly chesty sound of a mic placed under the chin. Hidden lavs are taped carefully so that clothing does not rub over the capsule, using foam, moleskin or special mounts, with a small loop of cable for strain relief. Visible lavs, common in interviews and documentaries, are clipped neatly in the center of the chest, away from jewelry and collars. Many productions record both a boom and lavalier tracks and choose or blend them in the edit.
Wireless systems
Wireless transmitters send lavalier or handheld microphone signals to a receiver at the camera or recorder, freeing subjects to move. Analog and digital systems operate in radio bands that are shared with television broadcasters and other users and regulated by national authorities, and frequencies available to wireless microphones have changed in recent years as spectrum was reallocated.
In the United States, wireless microphones are regulated by the Federal Communications Commission (FCC). The 600 MHz band was reallocated to mobile services, so older equipment operating there may no longer be used; many systems now use the remaining TV white spaces, the 900 MHz and 1.9 GHz bands or 2.4 GHz digital links, and frequency scanning before each shoot helps avoid interference.
Practical wireless habits: scan for clear frequencies at each location, use fresh batteries and change them on a schedule rather than waiting for failure, keep receivers in line of sight where possible, and record a backup on the transmitter itself if the system supports it, since dropouts are unrecoverable.
Levels, formats and recorders
Digital audio is measured in decibels relative to full scale (dBFS), where 0 dBFS is the maximum the recorder can capture. Anything louder clips, producing harsh distortion that cannot be repaired. Set the input gain so that normal dialogue peaks around −12 to −6 dBFS, leaving headroom for sudden shouts or laughs; quiet passages will fall well below that, which is fine with modern 24-bit recording. Many field recorders now record in 32-bit floating point, which captures an enormous dynamic range so that clipping in the file is practically impossible, though the microphone and preamplifier can still overload. Use limiters as a safety net, not a substitute for good gain setting. The standard format for video production is 48 kHz sample rate, 24-bit (or 32-bit float), uncompressed WAV files.
Recording sound directly into the camera is simple and keeps sync automatically, but many camera inputs have noisy preamplifiers and limited control. A separate field recorder (double-system sound) gives better quality, more inputs and independent monitoring, at the cost of synchronizing picture and sound later.
Synchronization
When sound is recorded separately, it must be synchronized with the picture in the edit. The traditional method is the clapperboard (slate): at the start of each take, the second camera assistant holds the slate in frame, announces the scene and take numbers, and closes the clapper. The editor aligns the frame where the sticks meet with the sharp spike of the clap in the audio. Professional productions also use timecode, a running clock written into both camera and recorder files, synchronized by timecode generators, so that clips line up automatically. Editing software can also synchronize clips by matching the camera's reference audio with the recorder's waveform, which works well when the camera records scratch sound. Even with timecode, a visual slate identifies each take for the editor.
Monitoring and noise control
Always listen to the recording through closed-back headphones, not to the room. Headphones reveal problems the ear ignores in the room: the hum of a refrigerator, distant traffic, clothing rustle, a buzzing light, wind on the microphone. Before recording, survey the location for noise: switch off refrigerators, air conditioning, fans and noisy lights (and leave a note or a car key in the fridge so you remember to turn it back on); close windows; choose rooms away from roads; and soften echoing rooms with blankets, rugs and furniture placed out of frame. Outdoors, protect microphones from wind with foam covers indoors and furry windshields or blimps outside, because wind noise is impossible to remove completely.
Room tone and wild lines
After each scene, record 30 to 60 seconds of room tone: the sound of the location with everyone silent and still, with the microphone in the same position. Editors use room tone to fill gaps between lines and smooth edits, because pure digital silence sounds unnatural against location dialogue. When a line is spoiled by noise (a passing plane, a cough) and the picture is fine, record a wild line: the actor repeats the line without the camera rolling, close to the microphone, for the editor to fit to the picture. Recording sound effects on location, such as doors, footsteps and props, also helps the edit.
Interviews and run-and-gun sound
For seated interviews, the best results usually combine a lavalier on the subject and a boom or a microphone on a stand just out of frame above them, recorded on separate tracks; the editor chooses the better one for each section. Ask the subject to avoid touching the lav, remove noisy jewelry, and switch phones off rather than to silent, since vibration and radio interference can be audible. Keep the interviewer quiet during answers: no "uh-huh" or "right", which are impossible to remove, and pause a beat after each answer before asking the next question so the editor has clean ends.
In run-and-gun documentary and event work, where a single operator handles camera and sound, a good on-camera shotgun microphone helps for ambient sound and nearby voices, but wireless lavaliers on the main subjects remain the key to usable dialogue. Monitor with headphones even when operating the camera, using one ear if necessary, and record a safety track at lower gain if the recorder or camera allows it.
After the shoot, back up sound files exactly as carefully as picture (Lesson 10), keep the sound reports with them, and note which track holds which microphone. An editor who receives clearly labeled, well-recorded sound with room tone and wild lines can build a clean soundtrack quickly; one who receives unlabeled, noisy files will spend days rescuing what could have been recorded properly in minutes.
Common mistakes
MistakeRelying on the camera's built-in microphone.
InsteadPut a boom or lavalier close to the speaker.
MistakeRecording without headphones.
InsteadMonitor every take with closed-back headphones.
MistakeSetting levels so dialogue peaks near 0 dBFS.
InsteadPeak around −12 to −6 dBFS, leaving headroom.
MistakeLeaving refrigerators and air conditioning running.
InsteadSurvey and silence noise sources before recording.
MistakeForgetting room tone.
InsteadRecord 30 to 60 seconds of room tone for every scene.
Summary and key terms
- Microphone distance matters most: halving distance gains about 6 dB of voice over noise.
- Condenser microphones dominate dialogue; patterns range from omni to cardioid to shotgun.
- Boom from above, just out of frame, aimed at the mouth, without handling noise.
- Lavaliers give consistent close sound but must be rigged to avoid rustle.
- Wireless systems need clear, legal frequencies, fresh batteries and backups.
- Record 48 kHz, 24-bit or 32-bit float WAV with dialogue peaking around −12 to −6 dBFS.
- Sync with slates and timecode, monitor with headphones, control noise, and record room tone and wild lines.
- Polar pattern
- The directional sensitivity of a microphone.
- Shotgun microphone
- A highly directional microphone used on a boom.
- Lavalier
- A small microphone attached to clothing.
- Boom
- A pole holding a microphone above or below the frame.
- dBFS
- Decibels relative to full scale in digital audio.
- Headroom
- The margin between normal peaks and clipping.
- Double-system sound
- Recording sound on a separate recorder from the camera.
- Timecode
- A clock signal recorded in media files for synchronization.
- Room tone
- Recorded ambient sound of a location without dialogue.
- Wild line
- A line of dialogue recorded without picture.
Practice problems
Work each problem on paper first, then reveal the answer to check.
How much does the voice level rise when the microphone distance is halved?
Show answer
About 6 dB.
A microphone moves from 2 m to 0.5 m. How much louder is the voice?
Show answer
20 log₁₀(4) ≈ 12 dB.
Which polar pattern is standard for an outdoor boom?
Show answer
Shotgun (hypercardioid or lobar).
Why is overhead booming preferred?
Show answer
The microphone points at the quiet floor and the top of frame is easier to keep clear.
What is the most common lavalier problem?
Show answer
Clothing rustle.
Why must wireless frequencies be checked?
Show answer
Bands are shared, regulated and have been reallocated; interference causes dropouts.
Where should dialogue peaks sit?
Show answer
Around −12 to −6 dBFS.
What sample rate and bit depth are standard for video?
Show answer
48 kHz, 24-bit (or 32-bit float).
How does a clapperboard help synchronization?
Show answer
The frame where the sticks meet aligns with the clap spike in the audio.
What is room tone used for?
Show answer
Filling gaps and smoothing edits with natural background sound.
Lesson quiz · 5 questions
Score 60% or more to complete this lesson.
Create a free account to save your progress, take quizzes and earn a certificate.