
SMW-230 · Lesson 9 of 12 · 19 min
Welding aluminum
The Ashgrove Elementary pool change room exhaust was the first aluminum job Kai helped weld. The duct itself was formed from aluminum sheet with seams and stainless screws, as SMW-220 described, but the exhaust plenum at the fan, its drain pan and the welded collars where the duct met the wall louvre were GTAW-welded aluminum, because the air was warm, damp and laden with chlorine from the pool. Aggie MacLeod told Kai on the first morning that aluminum would humble him, and it did. This lesson covers why aluminum welds so differently from steel and how the trade gets good results on it.
How aluminum differs from steel
Four properties of aluminum change how it is welded.
- Oxide. Aluminum is covered by a thin, tough layer of aluminum oxide that forms within seconds in air and thickens over hours and days. The oxide melts at about 2,050 °C (3,700 °F), roughly three times the melting point of the aluminum under it at about 650 °C (1,200 °F). Unless the oxide is removed, the aluminum melts under a skin of solid oxide and will not flow together. That is why aluminum is cleaned just before welding and why GTAW uses alternating current, whose cleaning action breaks the oxide up.
- Heat conduction. Aluminum conducts heat several times better than steel. The heat of the arc spreads away fast, so a joint that needs a given current on steel needs more on aluminum to start a pool, and then, as the whole part warms, much less to keep from melting through. The welder's foot on the pedal does a lot of work.
- No colour change. Steel glows red before it melts; aluminum shows almost no change in colour until it suddenly slumps. The welder has to watch the pool surface for the moment it turns shiny and wet.
- Expansion and shrinkage. Aluminum expands about twice as much as steel for the same temperature rise and shrinks a lot as it solidifies, so it distorts readily and some alloys crack as they cool.
Aluminum also holds hydrogen. Moisture, oil, grease and the hydrated oxide on old or stored metal give off hydrogen in the arc, which dissolves in the molten pool and comes out as porosity as it freezes. Clean, dry metal and filler are essential.
Aluminum alloys in the trade
Aluminum sheet for duct and architectural work is mostly from two alloy families. The 3000 series, mainly 3003, is aluminum with manganese: easy to form and weld, moderately strong, widely used for duct. The 5000 series, such as 5052, has magnesium, is stronger and has better corrosion resistance in marine and pool air, and is used for drain pans, hoods and outdoor work. Extrusions and structural shapes are often 6061 or 6063 from the 6000 series, which are heat-treated for strength; welding softens a band next to the weld, which designers allow for. The Ashgrove plenum was 5052 sheet with 6061 angle for the frame.
Filler metals
The two common aluminum filler alloys are ER4043, with silicon, and ER5356, with magnesium. They behave differently, and the choice depends on the base metals and the service.
| Property | ER4043 (silicon) | ER5356 (magnesium) |
|---|---|---|
| Fluidity and wetting | Very fluid, wets well, smooth bead | Less fluid, needs more heat |
| Crack resistance | Good on 6000-series alloys | Good on 5000-series alloys |
| Strength of the weld | Lower | Higher |
| Colour after anodizing | Turns grey, a poor match | Close match |
| Use with 5000-series base metal | Avoid on high-magnesium alloys | Preferred |
| Service temperature | Suitable above about 65 °C (150 °F) | Not for sustained high temperature |
For the Ashgrove plenum, with 5052 sheet in damp, chlorinated air, the procedure called for ER5356. For the 6061 angle frame welded to itself, ER4043 would have been easier to use, but because the frame was welded to the 5052 sheet and the whole assembly would see the same air, the procedure used ER5356 throughout for simplicity and corrosion resistance.
Cleaning aluminum
Aluminum cleaning is done in two steps, in this order, on the day of welding.
- Degrease: wipe the joint area and the filler rod with an approved solvent on a clean cloth to remove oil, grease, marker and fingerprints. Brushing first would drive the oil into the surface.
- Remove the oxide: brush the joint area with a stainless steel brush used only for aluminum, or use a clean carbide burr or file. Do not use abrasive discs that can embed grit in the soft metal, and never use a brush or disc that has touched steel.
Store aluminum sheet and filler dry and indoors; metal brought in from a cold truck into a warm shop will form condensation and should be left to warm up before welding. Keep filler rods in their sealed tube and clip off any oxidized end.
AC GTAW settings
Alternating current alternates between electrode-positive and electrode-negative halves. The electrode-positive half cleans the oxide but puts heat into the tungsten; the electrode-negative half heats the work and penetrates. Modern inverter machines let the welder set three things.
- Balance: the share of each cycle spent electrode-negative. A higher electrode-negative share gives more penetration, a narrower bead and a cooler tungsten, with less cleaning. A lower share gives more cleaning, a wider frosty band beside the weld and a hotter tungsten. Inverter settings of roughly 65 to 75 percent electrode-negative suit clean sheet; dirtier or older metal needs more cleaning.
- Frequency: how many cycles per second. Higher frequency, above the old fixed mains frequency, narrows and stiffens the arc, focusing it on thin sheet and in corners. Lower frequency gives a wider, softer arc for larger welds.
- Current: set by the thickness. A common rule of thumb is about one ampere per thousandth of an inch of thickness, roughly 40 amperes per millimetre, as a starting point for aluminum, adjusted on scrap and with the pedal.
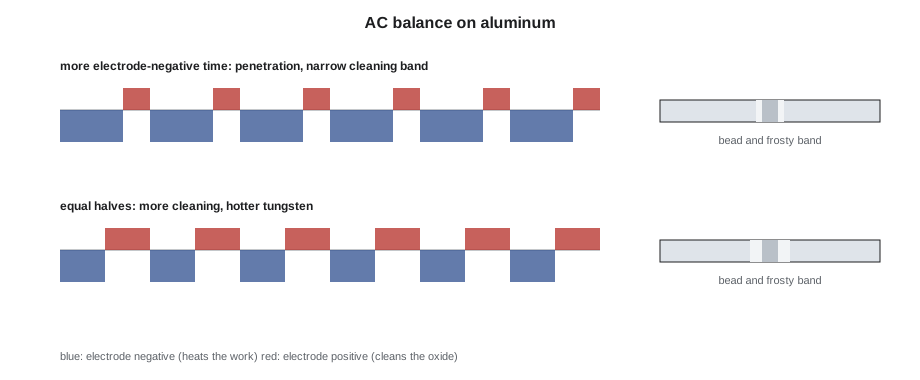
Kai worked out his starting settings for the Ashgrove plenum with the script below, using the rule of thumb and Aggie's balance and frequency settings, and then checked the effect of the balance on how the arc's time was split.
# AC GTAW starting settings for aluminum (rules of thumb; confirm on scrap)
parts = [('plenum side, 5052 sheet', 1.6), ('drain pan, 5052 sheet', 2.0), ('frame angle, 6061', 3.2)]         # (part, thickness in mm)
per = 40             # amperes per mm of thickness (starting point)
for name, t in parts:
    amps = t * per
    rod = lambda t: '1.6 mm' if t < 2 else ('2.4 mm' if t < 3 else '3.2 mm')
    print(f"{name:<30} {t} mm: start near {amps:.0f} A, filler about {rod(t)}")
freq = 120              # cycles per second
for en in (0.65, 0.70, 0.75):
    period_ms = 1000 / freq
print(f"balance {en:.0%} electrode-negative at {freq} Hz: {period_ms * en:.2f} ms heating, {period_ms * (1 - en):.2f} ms cleaning per cycle")plenum side, 5052 sheet 1.6 mm: start near 64 A, filler about 1.6 mm drain pan, 5052 sheet 2.0 mm: start near 80 A, filler about 2.4 mm frame angle, 6061 3.2 mm: start near 128 A, filler about 3.2 mm balance 65% electrode-negative at 120 Hz: 5.42 ms heating, 2.92 ms cleaning per cycle balance 70% electrode-negative at 120 Hz: 5.83 ms heating, 2.50 ms cleaning per cycle balance 75% electrode-negative at 120 Hz: 6.25 ms heating, 2.08 ms cleaning per cycle
The starting currents, about 65, 80 and 130 amperes, were higher than for stainless of the same thickness, as expected, and Aggie's pedal took them down as the parts heated.
Technique on aluminum
The basic GTAW technique from lesson 7 applies, with changes. Hold a short arc. Wait at the start for the pool to form: a bright, shiny, wet spot, which on cold aluminum takes a moment at full pedal. Add filler as soon as the pool forms and keep adding it steadily; aluminum pools are wide and fluid, and need more filler than steel. Move faster as the part heats, and ease the pedal back. At the end, taper the current slowly and add a final dab of filler to fill the crater, because aluminum craters crack easily. Keep the rod and tungsten out of contact: aluminum contaminates tungsten instantly, and a contaminated tungsten must be cleaned and reground before going on.
Fit-up and tacking follow the thin-sheet rules, but aluminum's expansion makes sequence and clamping even more important. Tack at short intervals and weld in a balanced order. On thin aluminum, a backing bar of stainless steel or aluminum with a shallow groove supports the pool; copper bars are used carefully because copper can contaminate the weld if the arc touches it.
GMAW on aluminum
Aluminum can also be welded with GMAW, using argon gas and spray or pulsed transfer. It is faster than GTAW and good for longer welds on heavier sheet and plate, but on thin sheet it runs hot and is harder to control, and the soft aluminum wire tends to tangle in the feeder. Shops that weld a lot of aluminum use a push-pull gun or a spool gun with a short wire path, plastic liners and U-groove drive rolls. Keelson used GTAW for all its thin aluminum work and sent heavier aluminum jobs to a fabricator with a pulsed GMAW cell.
Common aluminum defects
| Defect | Cause | Cure |
|---|---|---|
| Porosity | Moisture, oil, hydrated oxide, damp filler | Degrease, brush, keep metal and filler dry |
| Lack of fusion | Oxide not removed, too little heat at the start | Clean on the day; wait for the pool |
| Crater cracks | Abrupt stop | Taper the current and fill the crater |
| Hot cracking along the weld | Wrong filler for the alloy | Use the filler in the procedure |
| Black soot beside the weld | Magnesium oxide from 5000-series filler | Normal with ER5356; brush off |
| Melt-through | Heat builds up as the part warms | Pedal back and speed up as the part heats |
Worked problem
Picking the current and filler
Kai is to weld the 2.0 mm 5052 drain pan corners for the pool plenum. Using the shop rule of thumb, what current should he start near, and which filler?
Show solution
- Current ≈ 2.0 mm × 40 A/mm = 80 A.
- Filler for 5052 in damp, chlorinated air: ER5356, as the procedure specifies.
- Try on scrap of the same alloy and thickness; expect to need full pedal at the start and less as the pan warms.
Answer: Start near 80 A on AC with ER5356, adjusted on scrap and with the pedal.
Distortion and fit-up on aluminum
Aluminum's expansion makes it move even more than stainless as it is welded. A long butt seam in thin aluminum sheet opens up ahead of the weld as the heat spreads, then closes and pulls the parts together as it cools. The answers are the same as for steel, applied more strictly: tight fit-up, close tacks, short welds in a balanced order, clamping to a heavy table, and backing bars to carry heat away. On the Ashgrove plenum, Aggie tacked the sides at about 40 mm (an inch and a half), closer than she would on steel, and welded the corners in short segments from the middle outward.
Aluminum is also soft and scratches easily, and the scratches show on visible work. Parts are handled with clean gloves, laid on clean wood or plastic rather than steel benches, and kept separate from steel parts so that steel dust and filings do not embed in the surface and cause pitting later.
Safety on aluminum
Aluminum welding has a few hazards of its own. The bright arc and the reflective metal give off strong ultraviolet light, so skin must be fully covered and booth curtains closed; the ozone that ultraviolet light makes in the air around the arc calls for good extraction. Aluminum dust from grinding is combustible, and mixed with steel dust it can react violently, so aluminum grinding is done away from steel grinding and the dust is collected separately. Finally, the welded part stays hot for some time without any colour change, so hot parts are marked or quenched before anyone handles them.
Common mistakes
MistakeBrushing aluminum before degreasing.
InsteadDegrease first, then brush, or the brush drives oil into the surface.
MistakeUsing a brush that has touched steel.
InsteadKeep stainless brushes for aluminum only.
MistakeWaiting for aluminum to glow before it melts.
InsteadWatch for the shiny, wet pool; aluminum shows little colour.
MistakeStopping abruptly at the end of a weld.
InsteadTaper the current and add filler to fill the crater.
MistakeUsing ER4043 on high-magnesium 5000-series parts.
InsteadUse the filler in the procedure, usually ER5356 for 5000-series alloys.
Summary and key terms
- Aluminum's oxide melts far above the metal and must be removed; AC GTAW's cleaning action breaks it up.
- Aluminum conducts heat quickly, gives no colour warning and expands and shrinks a lot.
- Hydrogen from moisture and oil causes porosity; degrease, then brush, on the day of welding.
- ER4043 is fluid and suits 6000-series alloys; ER5356 is stronger and suits 5000-series alloys and anodized work.
- AC balance trades cleaning for penetration; higher frequency focuses the arc.
- Wait for the pool, add filler steadily, ease off as the part heats and fill the crater.
- Aluminum oxide
- The tough surface film on aluminum, melting far above the metal.
- AC balance
- The share of each AC cycle spent electrode-negative.
- Cleaning action
- Breaking up of aluminum oxide during the electrode-positive half of an AC cycle.
- ER4043
- A silicon-bearing aluminum filler, fluid and crack-resistant on 6000-series alloys.
- ER5356
- A magnesium-bearing aluminum filler, stronger and suited to 5000-series alloys.
- Spool gun
- A GMAW gun with a small wire spool on it, used for soft aluminum wire.
Practice problems
Work each problem on paper first, then reveal the answer to check.
Using the 40 A per mm rule, what starting current suits 1.2 mm aluminum?
Show answer
1.2 × 40 = 48, about 50 A.
Why is aluminum cleaned on the day of welding?
Show answer
The oxide reforms and thickens, and stored metal picks up moisture.
What does a wider frosty band beside the weld show?
Show answer
More electrode-positive time in the AC balance: more cleaning.
Why does aluminum need more current at the start than in the middle of a weld?
Show answer
It conducts heat away until the part warms up.
Lesson quiz · 5 questions
Score 60% or more to complete this lesson.
Create a free account to save your progress, take quizzes and earn a certificate.