
SMW-230 · Lesson 6 of 12 · 19 min
GMAW on carbon and galvanized sheet
With the machine set and tuned, the rest of a good GMAW weld on sheet is in the hands. Aggie MacLeod had Kai run bead after bead on scrap before she let him weld a part: flat beads on a plate, then butt joints, lap joints and outside corners, then the same joints vertical and overhead. Each exercise was about the same thing, controlling heat on a material that has very little room for error. This lesson covers the techniques that make that possible on carbon steel sheet, and the extra steps that galvanized steel needs.
Starting and stopping
The start and the end of a weld are where most defects on sheet happen. At the start, the metal is cold and the first fraction of a second of arc may sit on the surface without fusing, a cold start. At the end, the pool is hot and stopping suddenly leaves a crater, a small depression that can crack or leak.
- Start slightly ahead of where the weld should begin and move back into the joint, or start on a run-on tab, so the arc is stable by the time it reaches the joint.
- Clip the wire end before each start: a ball of melted wire on the tip makes a poor start.
- At the end, pause briefly or move back a short distance into the bead to fill the crater, or use the machine's crater-fill setting if it has one. On thin sheet, a long pause burns through, so the fill must be quick.
- On a liquid-tight joint, overlap each new weld onto the end of the last one by a short distance, so there is no gap between welds.
Stitch and skip welding
A continuous weld puts heat into the sheet faster than it can spread, and on thin metal the sheet warps or burns through. Stitch welding breaks a long weld into short segments with gaps between them. Skip welding, or back-step welding, places those segments out of order along the joint, so no single area gets too hot. Where the joint must be continuous, the gaps are filled in later, once the first segments have cooled, so the finished weld is unbroken but the heat went in in small amounts.
- Intermittent welds are specified by length and pitch, the distance between the starts of successive welds. A 25 mm weld at 100 mm pitch, written 25–100 on the weld symbol, welds a quarter of the joint. In inch work, the same might be a 1 in weld on 4 in centres.
- Staggered intermittent welds alternate on the two sides of a tee joint, so each side has gaps opposite welds on the other.
- Spot-style plug or tack welds hold sheet to frames where strength is modest, such as casing panels on an angle frame.
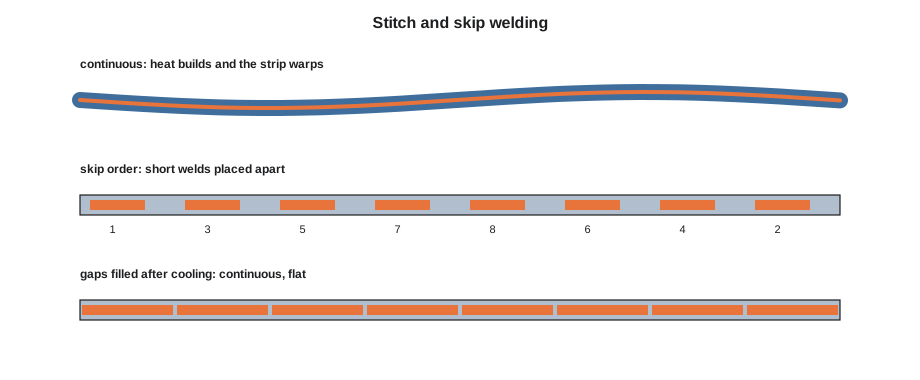
Kai used the script below to work out the welding on the Ashgrove casing panels, which the drawing called out as 25 mm stitches at 150 mm pitch, and the Brine & Ember frame, which needed continuous welds put in by skip welding.
# Intermittent and skip welding layout
def stitches(joint, weld, pitch):
    n = int((joint - weld) // pitch) + 1
    return n, n * weld
joint, weld, pitch = 1200, 25, 150
n, welded = stitches(joint, weld, pitch)
print(f"casing seam {joint} mm: {n} stitches of {weld} mm at {pitch} mm pitch = {welded} mm welded ({welded / joint:.0%})")
# skip order for a continuous weld split into segments: ends and middle first, then between
seg = 50
count = int(400 // seg)
order = []
lo, hi = 0, count - 1
while lo <= hi:
    order.append(lo)
    if hi != lo:
        order.append(hi)
    lo += 1; hi -= 1
print(f"frame joint 400 mm in {count} segments of {seg} mm")
print("weld segments in this order:", [s + 1 for s in order])casing seam 1200 mm: 8 stitches of 25 mm at 150 mm pitch = 200 mm welded (17%) frame joint 400 mm in 8 segments of 50 mm weld segments in this order: [1, 8, 2, 7, 3, 6, 4, 5]
The order alternates between the two ends of the joint and works in toward the middle, so the heat is spread out. In practice Aggie also let each segment cool to hand-warm before welding the one beside it.
Burn-through and how to avoid it
Burn-through is the hole that appears when the pool melts through the sheet. It is the commonest defect in thin-gauge GMAW, and once it starts, the hole grows quickly as the arc follows the edge. The causes are almost always too much heat in one place: too high a wire speed, too slow a travel speed, a pause, a gap in the joint, or the gun pointed into the gap instead of onto the metal.
- Keep the travel speed up, with the arc on the leading edge of the pool.
- Use the push angle and keep the stickout steady.
- Aim the arc at the metal, not into a gap: on an open butt joint, weave very slightly from edge to edge, or bridge the gap in short stitches.
- Use a backing bar of copper behind the joint where possible. Copper conducts heat away and does not fuse to the steel, so the pool is supported and cooled.
- To fill a hole, let the area cool, then build it up from the edges in short stitches, working inward. Do not hold the arc in the middle of a hole.
Welding out of position
Much of the trade's welding is in the flat or horizontal position on a bench, but field welding on curbs, supports and duct often has to be vertical or overhead. Short-circuit GMAW handles all positions because its small pool freezes quickly. On vertical joints in sheet, welding downhill, from top to bottom, is fast and puts in little heat, which suits thin metal, but the pool can run ahead of the arc and leave poor fusion; on heavier sections, uphill welding gives better fusion. Overhead welding needs slightly lower settings, a fast travel speed and good protection from falling spatter. Positions for code welding are tested separately: a welder qualified only in the flat position may not weld overhead on a code job.
Galvanized steel
Galvanized steel is the trade's most common material, and welding it brings two problems. The zinc coating boils off at a much lower temperature than steel melts, so the zinc vapour bubbles through the pool, causing porosity, spatter and an unstable arc, and it rises as the dense white fume covered in lesson 2. And the heat burns the coating off a band each side of the weld, front and back, leaving bare steel that will rust.
The first and best step is to remove the zinc from the weld zone before welding, on both faces, by grinding or with a flap disc, wherever the procedure and the job allow. Removing it reduces fume, porosity and spatter, and gives a cleaner weld. Where it cannot be removed, for example in a tight lap joint, the welder slows down very slightly so the zinc has time to burn off ahead of the pool, uses a gas and wire suited to coated steel, and relies heavily on fume extraction.
After welding, the bare strip must be protected again. The usual methods are a zinc-rich paint, applied over cleaned metal to the thickness the specification calls for, or a zinc-based repair alloy, a low-melting rod rubbed onto the heated surface. Thermal spraying of zinc is used on larger repairs. The repaired area should extend over the undamaged coating each side.
For the Ashgrove roof curbs, which were galvanized angle and channel welded into frames, Kai worked out the zinc to remove and the touch-up paint to buy with the script below. The paint coverage came from the product data sheet.
# Zinc removal and repair paint for welded galvanized curbs
weld_length = 28.0          # total weld length, m
strip = 40                # width of coating removed or burned each side of the weld, mm
faces = 2                   # both faces of the joint
area = weld_length * (2 * strip / 1000) * faces    # m²
coats = 2
coverage = 6            # m² per L of zinc-rich paint at the specified thickness
paint = area * coats / coverage
print(f"repair area: {area:.2f} m² (weld length x 2 strips x 2 faces)")
print(f"zinc-rich paint, {coats} coats: about {paint:.1f} L; buy {max(1, round(paint + 0.5))} L to allow for waste")repair area: 4.48 m² (weld length x 2 strips x 2 faces) zinc-rich paint, 2 coats: about 1.5 L; buy 2 L to allow for waste
The touch-up area is small, but it is easy to forget the back faces and the inside corners, which are exactly where water sits on a roof curb.
Common defects and their causes
| Defect | What it looks like | Usual causes on sheet |
|---|---|---|
| Burn-through | Holes melted through the sheet | Too much heat, slow travel, gaps, pauses |
| Porosity | Pinholes and bubbles in the bead | Zinc, oil or paint; lost gas shield; drafts |
| Lack of fusion | Bead sitting on the surface, cold edges | Too fast, too cold, wrong angle, cold start |
| Undercut | Groove melted into the edge beside the bead | Too much voltage or travel speed, wrong angle |
| Excess spatter | Balls of metal stuck around the weld | Voltage too high, carbon dioxide gas, zinc |
| Distortion | Buckled or bowed panels | Long continuous welds, poor sequence, no clamping |
When a defect appears, Aggie's rule was to stop, find the cause and fix it before going on, not to keep welding and hope the next bead is better. Grinding out and rewelding a defect puts even more heat into the same spot.
Worked problem
Choosing a stitch pattern
A 900 mm long casing seam must be welded with 25 mm stitches covering at least a sixth of its length. What pitch should Kai use, and how many stitches?
Show solution
- Welded length needed = 900 ÷ 6 = 150 mm, so at least 6 stitches of 25 mm.
- Pitch for 6 stitches over 900 mm with one at each end: (900 − 25) ÷ 5 = 175 mm.
Answer: Six stitches at up to about 175 mm pitch. Kai used a 125 mm pitch instead, which gives eight stitches and 200 mm of weld, comfortably over the minimum.
Welding steel sections to sheet
Much of the GMAW work in the trade joins thin sheet to heavier steel: a 1.0 mm (20 gauge) flashing to a 6 mm (quarter-inch) curb angle, a hanger tab to a channel, a sheet panel to an angle frame. The difficulty is that the heavy part needs much more heat to fuse than the sheet can stand. The technique is to set the machine for the sheet, or a little above, and to aim the arc almost entirely at the heavy part, letting the pool wash up onto the sheet edge rather than pointing the arc at it. Short stitches let the sheet cool between welds. Where the sheet overlaps the section, the overlap must be tight; a gap between them makes the sheet edge burn back.
Aggie's test for these joints was to break a few sample welds on scrap with a hammer and chisel. A good weld tore the sheet before the weld let go; a poor one popped off the angle cleanly, showing that the weld had only been sitting on the heavy part. Kai broke a dozen samples before his were consistently good.
Recording settings
Every setting that worked on a job was written on the job sheet: wire, gas, wire feed speed, voltage, stickout and any notes on angle or sequence. The next welder on the same material starts from known settings instead of guessing, and if a defect shows up later, the record shows what was used. On code work the welding procedure sets the ranges, and the record shows the job stayed inside them.
Common mistakes
MistakeWelding a long seam in one continuous pass on thin sheet.
InsteadUse stitch or skip welding and fill gaps after the segments cool.
MistakeHolding the arc in a burn-through to fill it.
InsteadLet it cool and build up from the edges in short stitches.
MistakeWelding through zinc where it could have been removed.
InsteadGrind the zinc off both faces of the weld zone first.
MistakeForgetting to repair the coating on the back face.
InsteadTouch up both faces, overlapping the sound coating.
MistakeStopping abruptly and leaving a crater.
InsteadFill the crater with a short pause or back-step, or use crater fill.
Summary and key terms
- Start ahead and move back into the joint, and fill the crater at the end; overlap welds on liquid-tight joints.
- Stitch and skip welding put heat in small amounts; gaps are filled later where a continuous weld is required.
- Burn-through comes from too much heat in one place; keep moving, aim at metal, use backing bars.
- Short-circuit GMAW welds in all positions; out-of-position welding must be within the welder's qualification.
- Remove zinc before welding where possible, and repair the coating on both faces afterwards.
- Stop and fix the cause of a defect before continuing.
- Stitch welding
- Welding a joint in short segments with gaps between them.
- Skip welding
- Placing weld segments out of order along a joint to spread the heat.
- Pitch
- The distance between the starts of successive intermittent welds.
- Burn-through
- A hole melted through the sheet by too much heat.
- Crater
- The depression left at the end of a weld if the pool is not filled.
- Zinc-rich paint
- A paint with a high zinc content used to restore protection on galvanized steel.
Practice problems
Work each problem on paper first, then reveal the answer to check.
A 600 mm joint gets 20 mm stitches at 100 mm pitch. How many stitches and what share is welded?
Show answer
(600 − 20) ÷ 100 = 5.8, so 6 stitches; 120 mm welded, 20 percent.
What is the likely cause of pinholes along a weld on galvanized lap joints?
Show answer
Zinc vapour bubbling through the pool; remove the zinc or slow slightly and extract fume.
Why does copper make a good backing bar?
Show answer
It conducts heat away quickly and does not fuse to the steel.
Why is downhill welding often used on thin vertical sheet joints?
Show answer
It is fast and puts in little heat, reducing burn-through.
Lesson quiz · 5 questions
Score 60% or more to complete this lesson.
Create a free account to save your progress, take quizzes and earn a certificate.