
SMW-230 · Lesson 10 of 12 · 19 min
Distortion control
The first stainless hood panel Kai welded on his own came off the bench with a weld as neat as any on Aggie's sample board and a panel that rocked on the table like a saddle. Aggie laid a straightedge across it to show him a gap of several millimetres (about a quarter of an inch) in the middle, and told him that the weld was the easy half of the job. On thin metal the hard half is keeping the part flat and square. This lesson explains why welds distort sheet and how welders prevent it, reduce it and, when it happens anyway, take it out.
Why welds distort
When a weld is made, a narrow band of metal along the joint is heated almost to melting while the metal a short distance away stays cool. The hot band tries to expand, but the cooler metal around it holds it back, so it is squeezed and, being soft when hot, it upsets: it gets slightly thicker and shorter. As it cools, it tries to shrink back, now from its shorter length, and the surrounding metal holds it again, this time in tension. The weld and the band beside it end up shorter than they started, pulling on the rest of the part. That pull is what bends, bows and buckles the sheet. Every weld shrinks; the question is only how much and in which direction.
The shrinkage acts in three main ways.
- Transverse shrinkage: across the weld. Two sheets butt-welded together end up slightly narrower in total than the sum of their widths.
- Longitudinal shrinkage: along the weld. A long weld pulls the edge of the sheet shorter, which bows the part like a banana, or, on a thin panel, makes the unwelded middle too long for its edges so that it buckles into waves or a dome.
- Angular distortion: the weld shrinks more on the side where it is larger, usually the face, so the two sheets fold up toward the weld, like the pages of a book closing.
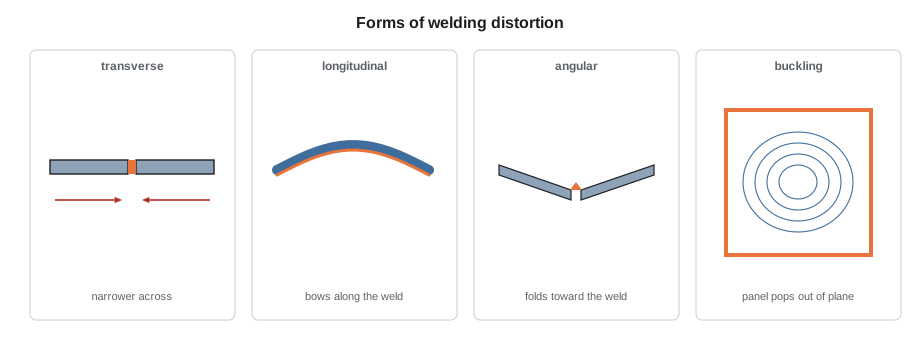
Thin sheet suffers most from buckling, because a thin panel has almost no resistance to compression. The welded edges shrink, the middle of the panel has nowhere to go, and it pops out of plane. Stainless and aluminum, with their high expansion, buckle more than carbon steel; stainless, which also holds heat near the weld, is the worst of the common trade metals.
Estimating shrinkage
Exact distortion is hard to predict, but simple estimates show which way things will move and roughly how much, which helps in setting allowances and choosing a sequence. One useful idea is that the shrinkage scales with the heat put in: more heat input per unit length means a wider hot band, which means more shrinkage. Another is that a fillet or butt weld's transverse shrinkage is roughly proportional to the area of the weld metal divided by the sheet thickness. Kai ran the estimates below for the Brine & Ember hood panels, using illustrative rules of thumb from the shop's reference.
# Rough shrinkage estimates for thin sheet welds (illustrative rules of thumb)
alpha = 17e-6            # expansion per degree for the metal
def strip_shrink(width, peak):
    # a heated band of this width at this peak temperature tries to shrink by about alpha x temperature x width
    return alpha * peak * width
for label, width in [('steady GTAW', 12), ('hot and slow', 22), ('pulsed with chill bar', 8)]:
    print(f"heated band {width} mm ({label}): tries to shrink about {strip_shrink(width, 700):.2f} mm across the weld")
def transverse(area, t, gap):
    # a common estimate for butt welds: 0.2 x weld area / thickness + 0.05 x root gap
    return 0.2 * area / t + 0.05 * gap
for label, area, t, gap in [('1.2 mm butt, tight fit', 2.5, 1.2, 0.0), ('1.2 mm butt, 0.8 mm gap', 3.6, 1.2, 0.8), ('3 mm butt, 1.5 mm gap', 9.0, 3.0, 1.5)]:
print(f"{label:<28} transverse shrinkage about {transverse(area, t, gap):.2f} mm")heated band 12 mm (steady GTAW): tries to shrink about 0.14 mm across the weld heated band 22 mm (hot and slow): tries to shrink about 0.26 mm across the weld heated band 8 mm (pulsed with chill bar): tries to shrink about 0.10 mm across the weld 1.2 mm butt, tight fit transverse shrinkage about 0.42 mm 1.2 mm butt, 0.8 mm gap transverse shrinkage about 0.64 mm 3 mm butt, 1.5 mm gap transverse shrinkage about 0.68 mm
The numbers are small, a few hundredths or tenths of a millimetre, but that is across one weld. A hood panel has welds on all four edges and a stiffener down the middle; shrinkage of a few tenths of a millimetre on each edge, pulling on a thin panel, is enough to buckle it. The estimate also shows the two levers the welder controls: the width of the hot band, set by heat input, and the amount of weld metal, set by fit-up and filler.
Preventing distortion: design and preparation
The best distortion control starts before welding. The drawing, the joint design and the preparation can remove much of the problem.
- Weld less. Use the smallest weld that meets the requirement, intermittent welds where continuous ones are not needed, and mechanical joints where welding is not required. Every millimetre of weld metal that is not deposited is shrinkage that does not happen.
- Use joints that need little filler: tight butt joints, flanged joints and outside corners fused with little or no filler.
- Add stiffness. Formed edges, beads, crossbreaks and stiffening ribs make thin panels resist buckling, and so do welds placed near the stiff edges rather than in the middle of a panel.
- Balance the welds. Put welds symmetrically about the centre of the part, so the shrinkage on one side is balanced by the other.
- Fit up closely. A gap means more weld metal and more heat, as the script showed.
- Pre-set the parts. If a joint is known to close up by a certain angle, set the parts that much open before welding so they pull into position. Experience on the first piece tells how much.
Preventing distortion: during welding
During welding, the controls are about putting the heat in a little at a time, carrying it away, and holding the parts until they cool.
- Lower the heat input: the lowest current that fuses the joint, a short arc, a steady travel speed, and pulsing on GTAW.
- Use chill bars. Copper or aluminum bars clamped close beside the joint, or behind it, conduct heat away and narrow the hot band. On stainless, copper chill bars beside the weld can halve the width of the heat tint.
- Clamp and fixture. Clamping the part flat in a fixture until it has cooled lets the shrinkage go into stretching the weld rather than bending the part. Release the clamps only when the part is cool to the touch.
- Tack well. Closely spaced tacks in a balanced sequence keep the joint from closing or opening.
- Sequence the welds. Stitch, skip and back-step welding from lesson 6 spread the heat. On a panel, weld from the centre outward toward the free edges, so the shrinkage pushes the slack out of the panel rather than trapping it in the middle.
- Balance the sides. Alternate between opposite sides of a part, or between two parts being made at once.
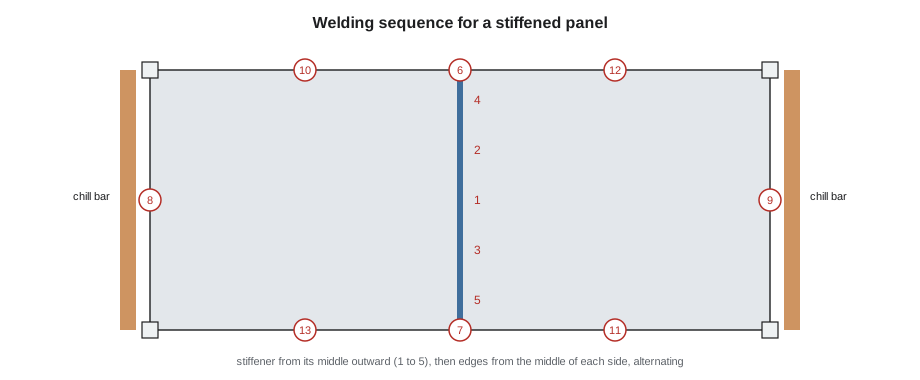
Aggie's sequence for the hood panels was the one in the figure: tack all around, weld the centre stiffener in short segments from its middle outward, let it cool, then weld the edges in segments starting from the middle of each long side and working toward the corners, alternating sides, with chill bars along each edge and the panel clamped to the table. The second panel came off within a millimetre (about a thirty-second of an inch) of flat across its diagonal.
Removing distortion
When distortion happens anyway, it can usually be taken out, though every correction adds work and some add risk.
- Mechanical straightening: pressing, bending or hammering the part back into shape. On thin sheet, planishing, working the weld and the area beside it with a planishing hammer against a dolly or anvil, stretches the shrunken metal back and flattens the panel. It also work-hardens and can thin the weld, so it is done lightly and evenly.
- Rolling: running a long weld seam through a planishing roller or a set of rolls stretches it.
- Heat shrinking: heating small spots on the high, stretched areas of a buckled panel to dull red and quenching them makes those spots shrink and pulls the panel flat. It is a skill learned by doing, and on stainless it causes more heat tint and can sensitize the metal, so it is used sparingly and only where the specification allows.
- Adding stiffeners: sometimes the cure is a stiffening rib or angle that holds the panel flat in service.
Prevention is far cheaper than cure, and on finished stainless every correction shows. Aggie's rule was that if Kai found himself straightening more than one panel in ten, the problem was in the sequence or the heat, not in his hammer.
Worked problem
Choosing a sequence
A 1.5 m by 0.9 m stainless panel is to be welded to a frame along all four edges. How should the welding be ordered?
Show solution
- Tack all around at close spacing, starting at the middles of the sides and working out to the corners.
- Clamp the panel flat on the table and put chill bars along the edges.
- Weld short segments starting at the middle of one long side, then the middle of the opposite long side, then the middles of the short sides.
- Work outward toward the corners, alternating sides and letting each area cool before welding next to it.
Answer: Centre outward and side to side, with chill bars and clamps, so the shrinkage pushes slack out to the corners instead of trapping it in the middle.
Distortion on the shop's real jobs
Each of Keelson's welded jobs had its own distortion risk, and Walt and Aggie planned for each before the first tack.
- Grease duct: long longitudinal seams on four corners of a rectangular duct tend to bow the section along its length and twist it. The answer was to weld opposite corners alternately, in short segments from the middle outward, with chill bars inside the corners.
- Hood panels: large flat stainless panels with welds around the edges tend to buckle in the middle. The answer was the centre-outward sequence in the figure, stiffeners formed into the panels, and clamping until cool.
- Lab exhaust transitions: four seams joining shaped panels tend to pull the round end oval. The answer was a fixture holding the round end and alternating opposite seams.
- Steel curbs: fillet welds on one side of an angle frame tend to pull the frame out of square. The answer was tacking all four corners, checking the diagonals, and welding opposite corners in turn.
In every case, the first item off the bench was measured: flatness with a straightedge, squareness by comparing diagonals, and roundness with a diameter tape. If it was out, the sequence or the clamping was changed before the next one was made. That habit, measure the first piece and adjust, prevents a whole batch of distorted parts.
Measuring flatness and square
Flatness on a panel is checked by laying a straightedge across it in several directions, including both diagonals, and measuring the largest gap under it with a feeler gauge or a rule. Square on a rectangular frame or duct end is checked by measuring both diagonals: if they are equal, the frame is square. A difference of more than a small amount, set by the drawing or the shop's tolerance, means the part is racked and needs correcting before the next weld locks the error in.
Common mistakes
MistakeWelding one long edge from end to end before starting the next.
InsteadUse short segments, centre outward, alternating sides.
MistakeReleasing clamps while the part is still hot.
InsteadLeave it clamped until it is cool to the touch.
MistakeDepositing a bigger weld than needed.
InsteadUse the smallest weld that meets the requirement; every extra bit shrinks.
MistakePlanishing heavily to fix every panel.
InsteadFind and fix the cause in the sequence or heat; planish lightly.
MistakeHeat shrinking stainless freely.
InsteadUse heat shrinking sparingly on stainless, only where allowed, because of tint and sensitization.
Summary and key terms
- Welds shrink as they cool, and the pull of the shrinkage distorts the part.
- Distortion is transverse, longitudinal or angular; on thin sheet it usually shows as buckling.
- Shrinkage grows with heat input and with the amount of weld metal.
- Prevent distortion with less weld, tight fit-up, stiff and balanced designs and pre-setting.
- During welding, use low heat input, chill bars, clamps, good tacks and a centre-outward balanced sequence.
- Remove distortion by planishing, rolling, heat shrinking or stiffening, but prevention is far cheaper.
- Distortion
- The change in shape of a part caused by the shrinkage of welds.
- Transverse shrinkage
- Shrinkage across a weld.
- Angular distortion
- Folding of the parts toward the side of the weld that shrinks most.
- Chill bar
- A copper or aluminum bar placed beside or behind a weld to carry heat away.
- Planishing
- Working a weld and the area beside it with a hammer and dolly to stretch it flat.
- Pre-setting
- Setting parts out of position before welding so shrinkage pulls them into place.
Practice problems
Work each problem on paper first, then reveal the answer to check.
Using 0.2 × area ÷ thickness, estimate the transverse shrinkage of a butt weld with 3 mm² of weld metal in 1.0 mm sheet.
Show answer
0.2 × 3 ÷ 1.0 = 0.6 mm.
Why should a panel be welded from the centre outward?
Show answer
So the shrinkage pushes the slack toward the free edges instead of trapping it in the middle.
What does a chill bar do?
Show answer
It carries heat away from the joint and narrows the hot band.
Why does stainless distort more than carbon steel?
Show answer
It expands more and conducts heat less, so the hot band is hotter and shrinks more.
Lesson quiz · 5 questions
Score 60% or more to complete this lesson.
Create a free account to save your progress, take quizzes and earn a certificate.