
PLB-420 · Lesson 6 of 12 · 24 min
Leak detection: pressure tests, acoustic and thermal methods
The call came in on a Monday morning. A family in a 1990s two-storey house near the Kingsway Tower site had a water bill three times the usual amount, and a damp patch was spreading across the basement floor slab near the furnace room. There was no visible dripping anywhere. Grace told Maya that this was the kind of call where method matters most, because a leak hidden in a wall, under a slab or underground can waste a lot of water and cause a lot of damage while the plumber guesses. This lesson covers how to confirm a leak exists, how to narrow it down to a part of the system, and how to pinpoint it with pressure tests, acoustic listening, thermal imaging, tracer gas and moisture meters before opening anything up.
Step one: confirm there is a leak
Before looking for a leak, confirm there is one. High bills can come from a running toilet, a dripping outdoor tap, a water softener stuck in regeneration, an irrigation system, a misread meter or simply more people using water. A damp patch can be condensation on cold pipes, groundwater coming through the slab, or a drain leak rather than a supply leak. The water meter is the first tool.
- Turn off every fixture and appliance that uses water, including ice makers, humidifiers, softeners and irrigation.
- Read the meter, including the low-flow indicator (a small triangle, star or dial that turns with very low flow).
- Wait at least 15 minutes without using water and read it again. Any movement means water is leaving the system somewhere downstream of the meter.
- Close the main shutoff just downstream of the meter. If the meter still moves, the leak is in the meter connection or the supply is passing the valve; if it stops, the leak is in the building.
- Close the shutoff to the water heater, then to individual branches where valves exist, to see which part of the system stops the meter.
Grace's meter showed the low-flow indicator turning steadily with everything off. Over 15 minutes, the register moved by 0.019 cubic metres. That is about 1.3 litres per minute, roughly 1,800 litres per day: a substantial leak.
Worked problem
Leak rate from a meter reading
With all fixtures off, a meter reads 1,284.317 m³ and, 15 minutes later, 1,284.336 m³. What is the leak rate in litres per minute and litres per day?
Show solution
- \[\Delta V = 1284.336 - 1284.317 = 0.019\ \text{m}^3 = 19\ \text{L}\]
- \[q = \frac{19\ \text{L}}{15\ \text{min}} \approx 1.27\ \text{L/min}\]
- \[q_{\text{day}} = 1.27 \times 1440 \approx 1820\ \text{L/day}\]
Answer: About 1.3 L/min, or roughly 1,800 L every day. That is more than most households use for everything else combined, so the leak is worth finding today.
Step two: isolate by zone
Once a leak is confirmed, the next step is to narrow it down, the same half-split approach from lesson 1. Closing branch valves one at a time and watching the meter tells which part of the system holds the leak. Many houses have only a main shutoff and a water heater valve, but even that splits the system into hot and cold. A leak that stops when the water heater cold inlet is closed is on the hot side, which is common for slab leaks because hot pipes expand and contract with each use, wearing against concrete or gravel.
Grace closed the water heater inlet. The meter stopped. The leak was on the hot side. Then she felt the slab with the back of her hand near the damp patch and found a warm area, a strong sign of a hot water leak under the slab. Closing an isolation valve on the hot branch to the upstairs bathrooms did not stop the meter; the leak was on the main hot run in the basement slab.
When there are no branch valves, a plumber can disconnect and cap sections of the system, or install temporary test caps, to isolate parts for a pressure test. On new installations, the code requires pressure testing before cover; in service work, the same idea finds which section has lost integrity.
Pressure tests in service work
A pressure test isolates a section of piping, pressurises it, and watches a gauge for a pressure drop. In service work, the test is usually done with water at the system's working pressure or with air at a moderate pressure, for example 350 to 700 kPa, using a test gauge with fine divisions. Air tests on water piping must follow the pipe manufacturer's instructions, because some plastic piping systems prohibit air or gas testing due to the stored energy if a joint fails. Never test plastic drain pipe with compressed air.
A test section that holds pressure is tight; a section that loses pressure has a leak. Pressure tests are good at answering yes-or-no questions about a section, but they do not tell you where the leak is. They are also sensitive to temperature. A water-filled section in a cold basement that warms by a few degrees can rise noticeably in pressure because water barely compresses and expands as it warms, and a section filled with warm water can drop in pressure as it cools, mimicking a leak. Air in the section makes the pressure less sensitive to temperature changes in the water but more sensitive to changes in air temperature.
For air tests, the ideal gas law gives a simple temperature correction. Pressure must be in absolute units (gauge plus atmospheric) and temperature in kelvin. If the air in the pipe cools, the pressure drops even with no leak.
Worked problem
Is it a leak or temperature?
Grace isolates the basement hot main and pressurises it with air to 550 kPa gauge at 22 °C. An hour later the gauge reads 530 kPa and the air in the basement has cooled to 18 °C. Did the section leak?
Show solution
- \[P_1 = 550 + 101 = 651\ \text{kPa abs}, \quad T_1 = 22 + 273 = 295\ \text{K}, \quad T_2 = 18 + 273 = 291\ \text{K}\]
- \[P_{2,\text{expected}} = 651 \times \frac{291}{295} \approx 642\ \text{kPa abs} \approx 541\ \text{kPa gauge}\]
- The gauge reads 530 kPa, about 11 kPa below what temperature alone would explain.
Answer: Temperature explains part of the drop but not all of it. The remaining loss points to a real leak, which agrees with the meter test. On a tight section, the corrected pressure would match the reading within the gauge's accuracy.
# Air test on an isolated section: separate the temperature effect from a real leak
ATM = 101.3  # kPa
readings = [  # (minutes, gauge kPa, air temperature in deg C)
    (0, 550, 22.0), (15, 545, 21.0), (30, 539, 20.0), (45, 535, 19.0), (60, 530, 18.0),
]
t0, p0, c0 = readings[0]
P1, T1 = p0 + ATM, c0 + 273.15
for t, p, c in readings:
    expected = P1 * (c + 273.15) / T1 - ATM
    unexplained = expected - p
    print(f"{t:3d} min  gauge {p:5.1f}  temperature-only {expected:6.1f}  unexplained loss {unexplained:5.1f} kPa")
rate = (P1 * (readings[-1][2] + 273.15) / T1 - ATM - readings[-1][1]) / (readings[-1][0] / 60)
print(f"Unexplained loss rate about {rate:.1f} kPa per hour -> {'leak' if rate > 3 else 'tight within gauge accuracy'}")0 min gauge 550.0 temperature-only 550.0 unexplained loss 0.0 kPa 15 min gauge 545.0 temperature-only 547.8 unexplained loss 2.8 kPa 30 min gauge 539.0 temperature-only 545.6 unexplained loss 6.6 kPa 45 min gauge 535.0 temperature-only 543.4 unexplained loss 8.4 kPa 60 min gauge 530.0 temperature-only 541.2 unexplained loss 11.2 kPa Unexplained loss rate about 11.2 kPa per hour -> leak
The script shows the unexplained loss growing steadily over the hour, the signature of a leak. A tight section would show the gauge tracking the temperature-only line, with the unexplained loss staying near zero. Recording temperature with every reading is what makes this kind of judgement possible.
Acoustic leak detection
Water escaping from a pressurised pipe makes noise: a hiss from a small hole, a rush from a larger one, sometimes the sound of water churning gravel or soil. An acoustic leak detector is an electronic listening device with a sensitive ground microphone or contact sensor, an amplifier, filters to cut out traffic and other background noise, and headphones. The plumber listens at points along the suspected pipe route and compares the loudness. The sound is usually loudest directly over the leak.
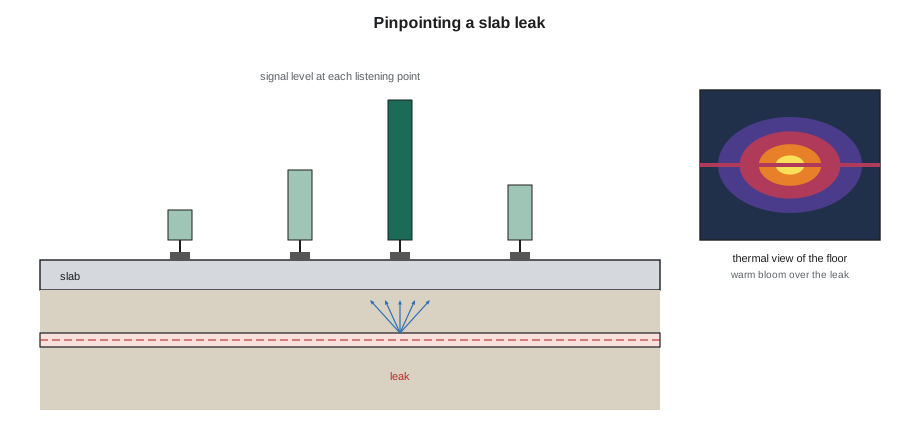
- Know the pipe route first. Listening is only useful along the pipe, so trace the route with a pipe locator, drawings or the visible entry and exit points.
- Keep the system under pressure. Leak noise depends on pressure; low pressure makes a quiet leak.
- Work in a quiet period. Turn off pumps, furnace blowers, dehumidifiers and anything else that hums.
- Compare, do not judge one reading. Listen at evenly spaced points and look for the peak.
- Contact listening on exposed pipe, valves and fixtures can carry sound a long way along metal pipe; plastic pipe carries sound poorly, so leaks in plastic are harder to hear from a distance.
Larger utilities and specialist firms use correlators, which place two sensors on the pipe at known points and calculate the leak position from the difference in the time the leak noise takes to reach each sensor. Service plumbers more often use ground microphones and contact listening, but understanding correlation helps explain why the leak sound reaches nearby points at different times.
Thermal imaging
A thermal camera shows surface temperature as an image. A hot water leak under a slab or in a wall warms the surface above it, producing a warm bloom. A cold water leak, or the evaporative cooling from a wet surface, can show as a cool area. Thermal imaging is fast and non-invasive, and it shows patterns that are hard to see any other way: the line of a buried hot pipe, a warm spot where it leaks, a damp patch in a ceiling.
Thermal cameras show surface temperature only. They cannot see through walls or slabs, and they can be fooled by heating ducts, sunlight, furniture recently moved, reflections from shiny surfaces and differences in surface material. To make a hot pipe stand out, Grace ran hot water for a few minutes before imaging, so the pipe route and the leak would warm up. She confirmed what the camera suggested with a moisture meter and with acoustic listening before recommending where to open the floor.
Moisture meters, tracer gas and dye
- Moisture meters measure the moisture content of drywall, wood and concrete with pins or a non-invasive sensor. They map the extent of a damp area and confirm whether a thermal image shows moisture or just temperature.
- Tracer gas testing fills a drained, isolated section of pipe with a safe tracer gas, commonly a hydrogen-nitrogen mixture, and uses a sensitive detector at the surface to find where the gas escapes. It can find small leaks in plastic pipe that are too quiet to hear.
- Dye tests use non-toxic coloured dye to trace drain and toilet leaks: dye in a toilet tank that appears in the bowl without flushing shows a leaking flapper; dye flushed into a drain that appears in a basement wall shows a drain leak.
- Smoke tests push harmless smoke into a drainage system to show leaks and open connections, particularly in vent and drain piping or where sewer gas odours are a problem.
Each method answers a slightly different question. Grace often combined three: meter and isolation to confirm and narrow, thermal and moisture mapping to find the area, and acoustic listening to pinpoint the exact spot.
Pinpointing and repair options
At the furnace room, the thermal camera showed a warm line along the slab and a brighter warm bloom about a metre from the wall. The acoustic detector peaked over the same spot. Grace marked a 300 mm square on the floor and explained the options to the homeowner.
| Option | What it involves | When it fits |
|---|---|---|
| Spot repair through the slab | Cut and break a small opening, repair the pipe, patch the concrete | A single leak in pipe that is otherwise in good condition |
| Reroute overhead | Abandon the buried line and run new pipe through walls and ceilings | Several leaks, aging pipe under the slab, or hard-to-reach locations |
| Repipe the section | Replace the whole buried run in a new trench or sleeve | When a reroute is not practical and the line has failed more than once |
| Epoxy lining of supply piping | Clean and coat pipe interiors with epoxy | Specialist method; must be approved for potable water and the local code |
Grace pointed out that the house had copper hot water lines under the slab from the original build, and that a slab leak in one place often means wear in others. A reroute overhead would take a day but would remove the buried hot line from the problem. A spot repair would be quicker and cheaper now but might not be the last one. The homeowner chose the reroute after seeing both prices.
Drain and waste leaks
Drain leaks do not show on the water meter, because drains are not under pressure. They show as stains, odours, damp patches below fixtures and sometimes pest problems. A leaking drain is found by running water at one fixture at a time, watching for drips, using dye, and, for buried drains, testing with water or smoke or inspecting with a camera. Common sources include failed slip joints, cracked tailpieces, worn wax rings under toilets, cracked shower pans and corroded cast iron.
When a ceiling stain appears below a bathroom, Grace ran each fixture separately for a few minutes while Maya watched the stain from below with a moisture meter. A stain that grows only when the shower runs with the curtain open is a splash and seal problem, not a pipe leak; a stain that grows when the drain runs with no splashing points to the drain or the shower pan.
Common mistakes
MistakeStarting to open walls before confirming a leak on the meter.
InsteadConfirm with the meter and isolate by zone first; many high bills are toilets, softeners or irrigation.
MistakeReading a pressure drop as a leak without checking temperature.
InsteadRecord temperature with every reading and correct for it.
MistakeAir testing plastic pipe that the manufacturer says must not be air tested.
InsteadFollow the manufacturer's test method; use water where air is prohibited.
MistakeTrusting a thermal image alone.
InsteadConfirm with moisture readings and acoustic listening before cutting.
MistakeListening for a leak with pumps and blowers running.
InsteadSilence background noise and keep the pipe under full pressure.
Summary and key terms
- Confirm the leak with the meter's low-flow indicator, then isolate by zone to narrow it down.
- Pressure tests tell whether a section is tight but not where it leaks; correct for temperature.
- Acoustic detectors find the loudest point along a known pipe route; quiet conditions and full pressure help.
- Thermal cameras show surface temperature patterns; confirm with moisture meters and listening.
- Tracer gas, dye and smoke tests find leaks that other methods miss.
- Offer repair options and explain why a slab leak may be a sign of more to come.
- Low-flow indicator
- A small dial or symbol on a water meter that turns with very low flow, used to detect leaks.
- Slab leak
- A leak in a water pipe buried under a concrete floor slab.
- Acoustic leak detector
- A listening device that amplifies the sound of water escaping from a pipe.
- Correlator
- A device that locates a leak from the time difference of its sound reaching two sensors.
- Tracer gas
- A safe gas, often hydrogen in nitrogen, put into a pipe so a detector can find where it escapes.
Practice problems
Work each problem on paper first, then reveal the answer to check.
The meter's low-flow indicator stops when the water heater inlet is closed. What does that tell you?
Show answer
The leak is on the hot water side.
A section tested with air drops 10 kPa in an hour while the air cools 4 °C. Is it leaking?
Show answer
Correct for temperature first; about 9 kPa of that drop could be temperature alone at a typical test pressure, so check the corrected figure.
Why run hot water before thermal imaging a slab?
Show answer
To warm the hot pipe and the leak area so they show clearly.
Why are leaks in plastic pipe harder to hear from a distance?
Show answer
Plastic carries sound poorly compared with metal.
Why don't drain leaks show on the water meter?
Show answer
Drains are not under supply pressure; the water has already passed the meter.
Lesson quiz · 5 questions
Score 60% or more to complete this lesson.
Create a free account to save your progress, take quizzes and earn a certificate.