
PHOT-401 · Lesson 10 of 12 · 34 min
Printing and presentation for exhibition
For most fine art photographers, the finished work is a physical object: a print of a certain size, on a certain paper, mounted and framed in a certain way, hung at a certain height in a certain room. These decisions are not packaging; they shape how the work is experienced and what it means. A small, intimate print viewed closely invites a different relationship from a large print that fills the viewer's field of vision. This lesson covers the practical and conceptual decisions involved in printing and presenting work for exhibition: resolution and print size, viewing distance, papers and inks, colour management, mounting and framing, hanging height and spacing, and the claims made about how long prints will last. Earlier courses introduced printing workflows; here the focus is on presentation as part of the artwork.
Presentation as meaning
Every presentation choice communicates. A typology shown as a tight grid of identical small frames invites comparison and suggests a system. Large, unframed prints pinned to the wall feel immediate and provisional. Heavy wooden frames suggest tradition and value; thin metal frames suggest neutrality. Face-mounted prints on acrylic look glossy and contemporary; matte cotton papers feel quiet and tactile. Ask of each choice whether it supports the concept or works against it. Contemporary artists have also shown work as wallpaper, projections, books on tables, prints on fabric and installations that combine photographs with objects and text.
Resolution and print size
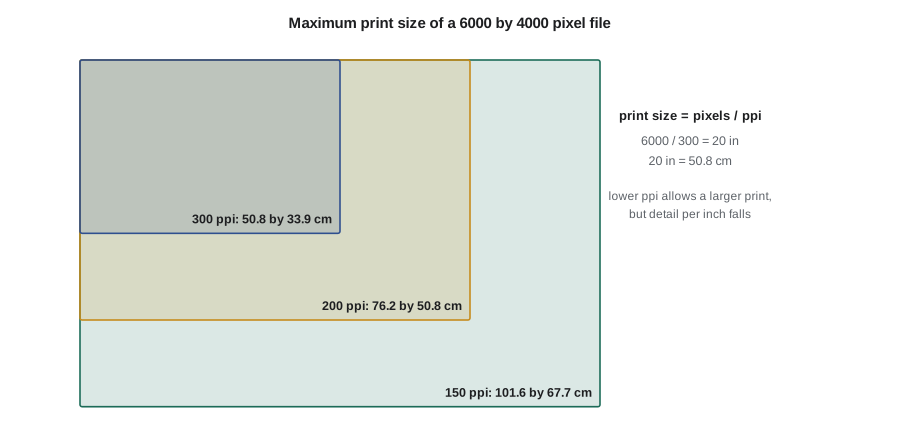
Digital images are made of pixels. When printed, those pixels are spread across the paper at a chosen density, measured in pixels per inch (ppi). The maximum size at which an image can be printed at a given ppi is found by dividing the pixel dimensions by the ppi.
Because the inch is built into the unit, metric print sizes are found by multiplying by 2.54 to get centimetres. A common target for high-quality inkjet printing viewed closely is about 300 ppi, though many printers and labs report that 200 to 240 ppi is indistinguishable at normal viewing distances, and very large prints viewed from a distance can be printed at lower values. Printer drivers and software can resample images up or down; enlargement adds pixels by interpolation but cannot add real detail.
Worked problem
Maximum print size from a camera file
A camera produces files of 6,000 by 4,000 pixels. What is the maximum print size at 300 ppi and at 200 ppi, in inches and centimetres?
Show solution
- At 300 ppi: \( 6000 / 300 = 20 \) in and \( 4000 / 300 \approx 13.3 \) in, which is \( 20 \times 2.54 = 50.8 \) cm by about 33.9 cm.
- At 200 ppi: \( 6000 / 200 = 30 \) in and \( 4000 / 200 = 20 \) in, which is 76.2 by 50.8 cm.
Answer: About 50.8 by 33.9 cm at 300 ppi, or 76.2 by 50.8 cm at 200 ppi. For a print larger than that, consider whether the viewing distance justifies a lower ppi or whether the image needs a higher-resolution source.
Worked problem
The effect of cropping
You crop the 6,000 by 4,000 pixel file to a square of 4,000 by 4,000 pixels. You want a square print 60 cm wide. What ppi will that give, and is it acceptable?
Show solution
- Width in inches: \( 60 / 2.54 \approx 23.6 \) in.
- Resolution: \( 4000 / 23.6 \approx 169 \) ppi.
Answer: About 169 ppi. That is below the 300 ppi target, but likely acceptable for a 60 cm print viewed from a metre or more; make a test print of a detailed section before committing.
Viewing distance
People naturally stand further back from larger prints. A common rule of thumb in print and display work is that a comfortable viewing distance is roughly one and a half to two times the diagonal of the image. At that distance, the whole image fits comfortably in the field of view. Viewers who step closer to inspect detail will see more, which is one reason photographers who work with fine detail, such as large-format landscape or architectural work, often print at high resolution even for large sizes.
A second estimate uses visual acuity. A person with typical vision can distinguish detail of about one minute of arc. Under that assumption, the ppi beyond which extra pixels are not visible is roughly 3,438 divided by the viewing distance in inches, or about 8,733 divided by the distance in centimetres. These are approximations: acuity varies between people, contrast and subject matter affect what is visible, and many photographers aim higher to allow for close inspection.
Worked problem
Viewing distance and the resolution it needs
A print is 50 by 60 cm. Estimate a comfortable viewing distance and the approximate ppi needed at that distance.
Show solution
- Diagonal: \( \sqrt{50^2 + 60^2} = \sqrt{6100} \approx 78 \) cm.
- Viewing distance: \( 1.5 \times 78 \approx 117 \) cm.
- Approximate ppi needed: \( 8733 / 117 \approx 75 \) ppi.
Answer: A viewer at about 1.2 m would not see a benefit beyond roughly 75 ppi, but viewers who step in to 30 cm would benefit from about 290 ppi, which is why 200 to 300 ppi remains a sensible target for exhibition prints that invite close looking.
Papers, inks and processes
Most contemporary exhibition prints are pigment inkjet prints, sometimes called giclée prints, made on archival papers. Other processes include chromogenic prints (the traditional colour darkroom process, now often exposed digitally by laser onto light-sensitive paper), silver gelatin prints for black-and-white work, and historical and alternative processes such as cyanotype, platinum and palladium printing.
- Cotton rag papers: made from cotton fibres, typically acid-free, often matte and with a soft, tactile surface.
- Alpha-cellulose papers: made from purified wood pulp, acid-free, often less expensive than cotton.
- Baryta and fibre-based papers: inkjet papers with a barium sulphate layer that imitates traditional darkroom fibre prints, often with a gloss or semi-gloss surface.
- Optical brightening agents (OBAs): chemicals added to some papers to make them look whiter under ultraviolet light. They can lose their effect over time, making the paper look warmer or yellower, so many archival photographers prefer papers without them.
Paper choice changes colour, contrast, black density and surface texture. Glossy papers give deeper blacks and stronger saturation; matte papers give softer contrast and a quieter feel. Test the same image on several papers before choosing for a series, and use one paper consistently across a series unless a change is intended.
Colour management and proofing
To print what you see, your workflow must be colour managed. Calibrate and profile your monitor, set its brightness to a level that matches print viewing conditions (many photographers find their monitors too bright for print matching), use accurate ICC profiles for each printer and paper combination, and soft proof in your editing software to preview how the print will look. Then make test prints, often small strips or sections, and view them under consistent light similar to the exhibition lighting. Many exhibition-quality prints are made by professional print studios that handle profiling and have large-format printers; working closely with a skilled printer is a long tradition in fine art photography.
Mounting and framing
Prints are presented in many ways, each with practical and conceptual implications.
- Window mat and frame: the print sits behind a bevelled opening in a mat board, with glazing in front. Use acid-free museum board and archival hinging so the print can be removed later.
- Float mount: the print is attached to a backing and sits within the frame with visible space around its edges, showing the paper itself.
- Dry mounting to rigid board: the print is bonded to a panel, such as aluminium composite, for a flat surface; it is usually permanent.
- Acrylic face mounting: the print is bonded to the back of a sheet of clear acrylic, giving depth and gloss. It is dramatic but permanent and needs careful handling.
- Unframed: prints pinned, clipped or taped directly to the wall, or hung from rails, for an informal or installation look.
Glazing can be glass or acrylic, standard or UV-filtering, and reflective or anti-reflective. Anti-reflective glazing is costly but greatly improves viewing in brightly lit rooms. Frame and mat costs often exceed printing costs, so budgeting must include them, as lesson 3 showed.
Hanging height
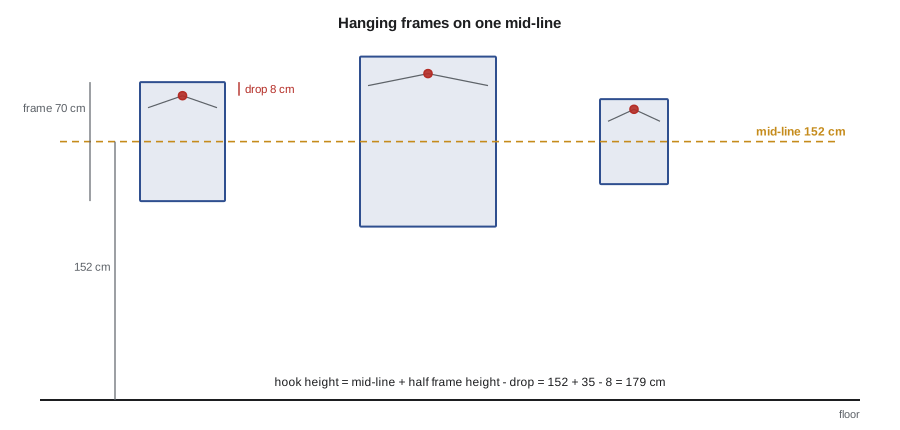
Most galleries and museums hang work so that the centre of each image sits at roughly average eye level. Common practice puts the centre line between about 57 and 60 inches (about 145 to 152 cm) from the floor. A consistent centre line across a wall creates visual calm even when frames are different sizes. Some exhibitions deliberately break this rule: very large works may sit lower, and some curators hang lower to suit children or wheelchair users, an accessibility consideration worth discussing with venues.
Worked problem
Calculating hook height
You hang a framed print 70 cm tall with its centre at 152 cm. The hanging wire, pulled taut, sits 8 cm below the top of the frame. How high should the hook be?
Show solution
- Top of the frame: \( 152 + 70 / 2 = 152 + 35 = 187 \) cm.
- Hook height: \( 187 - 8 = 179 \) cm.
Answer: Place the hook at 179 cm. Repeat the calculation for each frame, because different frame heights and wire positions give different hook heights even when all centres sit at 152 cm.
Spacing on the wall
Spacing affects rhythm in the same way sequence does. Even spacing suggests a steady pace; tight groupings suggest relationships between images; large gaps isolate a work and give it importance. A simple way to space frames evenly is to share the remaining wall space equally among the gaps.
Worked problem
Even spacing across a wall
A wall is 480 cm wide. You will hang five frames, each 60 cm wide, with equal gaps between frames and at both ends. What is the gap, and where does the centre of the first frame sit?
Show solution
- Total frame width: \( 5 \times 60 = 300 \) cm.
- Gap: \( (480 - 300) / 6 = 30 \) cm.
- Centre of the first frame: \( 30 + 60 / 2 = 60 \) cm from the left edge; each following centre is \( 60 + 30 = 90 \) cm further along.
Answer: Gaps of 30 cm, with frame centres at 60, 150, 240, 330 and 420 cm.
In practice, many curators leave larger margins at the ends of a wall than between frames, so that the group reads as a unit. Make a scale drawing or tape paper templates to the wall before putting in hooks.
Lighting
Gallery lighting is usually from ceiling track lights angled at about 30 degrees from vertical to reduce glare on glazing. Light levels affect both appearance and longevity. Conservation guidance commonly recommends limiting light on sensitive works on paper, often to around 50 lux for very sensitive materials, while many photographic prints are displayed under higher levels; light colour temperature affects how prints look. Ask venues about their lighting before final printing, because a print matched under bright studio light may look dull in a dim gallery.
Longevity claims
Buyers, collectors and institutions often ask how long a print will last. Independent laboratories, most notably Wilhelm Imaging Research in the United States, publish estimates based on accelerated ageing tests, in which prints are exposed to intense light, and sometimes to heat, humidity or ozone, and the results are projected to normal conditions. For many pigment ink and paper combinations, published display ratings under glass reach many decades, and some exceed a century.
These figures should be used with care. They are projections, not observations, because modern pigment prints have not existed long enough to be observed for a century. They depend on specific assumptions, including a particular light level for a set number of hours per day, framing under glass and a defined threshold for noticeable fading. Real conditions, such as direct sunlight, high humidity, air pollution or poor-quality mounting materials, can shorten life considerably. Results apply to a specific printer, ink and paper combination, not to "archival prints" in general.
When describing your prints, use hedged, accurate language. "Printed with pigment inks on acid-free cotton paper; the manufacturer's and independent test data suggest display life of many decades under recommended conditions" is accurate. "Will last 200 years" is not a claim you can support. Give buyers care instructions: avoid direct sunlight, keep relative humidity moderate and stable, use archival mounting materials and UV-filtering glazing.
| Option | Look and feel | Reversibility | Relative cost |
|---|---|---|---|
| Window mat and frame | Traditional, protective | High | Medium |
| Float mount in frame | Shows paper edges, crafted | Medium | Medium to high |
| Rigid board mount | Flat, modern, frameless or framed | Low | Medium |
| Acrylic face mount | Glossy, deep, contemporary | Very low | High |
| Unframed on wall | Immediate, provisional | High | Low |
Common mistakes
MistakePrinting large from a file without checking ppi
InsteadDivide pixel dimensions by ppi and test-print a detailed section.
MistakeMatching prints on a monitor set to full brightness
InsteadCalibrate the monitor to print-matching brightness and soft proof.
MistakeHanging frames by aligning their tops
InsteadAlign centres on a consistent line, usually 145 to 152 cm (57 to 60 in).
MistakeGuessing hook positions by eye
InsteadCalculate hook height from centre line, frame height and hanger drop.
MistakeClaiming a print "will last 200 years"
InsteadUse hedged language based on specific test data and conditions.
Summary and key terms
- Print size, paper, mounting, framing and hanging are part of what the work means.
- Maximum print size equals pixel dimensions divided by ppi; 6,000 px at 300 ppi gives 20 in, or 50.8 cm.
- Comfortable viewing distance is roughly 1.5 to 2 times the image diagonal.
- Colour management requires a calibrated monitor, accurate profiles, soft proofing and test prints.
- Galleries commonly hang work with centres at about 145 to 152 cm (57 to 60 in).
- Even spacing divides the remaining wall width by the number of gaps.
- Longevity ratings are projections under specific conditions and should be stated with care.
- ppi
- Pixels per inch, the density at which image pixels are printed.
- Resampling
- Changing the number of pixels in an image by interpolation.
- Viewing distance
- The distance from which a viewer comfortably sees a whole print.
- Pigment inkjet print
- A print made with pigment-based inks, often on archival paper.
- Optical brightening agent
- An additive that makes paper look whiter but may fade over time.
- Soft proofing
- Previewing on screen how an image will look on a specific printer and paper.
- Float mount
- A presentation in which the print's edges are visible within the frame.
- Acrylic face mounting
- Bonding a print to the back of clear acrylic.
- Centre line
- The consistent height at which the centres of hung works are placed.
- Accelerated ageing test
- A laboratory test that exposes prints to intense conditions to project longevity.
Practice problems
Work each problem on paper first, then reveal the answer to check.
What is the maximum width of a 7,200 pixel image at 300 ppi?
Show answer
\( 7200 / 300 = 24 \) inches.
How do you convert a print width in inches to centimetres?
Show answer
Multiply by 2.54.
A 4,500 pixel image is printed 30 inches wide. What ppi results?
Show answer
\( 4500 / 30 = 150 \) ppi.
What is a common rule of thumb for comfortable viewing distance?
Show answer
About 1.5 to 2 times the image diagonal.
Why might a photographer avoid papers with optical brighteners?
Show answer
Their whitening effect can fade, changing the paper's appearance.
Name three steps in a colour-managed print workflow.
Show answer
Calibrate the monitor, use printer and paper profiles, soft proof, make test prints.
Name two ways to present a print other than a window mat and frame.
Show answer
Float mount, rigid board mount, acrylic face mount, unframed.
What centre-line range do many galleries use for hanging?
Show answer
About 57 to 60 inches, or 145 to 152 cm.
A wall leaves 72 units free for 6 equal gaps. How wide is each gap?
Show answer
\( 72 / 6 = 12 \) units.
Why are longevity ratings projections rather than facts?
Show answer
They extrapolate from accelerated tests under specific assumed conditions.
Lesson quiz · 5 questions
Score 60% or more to complete this lesson.
Create a free account to save your progress, take quizzes and earn a certificate.