
PHOT-210 · Lesson 7 of 12 · 25 min
Classic portrait lighting patterns
Portrait photographers have long described lighting by the pattern of light and shadow it creates on the face, especially the shape of the shadow cast by the nose. These classic patterns, refined by painters such as Rembrandt van Rijn and by Hollywood studio photographers such as George Hurrell in the 1930s, form a shared vocabulary that lets photographers plan, describe and reproduce portrait lighting precisely. Each pattern is simply a particular position of the key light relative to the face and camera, and each has its own character. This lesson covers flat lighting, butterfly or Paramount lighting, loop lighting, Rembrandt lighting, split lighting, broad and short lighting, clamshell lighting, rim and profile lighting, and how to choose patterns for different faces and purposes.
How patterns are defined
Lighting patterns are defined mainly by the horizontal angle of the key light relative to the camera-to-subject axis and its height above the eyes. Moving the light from directly in front of the face around toward the side, and changing its height, changes the shadow of the nose from a small butterfly-shaped shadow under the nose, to a small loop on the cheek, to a triangle of light on the far cheek, to a face split into light and shadow. Patterns also depend on which way the subject faces: when the face is turned partly away from the camera, the lit side may be the side nearer the camera (broad lighting) or the side farther away (short lighting). Because faces differ, the exact light position for a given pattern varies, so photographers watch the shadows rather than measuring angles.
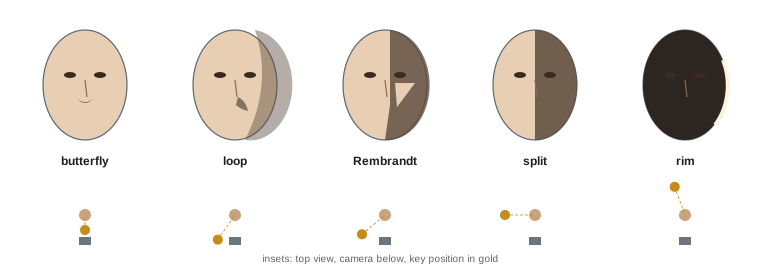
Flat lighting
Flat lighting places the key light close to the camera axis, often with fill or a ring light, so that the face is evenly lit with minimal shadows. It minimizes texture and is used for beauty, cosmetics and some fashion work, ID and passport photos, and high-key images. Its drawback is that it reduces the sense of three-dimensional form, making faces look wider and less sculpted. Flat light can be enlivened with careful makeup, rim lights and background separation.
Butterfly or Paramount lighting
Butterfly lighting places the key light directly in front of the face and above it, angled down, producing a small, symmetrical shadow under the nose that resembles a butterfly. It also creates shadows under the cheekbones and chin, defining the cheekbones and jawline. Associated with Hollywood glamour portraits of the 1930s and 1940s and named Paramount lighting after the studio, it suits subjects with defined cheekbones and is popular in beauty and fashion photography, often with a beauty dish. The light's height controls the length of the nose shadow: too high creates deep eye sockets and a long shadow reaching the lip, too low flattens the face. Adding a reflector or second light below the face creates clamshell lighting.
Clamshell lighting
Clamshell lighting uses a key light above the camera, as in butterfly lighting, and a fill light or reflector below the face, angled up, the two together resembling an open clamshell with the camera shooting between them. The fill opens up shadows under the eyes and chin, producing bright, glossy, flattering light with two catchlights, one above and one below the iris, characteristic of beauty and cosmetics advertising. The ratio between top and bottom lights controls how much shadow remains; the lower light should usually be dimmer so the face does not appear lit from below.
Loop lighting
Loop lighting moves the key light about 30 to 45 degrees to the side of the camera and a little above eye level, so that the nose shadow forms a small loop pointing down toward the corner of the mouth on the shadow side, without touching the cheek shadow. It is the most widely used portrait pattern because it flatters most faces, giving gentle shape and depth while remaining open and friendly. The loop should be small and should not touch the shadow on the cheek; moving the light slightly farther around or higher lengthens the loop toward Rembrandt lighting.
Rembrandt lighting
Rembrandt lighting, named after the Dutch painter whose portraits often show it, places the key light about 45 to 60 degrees to the side and above the eyes, so that the nose shadow joins the cheek shadow on the far side of the face, leaving a small, inverted triangle of light on the shadow-side cheek beneath the eye. The triangle should be no wider than the eye and no longer than the nose, and the eye on the shadow side should have a catchlight. Rembrandt lighting is moody, dramatic and sculptural, well suited to character portraits, men's portraits, actors' headshots and fine art work, and it slims round faces. It typically uses a modest fill to keep the shadow side readable.
Worked problem
Moving from loop to Rembrandt
A photographer has loop lighting with a softbox about 35 degrees to camera left and slightly above eye level. The client wants a moodier Rembrandt look. What adjustments should be made, and what should the photographer watch for?
Show solution
- Move the softbox farther around, to about 50 degrees, and raise it a little higher.
- Watch the nose shadow lengthen until it joins the cheek shadow on the right side of the face.
- Check that a small triangle of light remains on the right cheek, no wider than the eye, and that the right eye still has a catchlight.
- Reduce fill slightly to deepen the shadow side, perhaps to a 4:1 ratio, and re-meter.
Answer: Move the key farther around and higher until the nose and cheek shadows join, leaving a small triangle, and reduce fill for more mood.
Split lighting
Split lighting places the key light at about 90 degrees to the side of the face, at eye level or slightly above, so that one half of the face is lit and the other falls into shadow, divided along the line of the nose. It is dramatic, mysterious and strong, used for character studies, musicians, athletes and images suggesting duality or conflict. Split lighting emphasizes texture on the lit side and slims the face. With no fill, the shadow side may be completely dark; a small amount of fill or a rim light keeps the outline visible.
Broad and short lighting
When the subject turns their face partly away from the camera, one side of the face is nearer the camera and appears broader, and the other side is turned away and appears narrower. Broad lighting places the key on the side of the face nearer the camera, lighting the broad side; it makes faces look wider and is used for narrow faces or to show an ear, hairstyle or the side of the face. Short lighting places the key on the side turned away from the camera, lighting the narrow side and leaving the broad side in shadow; it slims faces, adds depth and drama, and is the more commonly used of the two for most portraits. Broad and short describe the side lit; loop or Rembrandt describe the shape of the nose shadow, so a portrait can be both short and Rembrandt.
| Pattern | Key light position | Nose shadow | Character |
|---|---|---|---|
| Flat | Near camera axis | Minimal | Even, smooth, less shape |
| Butterfly | In front, high | Small, under nose | Glamorous, symmetrical |
| Loop | 30–45° side, slightly high | Small loop toward mouth | Flattering, versatile |
| Rembrandt | 45–60° side, high | Joins cheek shadow, triangle | Moody, sculptural |
| Split | 90° side | Face divided in half | Dramatic, mysterious |
| Rim | Behind subject | Outline only | Separation, silhouette |
Rim and profile lighting
Rim lighting places the light behind the subject, to one side or both, aimed back toward the camera, so that it outlines the edges of the face, hair and shoulders with a thin line of light. On its own, with no front light, rim lighting creates a near silhouette with glowing edges, striking in profiles and for athletes or musicians. Combined with a key and fill, rim lights separate the subject from dark backgrounds. A flag or grid keeps rim lights from shining into the lens and causing flare. Profile portraits, with the subject facing sideways, are often lit with a key from the front of the face and a rim from behind.
Height and the eyes
The height of the key light matters as much as its angle. Light slightly above eye level, angled down about 30 to 45 degrees, looks natural, because we are used to light from above. Light too high creates dark eye sockets, especially with deep-set eyes, and loses catchlights. Light at eye level or below creates unusual, unsettling looks associated with horror films and campfires, and is avoided in conventional portraits, though very low light can be used deliberately for dramatic effect. Always check that both eyes have catchlights and are not lost in shadow; eyes are the focus of almost every portrait.
Choosing patterns
Choosing a pattern depends on the face, the purpose and the mood. Round or wide faces benefit from short lighting with loop or Rembrandt patterns that create shadow on the broad side; narrow faces from broad or butterfly lighting; faces with strong cheekbones from butterfly; textured, characterful faces from Rembrandt or split; corporate headshots from soft loop lighting with moderate fill; beauty from butterfly or clamshell; and dramatic or artistic portraits from Rembrandt, split and rim lighting. Glasses, hairstyles and the subject's preferred side also influence placement. Many photographers shoot a few frames in different patterns during a session to give clients variety.
Patterns with glasses
Glasses reflect light sources and can hide the eyes behind glare. To avoid reflections, raise the key light so that its reflection falls above the frame of the glasses, move it farther to the side, or ask the subject to tilt their head slightly down or tilt the glasses by lifting the arms slightly off the ears. Butterfly lighting with a high key is often the most problematic; loop and Rembrandt patterns from the side usually work better. Some photographers take one frame with glasses and one without, combining them in retouching, but for most portraits careful light placement is enough. Anti-reflective coatings on lenses help, while thick lenses may magnify or shrink the eyes and need careful positioning.
Patterns and facial features
Each pattern interacts with features differently. Prominent noses cast longer shadows, so lower or more frontal key positions keep the nose shadow small. Deep-set eyes need a lower key to avoid dark sockets. Strong jawlines and cheekbones benefit from butterfly and Rembrandt lighting that emphasizes their shape. Uneven features, such as one eye slightly larger than the other, can be balanced by lighting the smaller-looking side or by turning the face. Facial hair absorbs light and may need a little more exposure or a rim light to show texture. Observing the face carefully and adjusting the light in small steps is more effective than applying a formula.
Patterns in motion
When subjects move, turn or change expression, patterns change. A loop pattern can become Rembrandt or flat as the head turns. During a session, either ask the subject to keep a consistent head position for a series, or move the light with them, which an assistant can do while the photographer directs. For more freedom of movement, larger and more frontal sources make the pattern less sensitive to position, which is why fashion and beauty photographers often use large sources.
Recording patterns
After finding a pattern that suits a subject, note the light's angle and height and photograph the setup, so the same look can be repeated in future sessions.
Common mistakes
MistakePlacing the key so high that eyes lose catchlights.
InsteadLower the light until both eyes have catchlights.
MistakeLetting the loop shadow touch the cheek shadow unintentionally.
InsteadAdjust angle for a clean loop or a clear Rembrandt triangle.
MistakeMaking the Rembrandt triangle too large.
InsteadKeep it no wider than the eye and no longer than the nose.
MistakeUsing broad lighting on round faces.
InsteadUse short lighting to slim.
MistakeLetting rim lights flare into the lens.
InsteadFlag or grid rim lights.
Summary and key terms
- Patterns are defined by key light angle, height and the nose shadow.
- Flat lighting is even but reduces form.
- Butterfly lighting is symmetrical and glamorous; clamshell adds fill from below.
- Loop lighting flatters most faces.
- Rembrandt leaves a triangle of light on the shadow cheek.
- Split lighting divides the face; rim lighting outlines it.
- Broad lights the near side, short the far side; choose patterns for the face and mood.
- Butterfly lighting
- Key in front and above, small shadow under the nose.
- Paramount lighting
- Another name for butterfly lighting.
- Clamshell lighting
- Key above and fill below the face.
- Loop lighting
- Small loop shadow from the nose.
- Rembrandt lighting
- Triangle of light on the shadow-side cheek.
- Split lighting
- Face divided into light and shadow.
- Broad lighting
- Key on the side of the face nearer the camera.
- Short lighting
- Key on the side of the face turned away.
- Rim light
- Light from behind outlining the subject.
- Flat lighting
- Even light near the camera axis.
Practice problems
Work each problem on paper first, then reveal the answer to check.
Who popularized butterfly lighting in Hollywood portraits?
Show answer
Studio photographers such as George Hurrell.
Where is the key for butterfly lighting?
Show answer
In front of the face and above.
What is added for clamshell lighting?
Show answer
A fill or reflector below the face.
Key angle for loop lighting?
Show answer
About 30–45 degrees.
Describe the Rembrandt triangle.
Show answer
Light on the shadow cheek, no wider than the eye.
Key angle for split lighting?
Show answer
About 90 degrees.
Which slims faces, broad or short?
Show answer
Short lighting.
What does a rim light do?
Show answer
Outlines the subject from behind.
What happens if the key is too high?
Show answer
Dark eye sockets and lost catchlights.
Which pattern suits corporate headshots?
Show answer
Soft loop lighting with moderate fill.
Lesson quiz · 5 questions
Score 60% or more to complete this lesson.
Create a free account to save your progress, take quizzes and earn a certificate.