
LVT-230 · Lesson 8 of 12 · 20 min
IP video: cameras, lenses and resolution
A camera that records a blur is worse than no camera, because it gives everyone the feeling of being covered. The Juniper Point board wants to know who comes through the garage gate at night; the Riverside principal wants to see who enters the front door; St. Brendan's wants to see the pharmacy counter. Each of those is a different job, and each needs a different camera, lens and position. The installer, with the designer, makes those choices real: mounting the camera where it can see what it needs to, setting the lens and the image so the result is good enough for its purpose, and proving it at commissioning. This lesson covers camera types, sensors and resolution, lenses and field of view, pixel density and the DORI levels, low light and difficult lighting, and how to set up a camera's image.
Start with the purpose
Every camera on a good design has a written purpose: what it should see and what the owner needs to do with the image. The international standard for video surveillance systems, IEC 62676-4, describes purposes in terms of how much detail of a person the image must show. Detection means telling that a person is there. Observation means seeing what they are doing. Recognition means a person who knows them could say who it is. Identification means the image is good enough to identify a stranger beyond reasonable doubt. Those four levels, often abbreviated DORI, each need more image detail than the one before.
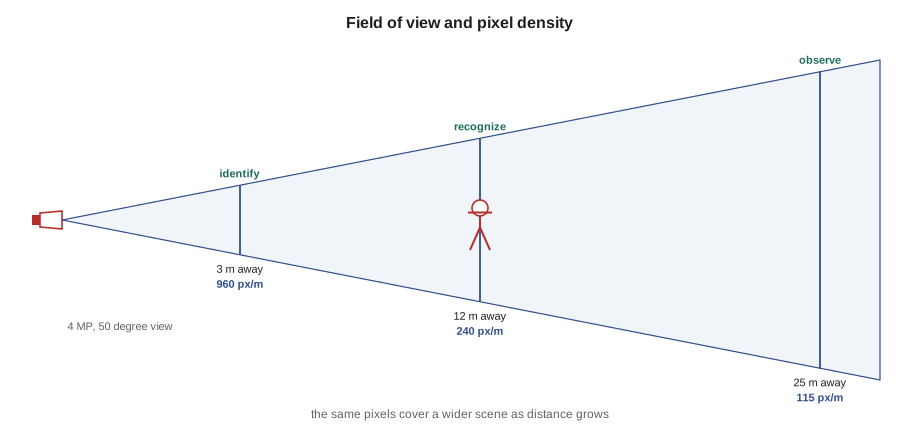
Image detail is measured as pixel density: how many pixels of the camera's image cover one metre (foot) of the scene at the distance where the subject is. A camera with many pixels spread over a wide view can have less pixel density at the door than a camera with fewer pixels and a narrow view. The usual DORI values are about 25 pixels per metre for detection, 62 for observation, 125 for recognition and 250 for identification. The design names the level for each camera's target, and the installer checks that the camera delivers it.
| Level | What the image allows | Pixels per metre | Pixels per foot (approx.) |
|---|---|---|---|
| Detect | Tell that a person is present | 25 | 8 |
| Observe | See what a person is doing | 62 | 19 |
| Recognize | A person who knows them can say who it is | 125 | 38 |
| Identify | Identify a stranger | 250 | 76 |
Camera types
Fixed cameras look at one view. They come as bullets, in a cylindrical housing on a bracket, which are easy to aim and suit walls and poles; as domes, under a clear or smoked cover, which are harder to knock out of aim and suit ceilings and indoor spaces; and as turrets, a ball in a shallow base, which avoid the reflections domes can have at night. Varifocal cameras have a lens whose focal length can be adjusted, usually with a motor from the camera's web page, so the installer can set the view exactly. Pan-tilt-zoom cameras, PTZs, move and zoom under control, which suits large areas watched by an operator, but a PTZ only records where it is pointing at the moment, so most designs do not rely on PTZs for evidence.
Multi-sensor cameras put two to four imagers in one housing, each with its own lens, to cover several directions from one mounting point, such as a corridor intersection or the four sides of a building corner. Panoramic or fisheye cameras use one very wide lens to see a whole room from the ceiling, at low pixel density. Specialized cameras include licence plate recognition cameras, which use a narrow view, fast shutter and infrared light to read plates, and thermal cameras, which see heat rather than light and are used for detection along perimeters.
Sensors and resolution
A camera's image sensor has a fixed number of pixels, given as width by height or as megapixels. Common sizes are 1920 by 1080, often called 1080p or 2 MP; 2688 by 1520, about 4 MP; and 3840 by 2160, 4K or 8 MP. More pixels give more detail across the same view, but they also need more bandwidth and storage, which lesson 9 covers, and in low light a sensor with many small pixels can perform worse than one with fewer, larger pixels. The design balances resolution against the lighting and the storage budget, not by choosing the most megapixels available.
The sensor's aspect ratio matters too. Most cameras are 16:9, wider than they are tall. For a corridor or a tall doorway, many cameras offer a corridor mode that rotates the image 90 degrees so the long side of the sensor runs along the corridor, putting more pixels where the people are.
Lenses and field of view
The lens's focal length, in millimetres, together with the sensor size, sets the angle of view. A short focal length, such as 2.8 mm on a typical small sensor, gives a wide view of about 100 degrees; a long one, such as 12 mm, gives a narrow view of about 30 degrees. At any distance, the width of the scene the camera sees is roughly twice the distance times the tangent of half the angle of view, and the pixel density at that distance is the sensor's horizontal pixel count divided by that width.
Here N sub h is the horizontal pixel count, d the distance to the target and theta the horizontal angle of view. The calculation lets the designer, and the installer checking the design, work out how far away a camera can be and still deliver the required level, or what angle of view is needed for a given distance.
# Pixel density at a target, and the DORI level it supports
import math
LEVELS = [("identify", 250), ("recognize", 125), ("observe", 62), ("detect", 25)]   # pixels per m
def density(h_pixels, angle_deg, distance):
    width = 2 * distance * math.tan(math.radians(angle_deg) / 2)
    return width, h_pixels / width
def level(pd):
    return next((name for name, need in LEVELS if pd >= need), "below detect")
cameras = [  # name, horizontal pixels, horizontal angle in degrees, distance to target in m
    ("Garage gate, 4 MP, 32 deg", 2688, 32, 6.0),
    ("Lobby door, 4 MP, 90 deg", 2688, 90, 8.0),
    ("Parkade aisle, 2 MP, 100 deg", 1920, 100, 20.0),
    ("Pharmacy counter, 8 MP, 60 deg", 3840, 60, 3.5),
]
for name, px, ang, dist in cameras:
    w, pd = density(px, ang, dist)
print(f"{name:32s} view {w:5.1f} m wide, {pd:5.0f} px/m -> {level(pd)}")Garage gate, 4 MP, 32 deg view 3.4 m wide, 781 px/m -> identify Lobby door, 4 MP, 90 deg view 16.0 m wide, 168 px/m -> recognize Parkade aisle, 2 MP, 100 deg view 47.7 m wide, 40 px/m -> detect Pharmacy counter, 8 MP, 60 deg view 4.0 m wide, 950 px/m -> identify
The garage gate camera, with its narrow lens, reaches identification at the gate. The lobby door camera, with a wide lens, reaches only recognition at the door, which is what the design asked for; the identification camera for the lobby is a separate unit at the vestibule. The parkade aisle camera at the far end of the aisle only detects, which is its purpose: it shows that someone is there, and the cameras at the doors show who.
Mounting height and angle
Cameras that must recognize or identify people work best when they look at faces from a moderate angle. A camera mounted high and looking steeply down sees the tops of heads and hat brims. Designers usually set identification cameras at about 2.4 to 3 m (8 to 10 ft) high, aimed so that the angle down to the target is no more than about 15 to 30 degrees. That means placing the camera some distance back from the door it watches, not directly above it. Cameras that only need to detect or observe can be higher, out of reach of tampering.
The camera should look along the path people take, not across it, where possible, so they walk toward it and stay in view for several seconds. It should not look straight at a bright window or a doorway to the outside, which turns faces into silhouettes. Outdoor cameras should be out of reach or vandal-resistant, sheltered from direct rain where possible, and aimed so the sun does not shine into the lens at sunrise or sunset.
Low light and difficult lighting
Lighting decides image quality more than any camera setting. Most cameras switch at night from colour to black-and-white and turn on built-in infrared illuminators, which light the scene with light the eye cannot see. Infrared has a rated range, and objects close to the camera can be over-lit while the far end is dark; walls or ceilings near the camera reflect infrared back into the lens. Where the owner wants colour at night, the design adds visible lighting or uses cameras with very sensitive sensors.
Scenes with very bright and very dark areas at once, such as a lobby with a glass front on a sunny day, or a garage exit with headlights coming in, are a problem for an ordinary camera. Wide dynamic range, WDR, combines several exposures to show detail in both, and the installer turns it on and adjusts it for such views. Licence plate cameras at the garage gate use a fast shutter so moving plates are not blurred, and their own infrared, so headlight glare does not wash out the plate.
Setting up the image
Once the camera is mounted, the installer sets it up through its web page or the video management system. The tasks are the same for every camera: set the camera's name and time from the network's time server, so recordings carry the right time; aim and focus the lens, using the camera's autofocus on varifocal models and checking the result on a full-resolution image, not a phone screen; set the resolution, frame rate and compression from the design, which lesson 9 covers; set exposure, WDR and day-night switching; apply privacy masks over areas that must not be seen; and turn off features the owner does not use, such as audio. Each camera's settings are saved and recorded.
The final check is a target test. With a person standing at the target position, Maya captures a frame and checks it against the design's level: can the person's face be recognized, or identified, at full resolution? Many installers use a test chart at the target distance, which shows pixel density directly. The images go into the commissioning record, one per camera, by day and by night.
# Choose a lens angle that gives a required pixel density at a distance
import math
def angle_for(h_pixels, distance, need):
    width = h_pixels / need                    # scene width that gives the required density
    return math.degrees(2 * math.atan(width / (2 * distance))), width
for name, px, dist, need in [("gate plate camera", 1920, 8.0, 250), ("vestibule face camera", 2688, 4.5, 250),
                             ("loading dock overview", 2688, 15.0, 62)]:
    ang, w = angle_for(px, dist, need)
print(f"{name:22s} at {dist:4.1f} m needs a view {w:4.1f} m wide: angle about {ang:4.1f} degrees")gate plate camera at 8.0 m needs a view 7.7 m wide: angle about 51.3 degrees vestibule face camera at 4.5 m needs a view 10.8 m wide: angle about 100.1 degrees loading dock overview at 15.0 m needs a view 43.4 m wide: angle about 110.6 degrees
The gate camera needs a lens of about 50 degrees, and the vestibule camera about 100; the dock overview can use a very wide lens, because it only has to observe. Working backward like this tells the installer which zoom setting to look for on a varifocal camera before climbing the ladder.
Worked problem
A face camera that cannot identify
At Riverside, the camera chosen to identify people at the main entrance is a 4 MP dome on the vestibule ceiling, directly above the inner doors, set to its widest angle. The principal complains that faces in the recordings are unrecognizable. What would Maya check, and what would she suggest?
Show solution
- Directly above the doors, the camera looks almost straight down and sees the tops of heads.
- At its widest angle, about 100 degrees, a 4 MP camera spreads its pixels across the whole vestibule, giving far less than 250 pixels per metre (76 pixels per foot) at the doors.
- Behind the people, the glass front lets in bright daylight, so faces are in shadow without WDR.
- She suggests moving the camera about 4 m (13 ft) back from the doors at 2.7 m (9 ft) high, zooming to about 74 degrees so the view at the doors is 6 m (20 ft) wide, and turning on WDR, then testing with a person at the doors.
Answer: After the change, the test frame at the doors shows about 450 pixels per metre (135 pixels per foot), and faces are identifiable in daylight and with the vestibule lights at night.
Common mistakes
MistakeChoosing the camera with the most megapixels.
InsteadChoose the resolution and lens that give the required level at the target.
MistakeMounting an identification camera directly above the door.
InsteadSet it back so it looks at faces at a moderate angle.
MistakeAiming a camera into a bright window.
InsteadAvoid backlight or use WDR, and test in the worst lighting.
MistakeChecking focus on a phone screen.
InsteadCheck focus on a full-resolution image.
MistakeSkipping the night test.
InsteadRecord a test image of every camera by day and by night.
Summary and key terms
- Each camera needs a written purpose: detect, observe, recognize or identify.
- Pixel density at the target decides the level; IEC 62676-4 gives about 25, 62, 125 and 250 px/m.
- Bullets, domes, turrets, varifocals, PTZs and multi-sensor cameras suit different jobs.
- Pixel density equals the horizontal pixels divided by the scene width at the target.
- Identification cameras look at faces from a moderate angle, set back from the door.
- Lighting, infrared range and WDR decide how well a camera works at night and in backlight.
- Setup ends with a target test and recorded images by day and night.
- DORI
- Detect, observe, recognize, identify: levels of image detail for people.
- Pixel density
- The number of image pixels per unit width of the scene at the target.
- Focal length
- A lens property that, with the sensor size, sets the angle of view.
- Varifocal lens
- A lens whose focal length can be adjusted.
- WDR
- Wide dynamic range, which shows detail in bright and dark areas together.
- Infrared illuminator
- A light source the camera can see but the eye cannot.
- Target test
- A test image with a person or chart at the target position.
Practice problems
Work each problem on paper first, then reveal the answer to check.
A 2 MP camera with 1,920 horizontal pixels sees a 7.7 m wide scene at the door. What level does it support?
Show answer
About 250 px/m: identification.
Why should an identification camera not be mounted directly above a door?
Show answer
It would see the tops of heads instead of faces.
What does WDR do?
Show answer
It combines exposures so bright and dark areas both show detail.
Why does a PTZ camera not suit evidence recording on its own?
Show answer
It records only where it is pointing at that moment.
Lesson quiz · 5 questions
Score 60% or more to complete this lesson.
Create a free account to save your progress, take quizzes and earn a certificate.