
WLD-230 · Lesson 7 of 12 · 16 min
Vertical groove welds (3G)
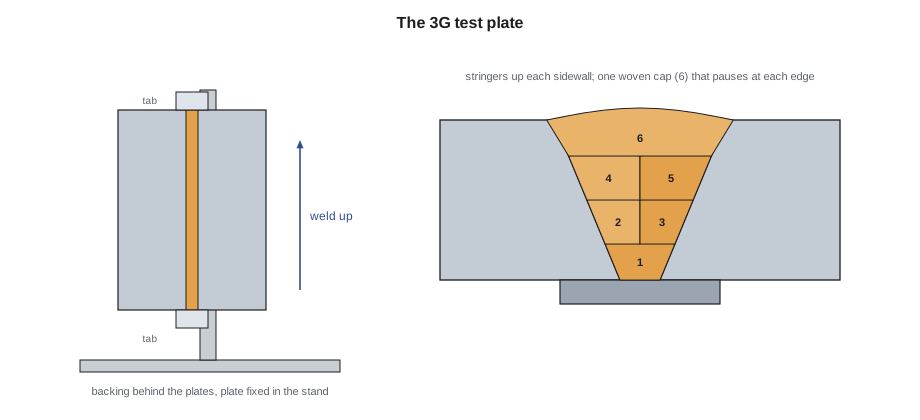
With vertical fillets under control, Devon moves to the weld that most welders find the hardest test of all: the vertical groove, 3G. The plates stand on edge with the groove running straight up, the backing bar behind them, and the whole joint is welded uphill from the root to the cap. Everything from the last four lessons comes together here. The root has to fuse its corners against gravity, each fill pass has to fuse the sidewall while the pool tries to slide down the groove, and the cap has to come out flat and even with no undercut. A passed 3G plate qualifies the welder for groove welds in the flat, horizontal and vertical positions, and with a 4G plate, for all positions.
Setting up the 3G plate
The plate is clamped in the welding stand with the groove vertical and the backing toward the wall. Devon sets the height so that the middle of the plate is at about chin height when he is standing comfortably, because he will weld the root and the bottom of each pass crouched slightly and the top standing straight. The test rules do not let the welder change the position of the plate once welding has started, so the height and angle must be right before the first arc. The stand also has to hold the plate solidly; a plate that shifts during a pass loses its alignment and its root opening.
Before welding, Devon checks the root opening once more, top and bottom, and the pre-set. On a vertical plate, angular distortion pulls the plates toward the cap side as on a flat plate, so the pre-set is the same: the outer edges of the plates set back slightly from the face side.
The vertical root
The root on backing in the vertical position is run with the same 1/8 in low-hydrogen electrode, at a lower current than flat, typically 95 to 110 A. The electrode is held square across the groove and pointed slightly upward, about 5 to 10 degrees. The motion is a small triangle or a short side-to-side movement no wider than the root opening, with a pause at each bevel corner long enough to see the pool wet the corner and the backing.
The difficulty with a vertical root is that the pool wants to run down onto the backing below the arc, where it freezes on top of the backing without fusing into it, and the corners above the arc get no heat. The cure is a short arc held right at the leading edge of the pool, a steady upward rhythm, and enough current for the arc to dig. If the root bead comes out with a crown and valleys, it is ground flat before the next pass, exactly as on the flat plate.
Devon's first 3G root bends show the same problem as his first flat roots, a cold corner on the right bevel, plus a new one: at each restart, the new bead sat on the old crater without fusing. He fixes the restarts by grinding each crater to a long taper and striking the new electrode on the taper about 3/8 in below the crater, then moving up through it.
Fill passes
On the test plate, the fill layers are run as stringers, vertical-up, one against each sidewall. Each stringer is run with the electrode pointed slightly toward its sidewall and slightly upward, with a small up-and-back motion that lets the pool freeze. The aim is to fuse the sidewall and the previous layer without building a peak that will leave a valley beside it. When the groove becomes wide enough that two stringers leave a valley in the middle, a third, center stringer is added.
Some shops and some procedures allow the fill of a vertical groove to be woven, with the weave spanning the whole groove from sidewall to sidewall and pausing at each side. A woven fill is faster and many good welders prefer it in the vertical position, because the weave helps hold the pool up. Its risks are lack of sidewall fusion, if the pause at each side is too short, and higher heat input. Hartwell follows the test center practice and has Devon run stringers on his test plates, with the weave saved for the cap.
| Pass | Electrode | Current | Motion |
|---|---|---|---|
| Root | 1/8 in | 95-110 A | Small triangle, pause at each corner |
| Fill, each sidewall | 1/8 in | 100-115 A | Stringer, small up-and-back |
| Fill, center (if needed) | 1/8 in | 100-115 A | Stringer |
| Cap | 1/8 in | 105-120 A | Side-to-side weave, pause at each edge |
Interpass temperature on a vertical plate
A vertical test plate heats up faster than people expect. The passes are short, the plate is small, and the heat rises through it, so the top of the plate is hotter than the bottom. If the welder runs pass after pass without waiting, the top of the plate becomes so hot that the pool will not freeze, and the last few centimeters of each pass sag. Devon checks the interpass temperature with a crayon at the top of the plate before each pass, and keeps a log so that he can see how quickly the plate heats and how long it takes to cool.
# Interpass temperature log for a 3G practice plate: check each reading and the heat input of each pass
LIMIT_MIN, LIMIT_MAX = 50, 500          # F: minimum (preheat) and maximum interpass
log = [("root", 68, 22.5, 102, 6, 100), ("fill 1a", 250, 23.0, 108, 6, 75), ("fill 1b", 345, 23.0, 108, 6, 72), ("fill 2a", 445, 23.0, 110, 6, 70), ("fill 2b", 510, 23.0, 110, 6, 68), ("cap", 400, 23.5, 112, 6, 160)]        # (pass, temperature before the pass F, volts, amps, length in, seconds)
hi_max = 0.0
for name, temp, v, a, length, sec in log:
    speed = length / (sec / 60)
    h = 60 * v * a / (1000 * speed)
    hi_max = max(hi_max, h)
    status = "ok" if LIMIT_MIN <= temp <= LIMIT_MAX else ("WAIT, too hot" if temp > LIMIT_MAX else "PREHEAT, too cold")
    print(f"{name:7} start {temp:4d} F  {status:16}  speed {speed:5.1f} in/min  HI {h:.1f} kJ/in")
print(f"highest heat input on this plate {hi_max:.1f} kJ/in")root start 68 F ok speed 3.6 in/min HI 38.3 kJ/in fill 1a start 250 F ok speed 4.8 in/min HI 31.1 kJ/in fill 1b start 345 F ok speed 5.0 in/min HI 29.8 kJ/in fill 2a start 445 F ok speed 5.1 in/min HI 29.5 kJ/in fill 2b start 510 F WAIT, too hot speed 5.3 in/min HI 28.7 kJ/in cap start 400 F ok speed 2.2 in/min HI 70.2 kJ/in highest heat input on this plate 70.2 kJ/in
The log shows the plate passing its maximum before the fourth fill pass, when Devon ran passes back to back. He waited about four minutes for it to cool before the cap. The cap, run as a slow weave up the plate, has more than twice the heat input of the stringers, which is normal for a vertical cap.
The vertical cap
The cap of a 3G plate is a single woven pass, side to side across the full width of the groove, moving up about the width of the electrode with each crossing. The width of the weave is set by the bevel edges: the electrode reaches just past each edge, pauses there long enough to fill the edge and melt into the plate surface about 1/16 in, and crosses quickly to the other side. The pauses prevent undercut; the quick crossing keeps the middle from bulging.
The cap needs the fill to be right underneath it. If the last fill layer is too low in the middle, the cap sinks there and leaves underfill; if it is too high, the cap stands proud. Devon fills to about 1/16 in below the surface with the bevel edges showing clearly on both sides before he starts the cap, and he grinds any high spots in the last fill pass flat.
Starting and ending the cap are the hardest parts. At the bottom, the cap starts on the run-off tab or at the very bottom edge of the plate, where the plate is cold, so Devon holds the first crossing a moment longer to build the bead to full width. At the top, the plate is at its hottest, so he speeds up slightly and shortens his pauses as he nears the end, and he fills the crater by pausing at the top before breaking the arc on the tab.
Reading the 3G cap
Lucia reads a 3G cap from a step back first and then close up. From a distance, a good cap has an even width from bottom to top, even ripples that look like a stack of shallow arcs, and straight edges. Close up, she checks the toes for undercut with a gauge, the reinforcement height, and the restarts. Common faults and their causes:
| Cap fault | Cause |
|---|---|
| Undercut along both edges | No pause or too short a pause at the edges, current too high |
| Bulge in the middle, edges thin | Crossing the middle too slowly |
| Width wanders | Losing sight of the bevel edges, uneven weave |
| Sagging near the top | Plate too hot; interpass not checked |
| Rough ripples, slag pockets | Weave too fast, arc too long |
Production vertical grooves: the column splices
Devon's first production groove welds are the column splices on the Coldwater skid. Each of the four short columns that carry the skid's upper deck is spliced to its base stub with complete joint penetration groove welds in the flanges, single-V on backing, welded in the vertical position because the columns are already standing on the frame. The flanges are 5/8 in thick, thicker than his test plate, so each joint takes a root, five fill layers split into stringers and a woven cap. Because Devon is not yet qualified for vertical groove welds, the production splices are welded by Marta, who holds the qualification. Devon preheats, cleans between passes and watches every pass from the side, and then welds a full-size mock-up splice on two column offcuts set up beside the skid in the same position. Lucia cuts the mock-up into slices and etches them, and the sections show what a 5/8 in vertical groove looks like inside: thirteen passes, all fused, with one small slag pocket at a fill restart that Devon would have caught if he had ground the crater properly.
Before each splice, Devon checks the preheat. The flange steel is thicker than the test plate and the shop is cold on winter mornings, so the procedure calls for a minimum preheat and interpass temperature, which he checks on both sides of the joint about 3 in back from the groove. The test plate procedure, on 3/8 in plate, needs only that the plate be above about 50 °F.
When the plate must stay put
Two rules from the test standards are worth practicing from the start. The first is that the plate must not be moved or rotated once welding has begun; the welder moves, the plate does not. The second is that the welder may grind and clean between passes but, on most tests, may not grind the cap after it is finished or repair it. Devon practices with both rules in place, so that on the test day he is not tempted to touch up a cap or turn the plate for a more comfortable angle.
Practicing the 3G in pieces
A full 3G plate takes Devon about forty minutes at first, and a failed bend tells him something went wrong without telling him much about which pass. So Marta breaks the practice into pieces. For three afternoons he welds roots only, on short vertical plates, and knocks the backing off each one to see the fusion. Then he welds plates with the root and the first fill layer, and cuts and etches a section across each to look at the sidewall fusion of the first stringers. Then he welds caps only, on plates whose fill was put in by Marta, so that he can concentrate on the weave without worrying about what is underneath.
Only when each piece is reliable does he weld complete plates and bend them. The method takes longer at the start, but by week six his complete 3G plates are passing, and when one fails he can usually tell from the opening which piece of the plate went wrong. Marta calls it learning the weld one pass at a time.
Common mistakes
MistakeMoving the test plate once welding has started.
InsteadSet the height and angle before the root; the plate stays put.
MistakeWeaving the fill on the test plate.
InsteadRun stringers up each sidewall; save the weave for the cap.
MistakeIgnoring the temperature at the top of the plate.
InsteadCheck interpass temperature at the top and wait if it is over the limit.
MistakeStarting the cap over a fill that is too high or too low.
InsteadFill to about 1/16 in below the surface with the bevel edges showing.
MistakeCrossing the cap slowly through the middle.
InsteadPause at the edges and hurry through the middle.
Summary and key terms
- A 3G plate is a vertical groove welded uphill from root to cap.
- Set the plate height and angle before starting; the plate may not be moved.
- Run the vertical root with a short arc, a small triangle and pauses at the corners.
- Fill with stringers against each sidewall; add a center stringer when needed.
- Check interpass temperature at the top of the plate.
- Weave the cap edge to edge, pausing at each edge and crossing quickly.
- 3G
- A groove weld in plate in the vertical position.
- Column splice
- A joint connecting two lengths of column, often by groove welds in the flanges.
- Weld map
- A record showing which welder made each weld on an assembly.
- Supervision
- Direct oversight of a trainee by a qualified welder who takes responsibility for the work.
Practice problems
Work each problem on paper first, then reveal the answer to check.
The plate reads 510 F before a pass on a 500 F maximum. What does the welder do?
Show answer
Wait for it to cool in air below 500 F before the next pass.
A 3G cap shows undercut along both edges. What is the likely cause?
Show answer
The welder did not pause long enough at the edges, or the current is too high.
Why is the top of a vertical test plate hotter than the bottom?
Show answer
Heat from each pass rises through the plate, and the top has less metal below it to absorb it.
Lesson quiz · 5 questions
Score 60% or more to complete this lesson.
Create a free account to save your progress, take quizzes and earn a certificate.