
WLD-120 · Lesson 8 of 12 · 19 min
Weaving, restarts and multi-pass pads
Real welds are rarely a single stringer. A fillet bigger than about 5/16 in takes several passes; a groove weld in thick plate may take dozens; and every electrode runs out after a short length, so long welds are a chain of beads joined end to end. This lesson covers the three skills that turn single beads into whole welds: weaving the electrode to make a wider bead, restarting a bead so the join is as sound as the rest, and building pads of overlapping beads, layer on layer, without trapping slag. These are the skills the qualification tests later in the program look at hardest, because the defects that fail welds, slag inclusions, lack of fusion and porosity at restarts, hide in exactly these places. For Devon they mean another week in the booth building pads on plate.
Stringers and weaves
A stringer is a straight bead with no side-to-side motion. A weave bead is made by moving the electrode tip from side to side as it travels, spreading the puddle wider than a stringer. Weaving has its uses: it covers a wider joint in one pass, fills the face of a groove, lets the welder control heat and puddle shape in vertical welding, and makes a smooth cap. It also has costs: a weave puts more heat into each unit length of weld because travel is slower, it widens the heat-affected zone, and it is more likely to trap slag at the edges or leave the edges undercut if the welder does not pause there.
For low-hydrogen electrodes the weave is kept narrow, typically no wider than about two-and-a-half to three times the core wire diameter, because a wide weave lengthens the arc at the turns and lets air in, and because procedures for toughness-critical work often limit bead width or heat input. Many structural procedures in the flat and horizontal positions call for stringers only, or for stringers on all passes except the cap. The welder reads the procedure before choosing a technique.
Weave patterns
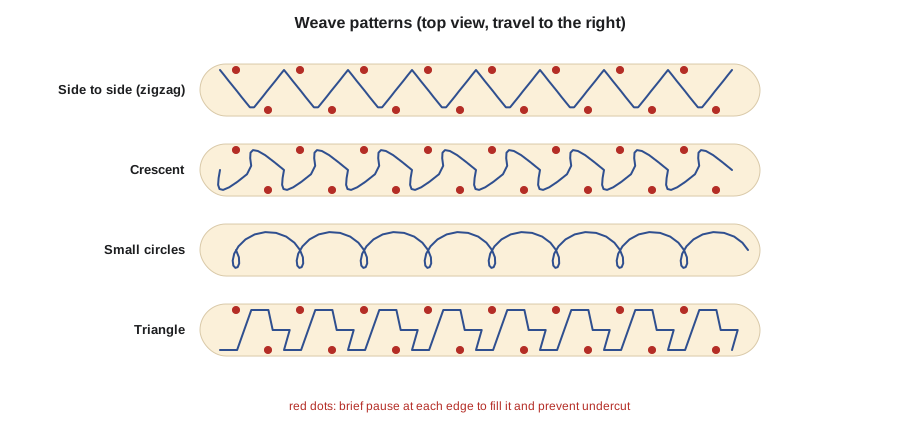
Several patterns are taught, each with its uses:
- Side-to-side (zigzag): a simple back-and-forth across the bead, with a short pause at each side. Used for flat caps and fill passes.
- Crescent: a curved path that bows back toward the finished weld, which helps hold the puddle and push slag back. Common in flat and vertical-up work.
- Circular or figure eight: small loops that spread heat and metal evenly over a wide area, used for pads and wide caps.
- Triangle and inverted-V: used in vertical-up fillets and grooves, covered in the all-position course.
Whatever the pattern, the same rules apply. Keep the arc length constant through the whole motion, which means the hand rises and falls slightly with the joint profile; pause briefly at each edge to fill the edge and prevent undercut; move quickly across the middle, where heat builds up; and keep the forward travel steady so the ripples stay even. A useful check is to count: one at the left edge, across, one at the right edge, across, at a steady rhythm.
Restarts and tie-ins
An electrode lays only a short length of bead, roughly 6 to 12 in for a 1/8 in electrode depending on bead size. Every time it runs out, the bead ends in a crater, and the next electrode must start so the join is full, fused and free of slag and porosity. A good restart is invisible; a poor one shows as a lump, a hollow, or a line of porosity, and on a cut section often as a pocket of slag or a cold lap.
The steps:
- Change electrodes quickly, while the crater is still hot if possible. A hot restart fuses more easily.
- Clean the crater: chip off the slag over the last 1 to 2 in of the bead and brush the crater. For low-hydrogen electrodes, grind a long, shallow taper on a cold crater if it has a hump or any visible porosity.
- Strike the arc about 1/2 to 3/4 in ahead of the crater, on the joint where the new bead will go, so the arc strike will be covered.
- Bring the arc back quickly to the front edge of the crater, at a slightly longer arc for an instant to preheat it, then shorten the arc and let the puddle fill the crater to the same width as the bead.
- Resume normal travel forward, over the strike point, which melts it into the new bead.
The most common restart faults are starting on top of the crater, which leaves a lump and often slag underneath, and starting too far back on cold bead, which leaves a hump and an unfused lap. Low-hydrogen electrodes also leave start porosity if the arc is struck right where the weld begins, which is why the strike is made ahead and the start remelted. On code work, restarts in a weld that is to be radiographed or ultrasonically tested are where inspectors look first.
Ending the last bead at the end of a joint has its own rule: the crater must be filled, and on open-ended joints it should be finished on a run-off tab if the procedure requires it, so the end of the weld is full size. Where a weld ends at a corner or the edge of a plate, the welder stops a short distance from the edge, then reverses briefly to fill the crater back on the bead, rather than running off the edge and leaving a hollow.
Building a pad
A pad is a practice block of overlapping stringer or weave beads laid side by side on flat plate, then layer on layer, each layer at right angles to or parallel with the one below. It teaches straight, even beads, consistent overlap, clean tie-in between beads, thorough slag removal, and heat management, and its cross-section shows clearly whether every bead fused to the one beside it and to the layer below.
Each new bead in a layer overlaps the previous one by about one-third to one-half of its width, with the arc aimed at the toe of the previous bead, where it meets the plate, so that the new bead melts into both the plate and the edge of the old bead. Too little overlap leaves valleys between beads, where slag gets trapped on the next layer; too much piles the new bead on the old one and leaves the far edge unfused to the plate.
Slag is removed from every bead before the next is laid, and between layers the whole surface is chipped and wire-brushed and any deep valleys or humps are ground smooth. The pad heats up as it grows. A very hot pad makes the puddle run, the slag hard to control and the beads wide, so welders work on two pads at once and let each cool between layers, or check that the pad is below the interpass temperature the practice procedure sets. Interpass temperature is one of the variables the metallurgy course takes up.
# Plan a practice pad: beads per layer, total bead length and electrodes needed
plate_w = 3         # width of the pad area (in)
pad_len = 8         # length of each bead (in)
bead_w = 0.31          # width of one stringer bead (in)
overlap = 0.4          # fraction of each bead overlapped by the next
layers = 4
bead_per_electrode = 9   # bead length one electrode lays (in)
step = bead_w * (1 - overlap)               # sideways step from bead to bead
beads_per_layer = int((plate_w - bead_w) / step) + 1
total_len = beads_per_layer * layers * pad_len
electrodes = total_len / bead_per_electrode
print(f"{beads_per_layer} beads per layer, step {step:.1f} in")
print(f"{layers} layers: {beads_per_layer * layers} beads, {total_len:,.0f} in of bead")
print(f"about {electrodes:.0f} electrodes, plus restarts and test beads")15 beads per layer, step 0.2 in 4 layers: 60 beads, 480 in of bead about 53 electrodes, plus restarts and test beads
The number of restarts matters as much as the number of electrodes. Each bead in Devon's pad needs about one electrode, so each layer has about as many restarts as beads, and each restart is a place to check.
Checking a pad
A finished pad is judged by eye and then by cutting. By eye: the beads are straight and parallel, each the same width, with even ripples and no visible slag, porosity, undercut along the outermost beads or unfilled craters; the surface of each layer is reasonably flat without deep valleys; restarts are smooth and in line. By cutting: a strip sawn across the pad, ground and etched with a mild acid etchant under supervision, shows each bead as a separate outline; good fusion appears as continuous boundaries, while slag shows as dark specks or lines between beads and lack of fusion as sharp, straight lines at the edges.
Marta saws Devon's first four-layer pad into three strips and lays them on the bench. Two show clean fusion; one has a dark line along the second layer, a slag inclusion that runs the length of one bead where Devon had not brushed out a valley. Devon rebuilds the pad with a wire wheel on the grinder for every valley, and the next cut is clean.
Worked problem
Overlap and bead count
A pad is 3 in wide with stringers 5/16 in wide overlapped by 40 percent. How many beads per layer?
Show solution
- Step between beads = 0.31 × (1 − 0.4) = 0.19 in.
- Beads = (3 − 0.31) / 0.186 + 1 = 15.5; only whole beads fit, so 14 full steps plus the first bead.
Answer: 15 beads per layer, which is the count the program gives.
Whipping
Some electrodes are run with a whipping motion: the arc is moved forward out of the puddle a short distance along the joint, then brought back into the puddle, in a steady rhythm. Moving forward lets the puddle cool and freeze slightly, which helps control it, especially in open roots and vertical-down or vertical-up work with cellulosic E6010 and E6011. The movement lengthens the arc briefly each time, which a cellulosic electrode tolerates because of its strong gas shield. Low-hydrogen electrodes do not: whipping E7018 lets air into the arc and causes porosity, so it is run with steady travel, a short arc and, where needed, a small weave instead.
Heat and distortion in practice plate
A pad built quickly on thin practice plate bows upward at the edges as each layer shrinks, and by the fourth layer it may rock on the table, which spoils the work clamp contact and the welder's position. Welders use plate at least 3/8 in thick for pads, tack or clamp it to the table at the corners, and alternate the direction of beads from layer to layer. Practice plate is also quenched in water only when the practice procedure allows it; quenching hot steel can harden it and, on a real weld, would be a serious fault, so many shops ban it entirely to avoid building the habit.
Restarts on code work
On code welds, restarts are sometimes staggered: the restart points of successive passes in a multi-pass weld are kept apart, often by at least 1 in, so that small discontinuities at restarts do not line up through the thickness. Some procedures also require restarts to be ground to a taper before the next electrode is started, whatever their appearance. Devon writes both rules in the notebook, because the formal qualification tests look closely at restarts.
Judging a weave by its ripples
A good weave bead has ripples that run evenly across its full width, slightly curved, with both edges straight and blended into the plate. Ripples that bunch up on one side show the hand lingering there; a bead edge that wanders in and out shows the pause at the edges changing length; a pointed, herringbone pattern across a wide bead shows travel too fast for the width of the weave. Devon photographs each pad layer with a phone before chipping the next and compares the ripple patterns over the week.
Common mistakes
MistakeWeaving wide with E7018 to finish faster.
InsteadKeep low-hydrogen weaves narrow, about 2.5 to 3 times the core diameter, or use stringers as the procedure requires.
MistakeCrossing the edges of a weave without a pause.
InsteadPause briefly at each edge to fill it and prevent undercut.
MistakeRestarting right on top of the crater.
InsteadStrike ahead, come back to the crater, fill it, then travel forward.
MistakeLeaving valleys between beads on a pad.
InsteadOverlap by one-third to one-half and grind out deep valleys before the next layer.
MistakeRunning layer after layer without letting the pad cool.
InsteadControl interpass temperature as the procedure says.
Summary and key terms
- Weaves widen a bead and suit caps and some fills; stringers suit most low-hydrogen structural passes.
- Pause at weave edges, cross the middle quickly and keep arc length constant.
- Restart by cleaning the crater, striking ahead, returning to fill the crater and traveling forward.
- Overlap pad beads by one-third to one-half and aim at the toe of the previous bead.
- Clean every bead, grind valleys, control heat, and check pads by cutting and etching.
- Weave bead
- A bead made with side-to-side motion of the electrode.
- Restart
- Starting a new electrode where the previous bead ended.
- Tie-in
- The fusion of a new bead into the previous bead or the base metal.
- Pad
- A practice block of overlapping beads built up in layers.
- Interpass temperature
- The temperature of the weld area just before the next pass.
- Etching
- Treating a cut weld section with a mild acid to show its structure.
Practice problems
Work each problem on paper first, then reveal the answer to check.
Why is a low-hydrogen weave kept narrow?
Show answer
A wide weave lengthens the arc and lets air in, and procedures may limit bead width or heat input.
Where is the arc struck for a restart?
Show answer
Ahead of the crater on the joint, so the strike is remelted.
How much should pad beads overlap?
Show answer
About one-third to one-half of the bead width.
What does a dark line between beads on an etched pad show?
Show answer
A slag inclusion or lack of fusion.
Lesson quiz · 5 questions
Score 60% or more to complete this lesson.
Create a free account to save your progress, take quizzes and earn a certificate.