
WLD-120 · Lesson 6 of 12 · 19 min
Striking the arc and running stringer beads
Every stick welder remembers the first few hours in the booth: the electrode that welds itself to the plate the instant it touches, the arc that goes out after a second, the bead that wanders like a snail's trail and then stops in a crater. The skills that fix those problems are learned by repetition, but they are learned faster when the welder knows what to look for. This lesson covers getting ready in the booth, striking and restarting the arc, freeing a stuck electrode, setting the current for the electrode size, running straight stringer beads in the flat position, reading the puddle, and ending a bead properly. The next lesson takes arc length, travel speed and electrode angle further; here the aim is a straight, even, well-tied-in bead on flat plate, which is where Devon starts.
Getting ready
Before striking an arc, the welder checks the booth and the body. The booth: screens closed, extraction arm pulled within 6 to 12 in of the work and aimed so the fume is drawn away from the face, work clamp on the table, practice plate clean and flat on the table, holder on its hook, chipping hammer and brush at hand, stub bucket in place. The body: helmet with the right filter shade, about 10 for 1/8 in electrodes at normal current, with safety glasses under it; dry leather gloves; flame-resistant jacket buttoned to the neck; nothing in the pockets that can burn; boots with trouser legs over them.
Position matters more than beginners expect. The welder sits or stands so the work is at a comfortable height, roughly level with the lower chest for flat welding, and braces against something solid: elbow on the table, forearm resting, or the free hand supporting the holder hand. The body should be able to move smoothly along the whole bead without shifting the feet. A practice run with the helmet up and the machine off, moving the electrode along the line, shows whether the cable will drag or the welder will run out of reach halfway.
Cable weight pulls on the wrist and spoils the motion. Draping the lead over the knee, the table edge or a hook takes the weight off; wrapping it around the arm or shoulder does not, and is not allowed for electrical reasons. With all that settled, the electrode goes in the holder, bare end fully in the jaws, usually at right angles to the holder for flat work.
Setting the current
The current range for an electrode depends mainly on its diameter, and to a lesser degree on the covering type, the position, the thickness of the work and the joint. The manufacturer's data sheet gives the range; a rough rule welders use for carbon steel electrodes in the flat position is about one ampere for every thousandth of an inch of core wire diameter, so about 125 A for a 1/8 in electrode, with a working range of some tens of amperes either side. Vertical and overhead welding use the lower part of the range, heavy plate and fast flat welding the upper part.
| Diameter | E6010 (A) | E6013 (A) | E7018 (A) | E7024 (A) |
|---|---|---|---|---|
| 3/32 in | 40 to 80 | 45 to 90 | 70 to 110 | not common |
| 1/8 in | 75 to 130 | 80 to 130 | 90 to 150 | 115 to 175 |
| 5/32 in | 90 to 175 | 105 to 180 | 120 to 200 | 180 to 240 |
| 3/16 in | 140 to 225 | 150 to 230 | 180 to 260 | 210 to 300 |
# Starting current for an electrode, from a typical range
ranges = {   # (low, high) amperes, typical flat-position ranges
    ("E7018", "3/32 in"): (70, 110), ("E7018", "1/8 in"): (90, 150), ("E7018", "5/32 in"): (120, 200),
    ("E6010", "1/8 in"): (75, 130), ("E6013", "1/8 in"): (80, 130), ("E7024", "5/32 in"): (180, 240),
}
position_factor = {"flat": 0.55, "horizontal": 0.50, "vertical": 0.35, "overhead": 0.35}

def start_current(electrode, dia, position):
    low, high = ranges[(electrode, dia)]
    return low, high, round(low + (high - low) * position_factor[position])

for e, d, p in [("E7018", "1/8 in", "flat"), ("E7018", "1/8 in", "vertical"),
                ("E7018", "5/32 in", "horizontal"), ("E6010", "1/8 in", "flat")]:
    low, high, a = start_current(e, d, p)
print(f"{e} {d:7s} {p:10s} range {low}-{high} A, start near {a} A, then adjust by test")E7018 1/8 in flat range 90-150 A, start near 123 A, then adjust by test E7018 1/8 in vertical range 90-150 A, start near 111 A, then adjust by test E7018 5/32 in horizontal range 120-200 A, start near 160 A, then adjust by test E6010 1/8 in flat range 75-130 A, start near 105 A, then adjust by test
The position factors are Hartwell's starting habits, not a rule: start a little above the middle for flat work and lower for vertical and overhead, run a test bead, and adjust. Signs of current too low: the electrode sticks often, the arc is hard to keep going, the bead piles up high and narrow with little penetration, and slag is hard to keep behind the puddle. Signs of current too high: the electrode glows red and the covering cracks or burns away well back from the tip, the arc is noisy with heavy spatter, the bead is wide and flat with undercut at the edges, and the puddle is hard to control.
Striking the arc
To start an arc, the electrode tip must touch the work to complete the circuit and then be lifted to arc length before it welds itself in place. There are two common methods:
- Scratch start. The electrode is dragged lightly across the plate like striking a match, then lifted to arc length as the arc lights. It is the easier method for beginners and for AC, but it leaves arc marks along the scratch, so it is done inside the joint or on a run-on tab, never on the finished face of the work.
- Tap start. The electrode is brought straight down, tapped on the spot, and lifted quickly to arc length. It is more precise and leaves a mark only where the weld will cover it, and it is preferred for low-hydrogen electrodes and for restarts in a joint.
With the helmet down, the welder cannot see the plate until the arc lights, so the electrode tip is placed about 1 in above the start point with the helmet up, the helmet is nodded down or flipped down with the free hand, and then the strike is made. Auto-darkening helmets make this easier, since the welder can see through the light-state lens until the arc strikes. Wherever the arc is struck, it must be inside the weld area or on a tab: an arc strike outside the weld is a small, rapidly cooled spot of melted steel that can be hard and cracked, and codes treat stray arc strikes as defects to be ground out and sometimes inspected.
Low-hydrogen electrodes, E7018 in particular, can leave porosity at the start of the bead, because the covering has not yet built a full gas shield when the first metal is deposited. Welders deal with this by striking the arc a little ahead of the start point, then moving back to the start and proceeding forward over the start, so the first metal is remelted. Some also strike on a scrap plate to bring the electrode tip up to temperature before moving to the joint.
A stuck electrode
If the electrode is not lifted quickly enough, or the current is too low, it welds itself to the plate. The current then flows as a dead short, the electrode heats rapidly, and if it is left, it can glow red and the covering can crack off. The remedy is a quick twist and snap of the wrist to break it free. If it does not come free at once, the welder releases the electrode from the holder jaws, or switches off the machine, and then breaks it loose with pliers or a hammer after it has cooled a moment. A stuck electrode is never pulled with a gloved hand while it is hot, and a holder is never left clamped on a stuck electrode.
Running a stringer bead
A stringer bead is a straight bead made with little or no side-to-side movement of the electrode. It is the basic unit of SMAW: root passes, fills and caps are all built from stringers or from weaves derived from them. On flat practice plate the welder lays straight beads side by side or in parallel rows, using a soapstone line or the edge of the previous bead as a guide.
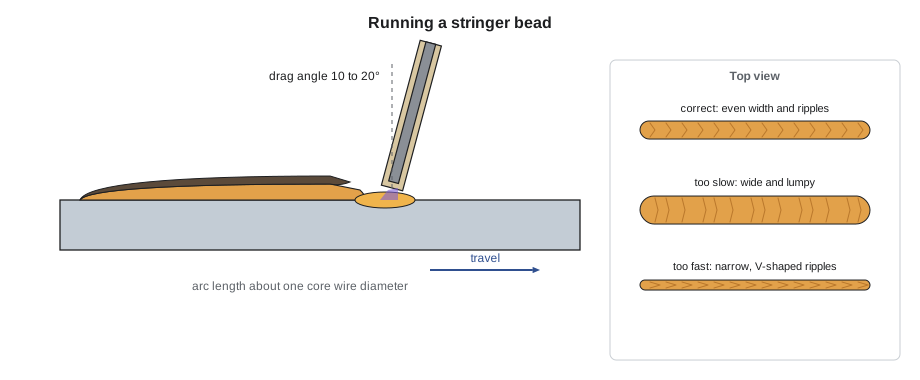
- Arc length. Hold it about equal to the diameter of the core wire, or a little shorter for low-hydrogen electrodes. A long arc sounds hissy and crackling and throws spatter; a short arc sounds like frying bacon.
- Electrode angle. Tilt the electrode back, about 10 to 20 degrees from vertical, in the direction of travel, so the arc points slightly back over the puddle. This drag angle pushes the slag back and keeps it from running ahead of the arc.
- Travel. Move steadily along the line at a speed that keeps the puddle about one-and-a-half to two times the electrode diameter wide. Too slow piles up a wide, high bead and lets slag roll ahead; too fast gives a thin, narrow, ropey bead with poor tie-in.
- Feed. Lower the holder smoothly as the electrode burns off, to keep the arc length constant.
Reading the puddle
Through the filter lens, the welder sees the bright arc, the glowing puddle under it, and a darker layer of molten slag floating on the puddle and trailing behind. The skill is to watch the leading edge of the puddle, where the arc melts the plate, and the edges where the puddle wets into the base metal, not the arc itself. A good puddle is round to oval, flows out to the sides and wets in smoothly; a puddle sitting on the plate like a bead of water on wax is cold, and one that is pulling edges into grooves is too hot or too slow at the edges.
Slag behavior is a guide too. The slag should stay behind the arc. If it starts to run ahead and under the arc, the electrode angle is too steep, the travel too slow, or the plate is tilted downhill; the result is slag trapped in the bead. Devon's first dozen beads all have slag rolling ahead, because Devon is trying to watch the arc instead of the back edge of the puddle.
Ending a bead
When a bead stops, the puddle shrinks as it freezes and leaves a depression called a crater. A crater left unfilled is thinner than the rest of the bead and often has a small crack in it, a crater crack, because the last metal to freeze is pulled in all directions. To fill the crater, the welder slows or pauses briefly at the end, or moves back a little onto the bead before breaking the arc, and lifts the electrode off quickly. On code work, unfilled craters are defects. When an electrode runs out partway along a joint, the new bead is restarted just ahead of the crater, brought back over it, and carried forward, and the crater area is cleaned first. Restarts get a lesson of their own later in the course.
After each bead, the slag is chipped off with the chipping hammer, working away from the face and with safety glasses on, and the bead is brushed. Then the welder looks at it: is it straight, even in width and height, with uniform ripples and smooth edges blending into the plate? Is the start full and free of porosity? Is the crater filled? Marta has Devon cut a few beads across with the band saw and etch the cut faces, so Devon can see how far each bead penetrated and how it changed when the current or speed changed.
Worked problem
Checking a practice bead by measurement
Devon runs a stringer 9 in long in 55 seconds with a 1/8 in electrode, and the bead is 9/32 in wide. Are the speed and width about right?
Show solution
- Travel speed = 9 / 55 × 60 = 9.8 in/min.
- Target width is about 1.5 to 2 times the core wire diameter: 3/16 to 1/4 in.
Answer: The bead is a little wide for a stringer, which suggests the arc is long or the current high; Devon shortens the arc on the next bead.
Common mistakes
MistakeStriking the arc on the plate surface beside the joint.
InsteadStrike inside the joint or on a tab; stray arc strikes are defects.
MistakePulling a stuck, red-hot electrode by hand.
InsteadTwist it free quickly, or release it from the holder and break it loose once it cools.
MistakeWatching the arc instead of the puddle.
InsteadWatch the leading and side edges of the puddle and the slag behind it.
MistakeBreaking the arc at the end of a bead without filling the crater.
InsteadPause or back up a little, then lift off; unfilled craters can crack.
MistakeRunning every electrode at the top of its range.
InsteadStart near the middle, run a test bead, and adjust to what the bead shows.
Summary and key terms
- Set up the booth and body position before striking: extraction, shade, dry gloves, cable weight supported, a comfortable braced stance.
- Current depends mostly on electrode diameter; start near the middle of the manufacturer's range and adjust by test.
- Strike with a scratch or tap inside the weld area, and free a stuck electrode quickly and safely.
- A stringer bead uses a short arc, a small drag angle and steady travel; the puddle should be about 1.5 to 2 diameters wide.
- Read the puddle edges and keep slag behind the arc.
- Fill every crater and chip and inspect every bead.
- Stringer bead
- A straight bead made without side-to-side weaving.
- Scratch start
- Striking the arc by dragging the electrode across the work.
- Tap start
- Striking the arc by touching the electrode straight down and lifting.
- Arc strike
- A spot of melted metal from striking an arc outside the weld.
- Crater
- The depression left where a bead ends.
- Drag angle
- Tilt of the electrode back toward the finished bead, pointing away from the direction of travel.
Practice problems
Work each problem on paper first, then reveal the answer to check.
What is a starting current for a 1/8 in E7018 in the flat position?
Show answer
About 120 to 125 A, near the middle of a 90 to 150 A range, adjusted by test.
Give two signs that the current is too high.
Show answer
Heavy spatter and noise, red-hot electrode, undercut, wide flat bead, hard-to-control puddle.
Why are low-hydrogen beads often started a little ahead of the start point?
Show answer
So the first metal, which may be porous, is remelted when the arc moves back over it.
Lesson quiz · 5 questions
Score 60% or more to complete this lesson.
Create a free account to save your progress, take quizzes and earn a certificate.