
SMW-430 · Lesson 3 of 12 · 19 min
Layout and pattern development review
Layout is the skill that sets a sheet metal worker apart from most other trades, and it is a large part of the fabrication questions on the exam. Kai's diagnostic showed that he knew the methods but had lost speed and accuracy with the hand calculations, because on Keelson jobs the fitting library and Lin's detailing software do most of that work. This lesson is the review Aggie ran with him over two Saturday sessions: the three development methods, the formulas behind them, the allowances, and the exam-style problems that test them. It refers back to the parallel line work in SMW-120 and the radial line and triangulation work in SMW-210.
Choosing the method
Every pattern problem starts with the same question: what kind of surface is this? If the surface is made of parallel straight lines, such as a pipe, a prism, an elbow or a tee, parallel line development applies, and the stretchout is the girth of the cross-section. If the lines all meet at a single point, the apex, as on a right cone or a concentric reducer, radial line development applies. If the surface is neither, as on a square-to-round, an offset transition or an eccentric reducer whose apex is out of reach, the surface is broken into triangles whose true lengths are found one by one, which is triangulation. Exam questions often describe a fitting and ask which method applies; the answer follows directly from this rule.
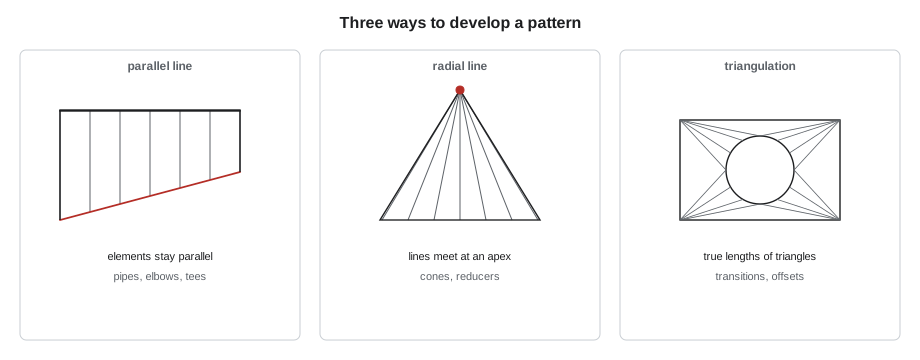
Parallel line: the essentials
For round pipe the stretchout is π times the mean diameter, which is the inside diameter plus one metal thickness. Using the outside or inside diameter is a common mistake that shows up as a distractor; on light gauge the difference is small, but on 1/8 in plate it is not. The circle in the profile is divided into equal parts, usually 12 or 16, and the element lines are carried from the profile to the stretchout. For a pipe cut at an angle, the height of each element line at its station gives the curve of the cut.
Gore elbows follow a simple rule that appears on almost every exam: a two-end-gore elbow made of n pieces has 2(n − 1) half-gores, so the angle of each end gore is the total turn divided by 2(n − 1). A four-piece 90° elbow therefore has six half-gores of 15° each, and the middle pieces are made of two half-gores, 30° each. Throat and heel lengths come from the centerline radius and the gore angle.
# Gore elbow: gore angle and middle-gore throat and heel lengths
import math
D = 12        # pipe diameter
R = 18        # centerline radius (1.5 D)
pieces = 4
turn = 90
half = turn / (2 * (pieces - 1))
r = D / 2
t = math.tan(math.radians(half))
print(f"half-gore angle {half:.1f} degrees")
print(f"middle gore: throat {2 * (R - r) * t:.2f} in, heel {2 * (R + r) * t:.2f} in")
print(f"stretchout of the profile: {math.pi * D:.2f} in")half-gore angle 15.0 degrees middle gore: throat 6.43 in, heel 12.86 in stretchout of the profile: 37.70 in
Rectangular elbows are developed with cheek and wrapper patterns: the two cheeks are flat and drawn to the radius, and the throat and heel wrappers are rectangles whose lengths equal the arc lengths of the throat and heel radii. Tees and laterals require the line of intersection, found by projecting the element lines of the branch onto the main.
Radial line: the essentials
A right cone is developed from its slant height, which becomes the radius of the pattern arc. The sector angle of the pattern is 360° times the base radius divided by the slant height. A frustum, the shape of a concentric reducer, uses two radii from the same apex: the slant height to the large end and the slant height to the small end. When the apex is far off the bench, the radii can be calculated instead of drawn. Exam questions usually give the diameters and the height of a reducer and ask for the pattern radius or the sector angle.
# Concentric reducer by radial line: pattern radii and sector angle
import math
D1, D2, h = 24, 16, 12      # large diameter, small diameter, height
r1, r2 = D1 / 2, D2 / 2
H = h * r1 / (r1 - r2)           # height of the full cone to its apex
s1 = math.hypot(r1, H)           # slant height to the large end
s2 = s1 * r2 / r1                # slant height to the small end
theta = 360 * r1 / s1
print(f"large radius {s1:.2f} in, small radius {s2:.2f} in, sector angle {theta:.1f} degrees")large radius 37.95 in, small radius 25.30 in, sector angle 113.8 degrees
Oblique cones, where the apex is not over the center of the base, are developed by triangulation from the apex, because the elements have different lengths. The St. Brendan's turret cap from SMW-210 was a right cone; the flue storm collar cut by the roof slope was a cone cut by an inclined plane, and the cut line was found by projecting the plane onto the elements.
Triangulation: the essentials
Triangulation divides a surface into triangles and finds the true length of each line. The true length is the hypotenuse of a right triangle whose base is the line's length in plan and whose height is the vertical rise between its ends. A true-length diagram lays out these triangles side by side so the pattern can be built one triangle at a time, starting from a seam line and working around. For a square-to-round, the round end is divided into equal parts, each corner of the square is joined to the nearest points on the round, and the pattern is formed of flat triangles at the corners and cones between them.
# True lengths for one quarter of a concentric square-to-round
import math
A = 24          # side of the square
D = 16         # diameter of the round
h = 18          # height between the two ends
r = D / 2
corner = (A / 2, A / 2)
for k in range(4):                          # points 0, 30, 60, 90 degrees on the round
    a = math.radians(90 * k / 3)
    p = (r * math.cos(a), r * math.sin(a))
    plan = math.dist(corner, p)
print(f"corner to point {k}: plan {plan:.2f} in, true length {math.hypot(plan, h):.2f} in")corner to point 0: plan 12.65 in, true length 22.00 in corner to point 1: plan 9.47 in, true length 20.34 in corner to point 2: plan 9.47 in, true length 20.34 in corner to point 3: plan 12.65 in, true length 22.00 in
The check that catches most errors is the girth. The sum of the chord lengths on the round end of the pattern must equal the circumference of the round, and the straight edges at the square end must add up to the perimeter of the square. Kai learned to do this check on every pattern before cutting, and to do it on exam problems as a quick way of eliminating wrong options.
Allowances
Patterns are drawn to the finished shape, and allowances are added for seams, locks and laps. A Pittsburgh lock needs a pocket allowance on one edge and a flange on the other; a button punch snap lock needs its own pair of allowances; a standing seam or a double seam needs more again. Exam questions may ask which edge carries which allowance, or how much extra material a seam takes, so Kai reviewed the allowance chart from SMW-130 alongside the patterns. Metal thickness matters too: bending heavier material uses part of the flat length, so heavier patterns are drawn to the neutral line, not the outside.
| Feature | What to remember | Common exam trap |
|---|---|---|
| Mean diameter | Inside diameter plus one thickness | Using the outside diameter |
| Gore angle | Total angle / 2(n − 1) | Dividing by n or by n − 1 |
| Cone sector | 360 × r / s | Using the height instead of the slant height |
| True length | √(plan² + rise²) | Using the plan length as the true length |
| Allowances | Added to the edges that form the seam | Adding them to both edges for every seam |
Worked problem
A reducer on the exam
A concentric reducer joins 24 in duct to 16 in duct over a height of 12 in. What is the slant height to the large end of the full cone?
Show solution
- Radii: 12 and 8 in.
- Full cone height: 12 × 12 / (12 − 8) = 36 in.
- Slant height to the large end: √(12² + 36²) ≈ 37.95 in.
Answer: About 37.95 in.
Working a layout problem under exam conditions
Layout questions on the exam are not full patterns. Nobody is asked to draw a square-to-round in a multiple-choice paper. Instead, the questions pick out one step of a development: the stretchout, a gore angle, a pattern radius, a true length, or the method to use. That makes them quick to answer once the step is recognized. Kai's approach was to sketch the fitting in a few seconds on the scrap paper, label the given values, decide which formula the question was really asking for, and only then calculate. The sketch took ten seconds and saved him from at least three wrong answers in his practice sets, all of which came from using the wrong dimension.
Some questions describe a procedure rather than a calculation: the order in which lines are drawn, which view gives the true length of an element, or where the seam should be placed on a pattern. For these, Kai pictured himself at the layout bench at Keelson doing the job, step by step, and chose the option that matched what he would actually do. When his picture and an option disagreed, he went back to the reason for each step, because the exam's order is the order that makes the pattern accurate.
Seam placement and economy
Where the seam goes affects both the fit and the cost of a fitting. On a round elbow, the seams of the gores are usually placed on the throat or alternated so they do not line up. On a square-to-round, the seam is often placed on the shortest line of the pattern, at the middle of one side, so that the pattern is symmetrical and easy to lay out from the center line. On a reducer, the seam position matters little for the fit but matters for nesting patterns on the sheet. Exam questions on seam placement usually ask for the reason, and the answer is nearly always accuracy, ease of forming, or economy of material.
Economy of material was a theme Kai had met in SMW-420, where Lin showed how nesting software arranges patterns on a sheet to reduce waste. On the exam, it shows up as simple questions: how many patterns of a given size fit across a standard sheet, or which way a pattern should be laid out so that its grain or coating direction is correct. A quick sketch of the sheet and the pattern usually answers these questions faster than any formula.
Checking against the shop's methods
Kai compared each hand method with the way the same fitting is produced in Keelson's shop. The plasma table's fitting library produces the same patterns from the same geometry, using the same mean dimensions and allowances, entered as numbers instead of drawn. Seeing the parallel helped him remember the hand methods: the software asks for the mean diameter because the stretchout depends on it; it asks for the number of gores because the gore angle depends on it; it asks for the heights of a transition because the true lengths depend on them. Each input in the software corresponds to a step in the hand layout.
| Software input | Hand layout step it replaces |
|---|---|
| Mean diameter and gauge | Profile circle and stretchout |
| Number of pieces and turn angle | Gore angle and the cut line on each gore |
| Diameters and height of a reducer | Apex, slant heights and the pattern arcs |
| Plan offsets and height of a transition | True-length diagram and the triangles |
| Seam and connector types | Allowances on the edges |
By the end of the two Saturday sessions, Kai could produce the key number for each of the common fittings in under ninety seconds, and his layout topic set rose from 68 percent on the diagnostic to 85 percent. More important, the errors left in his log were small slips, not gaps, and slips are the kind of error that the habits in Lesson 7 are designed to remove.
Common mistakes
MistakeUsing the outside diameter for the stretchout.
InsteadUse the mean diameter: inside diameter plus one thickness.
MistakeUsing the cone height as the pattern radius.
InsteadUse the slant height.
MistakeTaking plan lengths as true lengths in triangulation.
InsteadCombine plan length and rise with Pythagoras.
MistakeSkipping the girth check.
InsteadCheck that the pattern's edges add up to the perimeter of each end.
MistakeForgetting seam allowances.
InsteadAdd allowances to the right edges before cutting.
Summary and key terms
- Parallel line for pipes, elbows and tees; radial line for cones and reducers; triangulation for transitions and offsets.
- The stretchout of a pipe uses the mean diameter.
- A gore elbow of n pieces has 2(n − 1) half-gores.
- Cone patterns use the slant height and a sector angle of 360 × r / s.
- True lengths come from plan length and rise.
- Girth checks and allowances catch most layout errors.
- Stretchout
- The flat length of a pattern, equal to the girth of the shape.
- Mean diameter
- The diameter at the middle of the metal thickness.
- Gore
- One section of a segmented elbow.
- Slant height
- The distance from the apex of a cone to its base along the surface.
- True length
- The actual length of a line in space, found from its plan length and rise.
- Allowance
- Extra material added to a pattern edge to form a seam, lock or lap.
Practice problems
Work each problem on paper first, then reveal the answer to check.
A five-piece 90° elbow: what is the half-gore angle?
Show answer
90 / (2 × 4) = 11.25°.
A cone has a base radius of 8 in and a slant height of 20 in. What is the sector angle?
Show answer
360 × 200 / 500 = 144° (the same ratio in inches).
Which method develops an eccentric reducer whose apex is out of reach?
Show answer
Triangulation.
A line is 16 in long in plan with a rise of 12 in. What is its true length?
Show answer
20 in.
Lesson quiz · 5 questions
Score 60% or more to complete this lesson.
Create a free account to save your progress, take quizzes and earn a certificate.