
SMW-320 · Lesson 5 of 12 · 19 min
Flashing at penetrations, curbs, parapets and copings
Every pipe, vent, curb, hatch and support that passes through a roof is a hole in it, and every parapet wall is a wall standing in the rain with its top exposed. These are the details that low-slope roofs, which are most commercial roofs, depend on. This lesson covers flashing pipes and vents, equipment curbs such as the Brine & Ember exhaust fan curbs from SMW-230, roof hatches and supports, and the parapet details at the top of the wall: base flashing, counterflashing and the metal coping that caps the parapet.
Pipes and vents
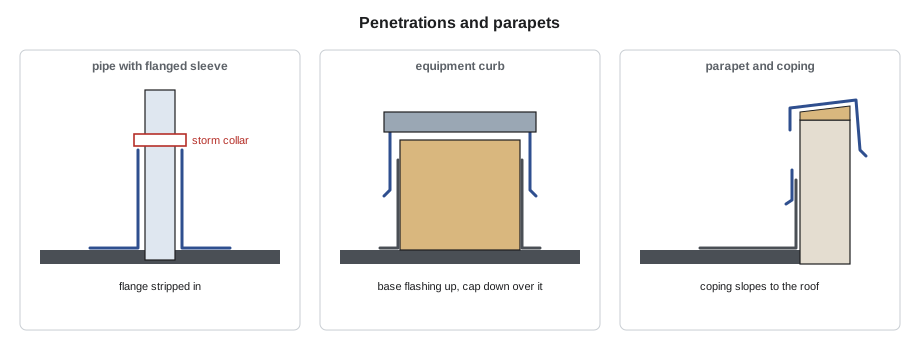
Small round penetrations, such as plumbing vents, conduits and gas lines, are flashed with a flanged sleeve: a metal flange that lies on the roof and is stripped in with membrane or interleaved with shingles, a sleeve or cone that rises around the pipe, and a cap or storm collar that covers the top of the sleeve so water running down the pipe cannot get into the gap. On a plumbing vent the classic detail is a lead or copper sleeve that is simply turned down into the top of the pipe. Rubber boots are common on houses and shingle roofs, but on a commercial roof or a heritage copper roof Keelson makes the flashing from metal and solders the sleeve to the flange.
Groups of small pipes close together are a common problem: they leave no room to flash each one. The usual fixes are to combine them under one curb with a hood, or to use a pitch pocket, a metal collar filled with sealant or pourable sealer around the pipes. Pitch pockets need maintenance because the filler shrinks; most roofing manuals treat them as a last resort.
Curbs
Rooftop units, exhaust fans, skylights and hatches sit on curbs: raised frames, usually at least 8 in above the finished roof surface so water and snow cannot reach the opening. The roof membrane turns up the sides of the curb as a base flashing, and a metal counterflashing or the equipment's own cap laps down over the top of that base flashing. On a sloped roof, the curb is flashed like a chimney, with step flashing on the sides, an apron at the bottom and a cricket at the top if the curb is wide.
The SMW-230 welded stainless curbs for the Brine & Ember kitchen exhaust fans sit on the restaurant's flat roof. The roofer turned the membrane up their sides, and Keelson made prefinished steel counterflashings that the fan's base overlaps. On the uphill side of the larger curb, which faces a slight slope toward the drains, Aggie added a small sheet metal cricket so water does not stand against it.
Roof supports and equipment rails
Pipes, conduits and duct on a roof need supports that do not puncture the membrane. Lightweight items sit on loose stands or pads that rest on the roof; heavy equipment needs structural supports that pass through the roof, each one flashed like a pipe or set on a curb. Equipment rails, long curbs that carry a unit, are flashed like curbs. The SMW-310 rooftop duct at Ashgrove sat on adjustable stands on pads, which is the light-load solution. The rule for the crew is the same as for hangers: never cut a support into the roof without a flashing detail, and never let a support rest directly on a membrane without a protection pad.
Parapets
A parapet is a wall that extends above the roof. Parapets hide equipment, give a fire separation between buildings and form the roof's perimeter. They also have three wet faces: the outside, the inside facing the roof, and the top. The inside face gets a base flashing, usually the roof membrane turned up the wall at least 8 in, then a counterflashing over it. The top gets a coping. Water that gets into the top of a parapet runs down inside the wall, often to the floor below, and is notoriously hard to trace.
Copings
A coping is a metal cap over the top of a parapet. Its top is sloped toward the roof, so water runs onto the roof rather than down the outside face of the building. Its faces turn down both sides of the wall, usually at least 4 in on the outside, with a drip, and lap the base flashing on the roof side. The outside face, and on wide copings both faces, hook onto continuous cleats, the same way roof edge faces do, so wind cannot lift them. The top is fastened through slotted holes or held with clips, so the coping can move. Under the coping, the parapet top is waterproofed with a membrane before the coping goes on, so the coping is the outer shield and not the only one.
Joints between coping lengths are where most copings leak. The usual details are the same as for roof edges: a small gap for movement, a concealed splice plate set in sealant under the joint, and sometimes a cover plate on top. Standing seam joints, which are folded up and locked, are used on copper copings and some heritage work. Corners and intersections are made as one-piece shop miters with long legs. Lap joints, the simplest, are the most likely to leak on a wide coping, because water runs along the lap.
Kai drew up the coping for the Ashgrove gym parapets: 240 ft of 24-gauge prefinished steel coping in 10 ft lengths, sloped top 14 in wide, outside face 5 in and inside face 4 in, with expansion gaps at each joint.
import math
# Coping take-off, slope and joint gaps (illustrative)
run = 240            # total coping length, ft
piece = 10           # piece length, ft
top = 14            # width of the sloped top, in
out_face, in_face = 5, 4   # face depths, in
hems = 2; hem_allow = 0.5
slope_rise = 1    # drop across the top toward the roof, in
developed = math.hypot(top, slope_rise) + out_face + in_face + hems * hem_allow
print(f"developed width {developed:.2f} in; top slope {slope_rise / top * 100:.1f} percent")
pieces = math.ceil(run / piece)
print(f"{pieces} lengths and {pieces - 1} joints (corners as shop miters)")
# expansion gap needed for each length over the design range
alpha, dT = 6.7e-6, 180
gap = alpha * piece * 12 * dT
print(f"each length moves about {gap:.2f} in; joint gap set at {max(gap, 0.25):.2f} in at mid temperature")developed width 24.04 in; top slope 7.1 percent 24 lengths and 23 joints (corners as shop miters) each length moves about 0.14 in; joint gap set at 0.25 in at mid temperature
Each length moves only a few millimeters or about an eighth of an inch over the year, so a standard quarter-inch-class gap over a splice plate is enough. The slope is small, about 7 percent, but it is enough to stop water ponding on the top and running over the outside face. The top slope comes from the wood blocking or a tapered piece under the coping, never from bending the metal into a slope over a flat top.
Copper copings at St. Brendan's
St. Brendan's hall wing has a short stone parapet with a copper coping, which SMW-120 laid out at the 80-degree corner. The original coping had been made of short 2.4 m or 8 ft lengths with flat lapped and soldered seams, fixed solid to the stone with copper nails. Over a century of movement, almost every soldered seam had cracked, and water had washed the lime mortar out of the top course. The restoration rebuilt the top course, added a self-adhered membrane over a timber nailer bedded on the stone, and made the new coping in 20 oz copper with loose-locked standing seam joints that let each length move, fixed at its center and held on continuous copper cleats at both faces. Lesson 2's example divided the run into three sections with two expansion joints.
Roof hatches, scuttles and access
Roof hatches and ladder scuttles are curbs with a lid. Their own manufacturer usually provides the curb and its counterflashing cap; Keelson's work is the roof flashing and sometimes a guardrail kit. A hatch is also a fall hazard: open, it is a hole in the roof, and the codes in both countries require it to be guarded when open. Keelson's crews do not leave a hatch open while working near it.
Inspection before covering
Penetration and parapet flashings are covered by other work soon after they are made, so the inspection happens first. Sean's checklist asks for every base flashing to be at its full height, every counterflashing to lap down over it by at least the minimum on the details, every coping joint to have its splice plate and sealant before the cover plate goes on, and every cleat to be fastened at the specified spacing. A photograph of each detail goes into the job record, with its gridline, because when a leak is reported five years later the first question is what is under the metal.
Worked problem
Choosing a penetration detail
Choose the flashing for each item on the Eastgate wing roof.
Show solution
- A single 4 in plumbing vent: a flanged metal sleeve stripped into the membrane, with a storm collar or a turned-down top.
- Six small conduits close together beside a mechanical unit: a single curb with a hood over the group, not six separate flashings or a pitch pocket.
- A rooftop air handler: an equipment curb at least 8 in high, membrane base flashing and the unit's own counterflashing cap.
- A gas line on supports: loose supports on protection pads, no penetration.
Answer: Each penetration gets the simplest detail that keeps a base flashing turned up and a separate cover lapped over it.
Expansion joints in roofs and walls
Large buildings have building expansion joints, gaps that run through the structure so different parts can move independently. Where one crosses a roof or a parapet, the roof covering and the metal must bridge it without being torn when the building moves. The usual detail is a pair of raised curbs, one on each side of the joint, with the membrane turned up both curbs and a metal cover, often with a flexible bellows underneath, spanning between them and fixed to only one side. Eastgate's new wing has an expansion joint where it meets the existing hospital, and the coping across the parapet at that point is made in two parts with a sliding cover over the gap, fixed on the new side only.
Scuppers and through-wall drains
Roofs drained toward a parapet need scuppers: openings through the parapet lined with metal that carry water out to a conductor head and downspout, or overflow scuppers that carry water out if the internal drains block. A scupper is a box of sheet metal with a flange that is stripped into the membrane on the roof side, sides that line the opening, and a drip or a collar on the outside. Its corners are soldered or welded watertight. The bottom of the scupper is set at the level the drainage design requires: primary scuppers at the roof surface, overflow scuppers set a little higher so they only run when the drains are blocked. On Ashgrove, the gym roof's two new overflow scuppers drain onto the canopy roof below.
On copper copings, the cleat on the outside face is copper, fastened into the blocking with copper nails or stainless screws, and the inside face is held by a second cleat or by the coping's hem locked over the base flashing's counterflashing. Cleats are spaced closely, and on a coping exposed to strong wind, as the hall wing is to the harbor, the specification called for the cleat fasteners at half the usual spacing.
Common mistakes
MistakeFlashing many small pipes in a pitch pocket by default.
InsteadGroup them under a curb with a hood; use a pitch pocket only as a last resort.
MistakeSetting a curb so low that snow and water reach the opening.
InsteadMake curbs at least 8 in above the finished roof.
MistakeSloping the coping by bending the metal over a flat parapet top.
InsteadSlope the blocking or a tapered piece under the coping.
MistakeMaking coping joints as plain laps on a wide coping.
InsteadUse a gap, a concealed splice plate in sealant and a cover plate.
MistakeCovering flashings before they are inspected and photographed.
InsteadInspect and record every detail before other work covers it.
Summary and key terms
- Every penetration needs a base flashing turned up and a separate cover lapping down over it.
- Pipes get flanged sleeves with caps or storm collars; groups go under a curb with a hood.
- Curbs stand at least 8 in above the roof; wide ones on slopes get crickets.
- Parapets need base flashing, counterflashing and a coping over a waterproofed top.
- Copings slope toward the roof, hook onto continuous cleats, and are fixed to move.
- Coping joints are the usual leak; use splice plates, standing seams or shop miters.
- Penetration
- Anything that passes through the roof, such as a pipe, support or curb.
- Storm collar
- A collar clamped to a pipe above a flashing sleeve to cover its top.
- Pitch pocket
- A metal collar filled with sealant around a penetration; a last-resort detail.
- Curb
- A raised frame on the roof that carries equipment or frames an opening.
- Base flashing
- The roof membrane or metal turned up a wall or curb.
- Splice plate
- A concealed plate under a joint between two pieces of edge or coping, set in sealant.
Practice problems
Work each problem on paper first, then reveal the answer to check.
Why is the top of a coping sloped toward the roof?
Show answer
So water runs onto the roof, not down the outside face of the building.
A coping length is 10 ft in aluminum. Over a 180-degree range, how much does it move?
Show answer
12.8 × 10⁻⁶ × 120 × 180 ≈ 0.28 in.
Why did the old St. Brendan's coping seams crack?
Show answer
The coping was fixed solid with soldered flat seams, so movement over many years cracked them.
How high should an equipment curb stand above the finished roof?
Show answer
At least about 8 in.
Lesson quiz · 5 questions
Score 60% or more to complete this lesson.
Create a free account to save your progress, take quizzes and earn a certificate.