
SMW-320 · Lesson 4 of 12 · 20 min
Flashing details: step, counter, apron, cricket and valley
Wherever a roof meets a wall, a chimney or another roof slope, there is a joint that the roof covering cannot close on its own. Flashing closes it. The sloped-roof flashings in this lesson are among the oldest details in the trade and among the most often done wrong: step flashing along a sidewall, counterflashing that covers it, apron flashing across the head or foot of a wall, the cricket or saddle behind a chimney, and the valley where two slopes meet. All of them work the same way, by lapping each piece over the one below it so water is always carried downhill and out, never into the joint.
Step flashing
Where a sloped roof runs along the side of a wall, a dormer or a chimney, each course of shingles or slate gets its own small L-shaped flashing. One leg lies on the roof under the shingle; the other turns up the wall. Each piece laps over the one below it, like the shingles, so water running down the wall or the roof is handed from piece to piece down the slope. Step flashings are usually a little longer than the shingle exposure, so each overlaps the next by a few centimeters or a couple of inches, and they are nailed only at the top corner of the roof leg, so the shingle above covers the nail.
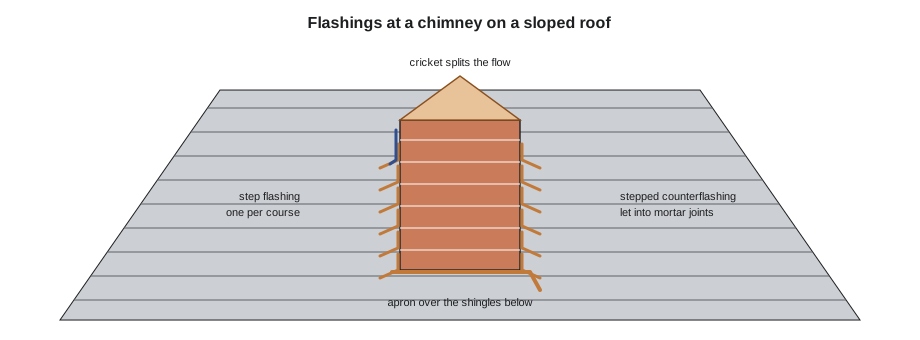
The wall leg of step flashing must go behind the wall's weather barrier, or behind the siding with the barrier lapped over it. If it is face-fastened to the outside of the siding or sealed to the face of the wall, water running down behind the siding finds its way inside. On a masonry wall, the step flashings run up the face of the brick or stone and are covered by a counterflashing set into the masonry joints.
Counterflashing and reglets
Step flashing and other base flashings turn up the wall and stop. Their top edges have to be covered, or water running down the wall gets behind them. The cover is a counterflashing, also called a cap flashing: a separate piece fixed to the wall that laps down over the top of the base flashing. Because the counterflashing and the base flashing are separate pieces, the roof can move a little relative to the wall without tearing the flashing, and the base flashing can be replaced when the roof is redone without disturbing the wall.
On masonry, the counterflashing's top edge is turned into a mortar joint, either built in by the mason as the wall goes up or let into a joint that is raked or cut out later, about 1 in deep, and then wedged and repointed. On a sloped roof along a masonry wall, the counterflashing is made in steps that follow the mortar joints, with each step's bottom edge running parallel to the roof. On concrete, the counterflashing sits in a reglet, a groove cast in or sawn into the concrete, and is held with wedges or a spring lock and sealed. On new walls with metal panels or siding, the counterflashing may be a two-piece receiver and insert system that lets the roofer take the insert out for reroofing.
At St. Brendan's, the old counterflashings on the bell tower were lead, let into the stone joints. Most were sound, but at the south face the mortar had eroded and the lead had been pulled out by wind. Aggie's crew raked the joints, refitted new 16 oz copper counterflashing into them, wedged it with copper wedges, and the mason repointed with a lime mortar matched to the original.
Apron flashing
Where a sloped roof runs into the face of a wall, as at the front of a chimney or the downhill side of a dormer, a single long apron flashing runs across the face. Its lower leg lies over the shingles below, so it sheds onto them, and its upper leg turns up the wall under the counterflashing. At the uphill side of a roof meeting a wall, such as a lean-to roof against a taller building, the head of the roof gets a similar flashing with its roof leg under the top course, and the wall's counterflashing covers its upper leg. The ends of the apron wrap around the corners and lap the first step flashing, so there is no gap where the two meet.
Crickets and saddles
A wide chimney, curb or wall facing up a slope acts as a dam. Water, leaves and snow collect behind it and eventually find a way in. A cricket, called a saddle when it is small, is a small ridged roof built behind the obstruction that splits the flow to either side. The cricket is framed by the carpenter or formed entirely in sheet metal, covered with metal or with the roofing and flashed into the step flashing on both sides. Codes and manuals generally call for a cricket behind any chimney or curb wider than about 30 in across the slope.
The cricket's ridge runs from the center of the back of the chimney up the slope to meet the main roof. Its length up the slope is set by the chimney width and the cricket's own slope. A steeper cricket is shorter but stands taller against the chimney.
For the St. Brendan's hall chimney, which is 44 in wide across the slope on a roof pitched at 8 in 12, Kai worked out the cricket's dimensions and the step flashings needed up both sides of the chimney.
import math
# Cricket behind a chimney and step flashing count (illustrative)
width = 44                  # chimney width across the slope, in
roof_pitch = 8 / 12          # main roof rise per run
cricket_pitch = 8 / 12       # cricket side slopes, same as the roof here
half = width / 2
# The cricket ridge is level across the chimney back; its length up the roof is where its sides meet the main slope.
ridge_len = half * cricket_pitch / roof_pitch
height_at_chimney = ridge_len * roof_pitch
print(f"cricket ridge length up the slope {ridge_len:.1f} in, standing {height_at_chimney:.1f} in above the roof at the chimney")
side = 36                # length of each chimney side along the slope, in
exposure = 5.5             # shingle exposure, in
steps = math.ceil(side / exposure)
print(f"step flashings per side: {steps}, total {2 * steps}")cricket ridge length up the slope 22.0 in, standing 14.7 in above the roof at the chimney step flashings per side: 7, total 14
With the cricket at the same pitch as the roof, its ridge runs half the chimney width up the slope. A flatter cricket would reach further up the roof and hold water longer; a steeper one would stand taller against the chimney. Aggie kept the roof pitch, which also makes the copper easy to fold at the ridge.
Valleys
A valley is the internal corner where two roof slopes meet. It carries more water than any other part of a sloped roof, because it collects from both slopes, and it carries it at a lower slope than either. Valleys are lined with metal in one of two ways. An open valley has a metal liner, often with a center rib or a crimp to stop water rushing across from one slope and up under the other, and the roofing is cut back to leave a clear channel that widens toward the bottom. A closed valley has the roofing carried across it, with metal underneath as a backup.
Metal valley liners are made in long pieces with generous laps, the upper piece over the lower, and are held at their outside edges with cleats rather than nails through the liner, so the liner can move. The metal must be wide enough that the roofing on each side laps well over it; SMACNA and the roofing manuals give minimum widths that increase with the slope length the valley drains. On a slate or shingle roof, a nail through the valley liner is a hole in the busiest drain on the roof.
On St. Brendan's, the valleys where the transept roofs meet the nave are open copper valleys under slate. The old liners were 16 oz copper with a center crimp, and in the lower third of each valley the copper had worn thin where water carried grit down from the slates for over a century. The restoration replaces the valley liners in 20 oz copper, matching the crimp, with the laps increased because the specification called for longer laps than the original.
Sidewall kick-out
At the bottom of a sloped roof that ends against a wall that continues down past the eave, water running down the step flashing reaches the end of the roof and, without help, runs straight into the wall below. A kick-out or diverter flashing at the bottom of the step flashing turns that water out into the gutter. A missing kick-out is a famous cause of rotted walls on houses and small buildings. On the Ashgrove canopy, the canopy roof meets the two-story classroom wall, and the new step flashing ends in a soldered kick-out that discharges into the canopy gutter.
Making flashings in the shop and on the roof
Step flashings are made by the hundred from strips on the brake and cut to length; the crew carries boxes of them up the scaffold. Aprons, crickets and counterflashings are fitted on the roof, often from templates. Copper pieces are soldered where they must be watertight and cannot lap, such as the corners of an apron or a cricket's ridge; laps that shed water do not need solder. Kai learned to pre-tin the copper, as in SMW-130, and to keep the soldering coppers clean, because a cricket's soldered ridge is in the wettest spot on the roof.
Worked problem
Laps on a sidewall
A roof along a wall is 14 ft long on the slope, with a shingle exposure of 5.5 in. How many step flashings are needed, and how long should each be?
Show solution
- Courses along the wall = 168 ÷ 5.5 = 30.5, so 31 step flashings.
- Each piece must cover its course and lap the one below, so it is the exposure plus about 2 in: about 7.5 in long, with an extra piece or two at the top and bottom.
Answer: About 31 pieces of about 7.5 in, nailed only at the upper corner of the roof leg and with the wall leg behind the weather barrier.
Flashing details at dormers and roof-to-wall corners
Dormers combine every detail in this lesson in a small space: an apron across the dormer front, step flashing up both cheeks, a cricket or saddle if the dormer is wide, and valleys where the dormer roof meets the main roof. The corners where these meet are where leaks hide. At the bottom corners of a dormer, the apron's ends must wrap around the corner and lap the first step flashing; at the top, the step flashing must run up under the dormer's valley or saddle. On copper work, Aggie solders the corner pieces into one watertight unit, because a lap at a dormer corner faces water from two directions.
On the St. Brendan's nave, the dormers had been the source of most of the nave leaks. The survey found that a 1970s repair had replaced the original soldered copper corners with lapped and caulked pieces; the caulk had dried and cracked. The restoration remakes each dormer's corners as soldered copper assemblies, made in the shop from templates taken on the roof.
Copper step flashings and counterflashings on St. Brendan's are 16 oz copper, but the valley liners are heavier, 20 oz, and the crickets are formed from 16 oz with soldered seams. Where copper flashings meet the slate, the slater and the sheet metal crew work together course by course, because each step flashing has to go in with its slate. Kai learned to keep a stack of pre-cut steps on the scaffold and to check each slate course for the right lap before the next went on.
Common mistakes
MistakeFastening step flashing wall legs to the face of the siding.
InsteadPut the wall leg behind the weather barrier or the siding.
MistakeMaking step flashing as one long piece along the wall.
InsteadUse one piece per course, each lapping the one below.
MistakeSealing the counterflashing to the base flashing.
InsteadKeep them separate so the roof can move and be redone.
MistakeLeaving a wide chimney without a cricket.
InsteadBuild a cricket behind any obstruction wider than about 30 in.
MistakeNailing through a valley liner.
InsteadHold valley liners with cleats at their outside edges.
Summary and key terms
- Every sloped-roof flashing works by lapping each piece over the one below.
- Step flashings go with each course, nailed at the top corner, with the wall leg behind the barrier.
- Counterflashing covers the base flashing and is let into masonry joints or reglets.
- Aprons shed onto the roofing below and wrap around corners to lap the step flashings.
- Crickets split the flow behind wide chimneys and curbs.
- Valleys carry the most water; metal liners need generous laps and cleat fastening.
- Step flashing
- An L-shaped flashing installed with each course where a roof runs along a wall.
- Counterflashing
- A flashing fixed to the wall that covers the top of a base flashing.
- Reglet
- A groove in masonry or concrete that receives the edge of a counterflashing.
- Apron flashing
- A flashing across the face of a wall where a roof slope runs into it.
- Cricket
- A small ridged roof behind a chimney or curb that splits the water flow.
- Kick-out flashing
- A diverter at the bottom of a step flashing run that sends water into the gutter.
Practice problems
Work each problem on paper first, then reveal the answer to check.
Why are step flashings nailed only at the upper corner of the roof leg?
Show answer
So the shingle above covers the nail and no nail is in the path of the water.
How deep is a mortar joint raked for a let-in counterflashing?
Show answer
About 1 in.
A chimney is 40 in wide across the slope. Does it need a cricket?
Show answer
Yes; it is wider than about 30 in.
What does a kick-out flashing do?
Show answer
It turns water from the bottom of a step flashing run out into the gutter instead of into the wall below.
Lesson quiz · 5 questions
Score 60% or more to complete this lesson.
Create a free account to save your progress, take quizzes and earn a certificate.