
SMW-220 · Lesson 3 of 12 · 19 min
Rectangular duct construction
Rectangular duct is most of what Keelson's fabrication floor makes. It fits the shallow ceiling spaces of schools and offices, it connects directly to rectangular air handler openings, coils and grilles, and it can be built from flat sheet on the shop's own machines. It is also the shape that needs the most thought, because its flat sides flex under pressure. This lesson covers how a rectangular duct section is built: the sheet gauge, the longitudinal seams that close it, the transverse joints that connect one section to the next, and the stiffening that keeps its sides from drumming. Reinforcement, the members added to larger duct, has its own lesson next.
A duct section
A straight piece of rectangular duct is called a section or a joint length. Its size is given as width by depth, the width first, and by convention the first number is the side the drawing shows. Its length is set by the sheet or coil and by the joint system: Keelson's sections were mostly 5 ft long, cut from coil on the coil line, though sections of 4 ft were used where smaller pieces suited the job. The size on the drawing is the inside clear size of the duct, the size the air sees. Liner, where it is used, is added inside that dimension, so a lined duct's metal is larger than its stated size, which Lesson 6 covers.
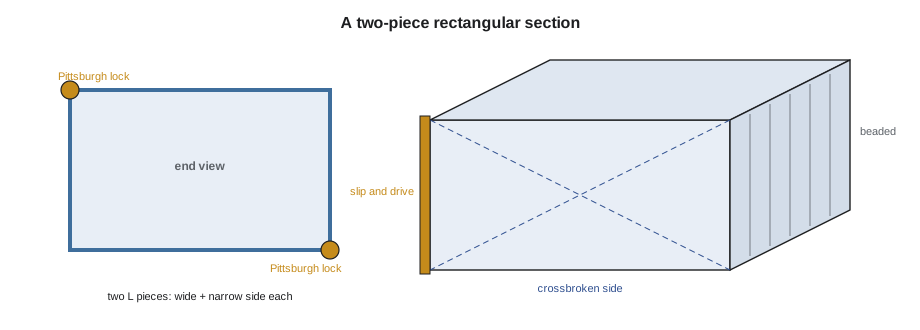
A section is made of one, two or four pieces of sheet, depending on its size and the shop's machines. Small ducts can be made in one piece, folded on the brake into a box and closed with one seam. Most medium ducts are made from two L-shaped pieces, each one wide side and one narrow side, joined with two seams at opposite corners. Large ducts are made from four flat panels with seams at all four corners. The two-piece L is Keelson's standard for anything that fits the coil, because it needs only two seams and its pieces nest on the coil.
Gauge
The gauge of a rectangular duct depends on two things: its larger side and its pressure class. The bigger the side, the more it flexes, and the higher the pressure, the more load it carries. The standard's tables give, for each pressure class, the minimum gauge for each range of duct widths, together with the joint and reinforcement needed. They allow some choices: a lighter sheet with closer reinforcement, or a heavier sheet with reinforcement further apart. Contractors usually pick one combination for each width range and keep to it, so the shop has a simple chart instead of the full tables at every bench.
Keelson's chart, posted at the coil line, was simplified from the standard for the pressure classes the shop used most. It is illustrative, written for training, and a real job must be checked against the standard and the specification. For the 2 in w.g. class, it read:
| Larger side up to | Sheet | Intermediate reinforcement |
|---|---|---|
| 12 in | 26 ga | none |
| 18 in | 24 ga | none |
| 30 in | 24 ga | every 5 ft |
| 42 in | 22 ga | every 4 ft |
| 54 in | 20 ga | every 3 ft |
| 72 in | 18 ga | every 2.5 ft |
| 96 in | 18 ga | every 2 ft, plus tie rods |
The gauge chosen for the larger side is used for the whole section, both the wide and the narrow sides, because the pieces are cut from the same coil and the seams join sheets of equal thickness. Kai's first take-off on the floor applied the chart to the Ashgrove trunk and a small return, and worked out the weight of metal in each section with typical weights per unit area of galvanized sheet.
# Keelson shop chart (illustrative, simplified from the duct standard): rectangular duct gauge by width
chart = [(12, '26 ga', None), (18, '24 ga', None), (30, '24 ga', 5), (42, '22 ga', 4), (54, '20 ga', 3), (72, '18 ga', 2.5), (96, '18 ga', 2)]             # (largest side up to, thickness or gauge, reinforcement spacing or None)
weight = {'26 ga': 0.906, '24 ga': 1.156, '22 ga': 1.406, '20 ga': 1.656, '18 ga': 2.156}               # weight per unit area of galvanized sheet for each thickness or gauge
def pick(w):
    return next(r for r in chart if w <= r[0])
ducts = [('T1', 36, 18, 240), ('T2', 24, 18, 180), ('T3', 18, 12, 120), ('R1', 12, 8, 96)]             # (tag, width, height, length) in in
total = 0
for tag, w, h, length in ducts:
    big = max(w, h)
    lim, g, sp = pick(big)
    area = 2 * (w + h) * length / 144
    wt = area * weight[g]
    total += wt
    rs = "none" if sp is None else f"every {sp} ft"
    print(f"{tag}: {w} x {h} in -> {g}, reinforcement {rs}, metal {area:.1f} sq ft, {wt:.0f} lb")
print(f"total sheet weight {total:.0f} lb")T1: 36 x 18 in -> 22 ga, reinforcement every 4 ft, metal 180.0 sq ft, 253 lb T2: 24 x 18 in -> 24 ga, reinforcement every 5 ft, metal 105.0 sq ft, 121 lb T3: 18 x 12 in -> 24 ga, reinforcement none, metal 50.0 sq ft, 58 lb R1: 12 x 8 in -> 26 ga, reinforcement none, metal 26.7 sq ft, 24 lb total sheet weight 456 lb
The 36 by 18 in trunk falls in the 42 in row, so it is 22 gauge with reinforcement every 4 ft. The 24 by 18 is in the 30 in row, 24 gauge with reinforcement every 5 ft, which on a 5 ft section means the joints alone are enough. The 18 by 12 and the small return need no intermediate reinforcement at all. The total sheet in the four runs is about 456 lb, a number Walt used to check that the coil on the line would last the job.
Longitudinal seams
The seams that run the length of a section, at its corners, are the longitudinal seams. SMW-130 covered how each is made; here the question is which to use. The Pittsburgh lock is the standard corner seam for rectangular duct in nearly every shop, because it is formed on a roll-forming machine in one pass, closes with a hammer or a closing machine, and is strong and tight when sealed. The button punch snap lock is faster to assemble and is common on low-pressure duct, but most standards limit it to lower pressure classes and smaller sizes, because it can pull apart under higher loads. Grooved seams and standing seams are used where a seam must be on a flat side instead of a corner, such as joining two panels on a very wide duct.
At Keelson, the rule was simple: Pittsburgh locks on everything at 2 in and above, button punch snap locks allowed on low-pressure branch duct where the specification permitted them, and all longitudinal seams sealed in the shop for seal class A or B work. Kai ran the Pittsburgh machine for most of the Ashgrove trunk, feeding each L piece's two edges through it to form the pocket on one edge and leaving the flange on the other, so that each pair of L pieces locked together into a closed section.
Transverse joints
The joints that connect one section to the next are the transverse joints, and they do two jobs. They join the sections into a continuous duct, and, because they are stiff, they also act as reinforcement for the duct's sides at the ends of each section. The standard rates each transverse joint by its stiffness, given a rigidity class or rating, and its tables say which joints may be used for each duct width and pressure class.
The common transverse joints for rectangular duct are:
- The slip and drive: S-slips on the two wide sides and drive cleats on the two narrow sides, or the reverse. It is cheap, light and quick, but it is not very stiff, so it is used on small, low-pressure duct.
- The standing S and standing drive slip: the slip and drive with a raised standing leg that adds stiffness, allowing larger ducts and higher pressures.
- Companion angle flanges: steel angles riveted or welded to each section end and bolted together, with a gasket between them. They are stiff and strong but slow to make.
- Formed-on flanges and manufactured flange systems, often called TDC and TDF after the machines and systems that make them: the duct's own sheet is rolled into a flange at each end, or a manufactured flange rail is slipped on, and the flanges are joined with corner pieces, bolts and cleats, with a gasket. These are now the most common joint on medium and large commercial duct, because the flange is formed on the coil line as the section is made and the joint is fast to assemble in the field.
Keelson's coil line could roll a formed-on flange onto each end of a section as it was cut and notched, so for the larger Ashgrove trunk the shop used formed flanges with corner pieces and a gasket, and for the small branch duct it used slip and drive joints. Lesson 4 shows how the joint's rating counts as reinforcement at the section ends.
Stiffening the sides
A flat sheet metal side, even when its ends are held by joints, can drum: it pops in and out as the fan starts and stops, making a booming noise that carries through the system. The standard requires the sides of larger duct to be stiffened with crossbreaking or beading, unless the side is narrow or the duct is lined or insulated so that drumming is damped.
- Crossbreaking bends a shallow X into each panel from corner to corner, on the brake or a crossbreaking machine, so the panel is very slightly pyramid-shaped and cannot pop through flat. The X points outward on positive-pressure duct and inward on negative.
- Beading rolls shallow ribs across the panel at regular spacing on a beading machine, stiffening it along its length.
Keelson beaded most panels on the coil line, which could roll beads as the sheet passed, and crossbroke panels by hand only for short pieces and fittings. The standard sets the width above which stiffening is required, and Kai's chart showed it with a mark at that width.
Worked problem
Sheet in a rectangular section
How much sheet is in a 24 by 18 in duct section 5 ft long, not counting seam allowances?
Show solution
- Perimeter = 2 × (24 + 18) = 84 in = 7.0 ft.
- Area = perimeter × length = 7.0 × 5 = 35 sq ft.
Answer: 35 sq ft of sheet, before seams and joints are added.
Allowances and the blank
The net sheet in a section is its perimeter times its length, but the blank cut from the coil is larger. Each longitudinal seam needs an allowance on each piece: the Pittsburgh pocket on one edge and the flange on the other. Each transverse joint needs an allowance at each end: the slip or drive, or the formed flange. SMW-130 gave Keelson's allowances, and Lesson 11 uses them for a cut list. For a two-piece L section, the blank width is the wide side plus the narrow side plus the two seam allowances, and the blank length is the section length plus the two end allowances.
On a formed-flange system the coil line takes care of most of this. The operator enters the duct size, the gauge, the length and the flange type, and the machine cuts, notches, beads and rolls the flange in one pass; the operator's job is to check the first piece and keep an eye on the rest. On a slip and drive system, the allowances are added by hand on the layout, and the pieces are notched at the corners before forming so the slips and drives can be turned.
Common rectangular details
A few details come up on almost every rectangular job. Notching the corners correctly before forming keeps the joints tight and prevents the torn corners that leak. Hammering the Pittsburgh lock closed evenly along its whole length, without skipping, keeps it from opening later. Sealing the seam with sealant in the pocket, or with a bead along the finished seam, gives seal class A or B. Marking each section with its piece number, size, gauge and pressure class, as Lesson 11 describes, lets the field crew put it in the right place. And capping both ends of a finished section with plastic film keeps dust out until it is installed, which was a specification requirement at Ashgrove.
Common mistakes
MistakeChoosing the gauge from the smaller side.
InsteadUse the larger side of the duct and the pressure class.
MistakeUsing button punch snap locks on high-pressure duct.
InsteadUse Pittsburgh locks or other seams the standard allows for the class.
MistakeTreating transverse joints as connections only.
InsteadThey also reinforce the duct; their rating decides how far apart reinforcement must be.
MistakeForgetting to stiffen wide panels.
InsteadCrossbreak or bead panels wider than the standard's limit to stop drumming.
MistakeLeaving duct ends open on the way to an occupied building.
InsteadCap the ends when the specification calls for clean duct.
Summary and key terms
- A rectangular section is made of one, two or four pieces; the two-piece L is common for medium duct.
- The gauge depends on the larger side and the pressure class; the same gauge is used for all four sides.
- Pittsburgh locks are the usual longitudinal seam; button punch snap locks are limited to lower classes.
- Transverse joints connect sections and also reinforce the duct ends; formed and manufactured flanges are now common.
- Wide panels are crossbroken or beaded to stop drumming.
- The blank includes seam and joint allowances on top of the net perimeter and length.
- Section
- A straight piece of duct between two transverse joints.
- Longitudinal seam
- A seam running the length of a duct section, usually at a corner.
- Transverse joint
- A joint across the duct connecting two sections.
- Crossbreaking
- Bending a shallow X into a duct panel to stiffen it.
- Beading
- Rolling shallow ribs across a panel to stiffen it.
- Formed flange
- A flange rolled from the duct's own sheet at the end of a section.
Practice problems
Work each problem on paper first, then reveal the answer to check.
From Keelson's chart, what sheet is a 48 by 24 in duct at 2 in w.g.?
Show answer
20 gauge, with reinforcement every 3 ft.
How many seams does a two-piece L section have?
Show answer
Two longitudinal seams at opposite corners.
Why is crossbreaking pointed outward on positive-pressure duct?
Show answer
So the pressure pushes the panel into its stiffer shape instead of popping it through.
What is the net sheet in an 18 by 12 in section 4 ft long?
Show answer
Perimeter 60 in, 5 ft, times 4 ft, 20 sq ft.
Lesson quiz · 5 questions
Score 60% or more to complete this lesson.
Create a free account to save your progress, take quizzes and earn a certificate.