
SMW-220 · Lesson 11 of 12 · 19 min
Fabrication workflow and quality
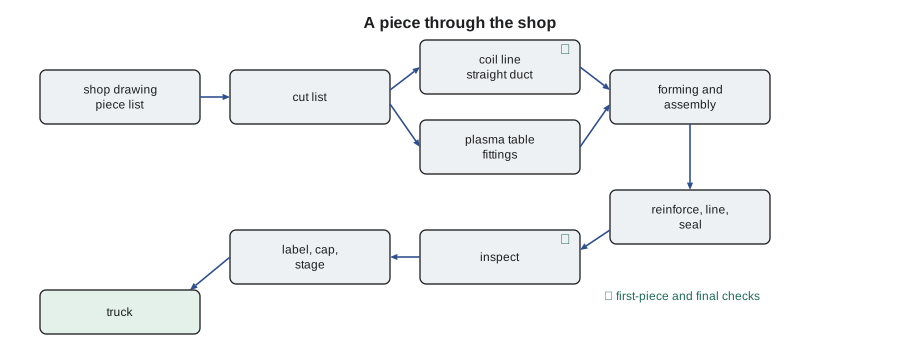
A duct shop is a small factory. Sheet comes in on coils and in flat stacks, and finished duct goes out on trucks in the order the field crew will hang it, labeled, capped and checked. Between those two points, a piece passes through take-off, cut list, cutting, notching, forming, seaming, assembly, reinforcement, sealing, inspection and labeling. Each step can add an error, and an error found on site costs many times what it would have cost on the bench. This lesson follows a piece through Keelson's shop, from Lin's shop drawing to the loading dock, and covers the cut list and coil yield, the machines, the quality checks and the labeling that let the field crew trust what they unload. SMW-420 covers the shop drawings, estimating and CNC plasma cutting in depth; this lesson stays with the workflow on the floor.
From shop drawing to cut list
Every job starts with the shop drawings. Lin draws each run of duct to scale in the building, coordinated with the other trades, and numbers each piece: straight sections, fittings, transitions, plenums. The piece list, generated from the drawing, gives each piece's number, type, size, length, gauge, pressure class, seal class, joint type and any special features such as liner, taps or access doors. That list is the shop's work order.
From the piece list, the shop makes a cut list for each machine: the blanks to be cut from coil for straight duct, the flat patterns to be cut for fittings, the rounds to be made on the spiral machine, and the parts to be bought, such as dampers and gasketed fittings. Straight rectangular duct is grouped by gauge, so the coil line runs all the pieces of one gauge together without changing coils, and fittings are grouped for the plasma table, which cuts flat patterns from sheet.
The coil line
Keelson's coil line was the shop's most productive machine. A coil of galvanized sheet sat on a decoiler at one end; the sheet was flattened, beaded, notched at the corners for the joints and seams, cut to length and, on formed-flange duct, rolled with a flange at each end, all under computer control. The operator entered the piece list for a run, loaded the right coil, and watched the first piece come off. After that the machine produced blanks steadily, each ready to be folded on the brake into an L, seamed on the Pittsburgh machine and closed.
A coil is bought in standard widths, and the width limits the size of blank the line can cut. A two-piece L section needs a blank as wide as one wide side plus one narrow side plus the seam allowances. If that is wider than the coil, the section is made in four pieces instead, with seams at all four corners. Kai worked out the cut list and coil yield for a batch of Ashgrove sections with the script below, using illustrative allowances.
# Cut list and coil yield for straight rectangular sections (two-piece L wraps)
import math
coil = 48               # coil width, in
sections = [('T1', 36, 18, 4), ('T2', 24, 18, 3), ('T3', 18, 12, 3), ('R1', 12, 8, 2)]           # (tag, width, height, count)
seam = 1.75               # allowance for Pittsburgh lock plus flange on each piece, in
joint = 1.25               # added to each end for the transverse joint, in
used = 0
for tag, w, h, n in sections:
    blank = w + h + seam                     # an L piece: one wide side and one narrow side
    pieces = 2 * n
    fits = coil >= blank
    used += blank * pieces
    print(f"{tag}: blank {blank} in wide, {pieces} pieces", "" if fits else "-> too wide for the coil, use four pieces")
length = 60 + 2 * joint
print(f"blank length {length} in along the coil; coil used {used * length / 144:.1f} sq ft")
yield_ = sum((w + h) * 2 * n for _, w, h, n in sections) / used
print(f"material in the duct walls / coil used: {100 * yield_:.1f} percent")T1: blank 55.75 in wide, 8 pieces -> too wide for the coil, use four pieces T2: blank 43.75 in wide, 6 pieces T3: blank 31.75 in wide, 6 pieces R1: blank 21.75 in wide, 4 pieces blank length 62.5 in along the coil; coil used 428.0 sq ft material in the duct walls / coil used: 95.7 percent
The 36 by 18 in trunk sections needed L blanks 55 3/4 in wide, too wide for the shop's 48 in coil, so they were made from four pieces. The smaller sections all fitted as two-piece Ls. About 96 percent of the coil used went into the duct walls, the rest into seams and joints, which is typical. Walt pointed out that the script counted the trunk as if it fitted; Kai reworked it as four pieces, which added two more seams per section and about 1.5 percent more metal in the batch.
Fittings and the plasma table
Fittings are cut as flat patterns from sheet on a CNC plasma table, which reads the patterns from the fitting software and cuts them with a plasma torch, nesting the parts on each sheet to waste as little as possible. A good nest can use 85 to 90 percent of a sheet; the offcuts go to a rack for small parts. The patterns come from the same software that drew the shop drawings, with the seam and joint allowances built in, so the plasma table's output is usually ready to form. Each part is marked with its piece number as it is cut, by the table's marker or by hand.
The fabricator still needs the pattern skills of SMW-120 and SMW-210. The software is only as good as its inputs, and someone has to check that a fitting's sizes, angles and allowances are right before a stack of sheet is cut. Keelson checked the first fitting of each new type by laying it out by hand or by measuring the plasma-cut part against the drawing before cutting the rest.
Forming and assembly
After cutting, pieces go to the forming machines: the brake for folds and the L bend, the Pittsburgh machine for the lock seams, the roll for curved heels and throats, the button punch for snap locks, the flange machine for formed flanges on fittings. Then the pieces are assembled: seams closed, sealant applied in the pockets for seal class A or B work, vanes and dampers fitted, reinforcement fixed, liner glued and pinned, taps and access doors cut and framed. Each step has its own small checks: the Pittsburgh pocket closed along its full length, the flanges square, the reinforcement at the right spacing, the liner pins at the right spacing.
The order of assembly matters. Liner goes in before the last seam is closed. Vane rails go in before the elbow's second cheek is fixed. Taps and access doors are cut while the piece can still be laid flat. Kai kept a small card at his bench with the order for each kind of fitting, and added a line to it each time he got one wrong.
Quality checks
Keelson's quality checks were simple and done every time. The first piece off the coil line for each run was measured against the piece list: width, depth, length, notches, beads and flanges. The first fitting of each type was measured against the drawing. Every finished piece was checked before labeling for:
- Size at each end, measured inside, and squareness on the diagonals for rectangular pieces, roundness on two diameters for round.
- Length, or centerline length for fittings, against the drawing.
- Gauge and material, against the piece list.
- Seams closed and sealed, joints formed correctly, reinforcement and tie rods at the right spacing and fixed firmly.
- Liner, vanes, dampers, quadrants, taps and access doors present and in the right places.
- No dents, kinks or damaged coating.
A piece that failed a check was tagged and fixed or remade, and the cause was noted. Walt reviewed the notes each week; a repeated fault, such as one machine notching slightly short, meant a machine to adjust or a step to teach again, not just a piece to fix.
Labeling, capping and staging
Every finished piece was labeled before it left the bench: job name, piece number, size, gauge, pressure class, system, and the floor or area it belonged to. The label went where the field crew would see it, on the side that would face out in the stack, and on large pieces on two sides. Flow direction was marked with an arrow on fittings and on dampers. Open ends were capped with film where the specification required clean duct, as Ashgrove's did.
Finished pieces were staged by delivery, not by the order they were made. Sean, the field foreman, told the shop which runs he would hang first, and the shop loaded each truck in the reverse order, so the first pieces needed came off first. Small parts, hangers, dampers, gasketed fittings and sealant for each delivery were boxed and labeled with the delivery number. A delivery ticket listed every piece, and the field crew checked it off as they unloaded, which closed the loop: anything missing or damaged was reported the same day.
Kai's label template for Ashgrove read, for example: ASHGROVE / L-T1-03 / 36 x 18 x 60 / 22 GA / +2 IN / SA / LIBRARY SUPPLY / LEVEL 2, with an arrow for flow.
Worked problem
Coil width check
A section is 28 by 16 in, two-piece L, with 1 3/4 in of seam allowance per L blank. Will it fit a 48 in coil?
Show solution
- Blank width = 28 + 16 + 1.75 = 45.75 in.
Answer: Yes: 45.75 in is less than 48 in.
Safety on the fabrication floor
SMW-110 covered shop safety in general. On the fabrication floor, three hazards stand out. Sheet edges and burrs cut hands, so cut-resistant gloves are worn for handling sheet and blanks. Machines with rolls, shears and brakes catch hands and sleeves, so guards stay on and lockout is used for clearing jams and changing rolls. Large pieces, coils and stacks are heavy and awkward, so coils are moved with the hoist or forklift, large pieces with two people, and stacks are kept low and stable. On the plasma table, eye protection and fume extraction are needed, and on any welding of galvanized steel, as SMW-230 explains, so is protection from zinc fumes.
Rework and continuous improvement
Every shop makes mistakes; good shops learn from them. Keelson's quality sheet for each job recorded every failed check, its cause and its fix: a notch cut short, a seam closed unevenly, a fitting length misread from the drawing, a missing access door. Walt looked for patterns. A notch problem on one machine meant a tooling adjustment. A length problem on one kind of fitting meant a better way of showing that dimension on the shop drawing, which he took to Lin. A repeated sealing miss meant a short refresher at the Monday safety talk. Over a year, the shop's rework fell by about a third, which Halima measured as hours saved and trucks not sent back to site.
The field crew's reports closed the loop. When Sean's crew found a piece that did not fit, they photographed it with its label and sent it back to the shop the same day. Kai learned to treat those reports as useful rather than as criticism: each one showed a weak point in the shop's process, and each fix made the next job smoother.
Kai also kept his own notebook of fixes, separate from the shop's quality sheet. Each entry named the piece, the fault, what caused it and the check that would have caught it sooner. By the end of the term the notebook was a short list of habits: measure the first piece, check the coil width before cutting, close every Pittsburgh lock from one end to the other without skipping, and look at the access side twice. Walt said that list was worth more than any machine in the shop.
Common mistakes
MistakeRunning the whole coil-line batch without checking the first piece.
InsteadMeasure the first piece of each run against the piece list.
MistakeAssuming every two-piece L fits the coil.
InsteadCheck blank width against the coil; make wide sections in four pieces.
MistakeClosing the last seam before fitting liner or vanes.
InsteadFollow the assembly order for each fitting type.
MistakeLabeling only on the side that faces the stack.
InsteadPut labels where the field crew will see them, on two sides for large pieces.
MistakeLoading the truck in the order pieces were made.
InsteadStage by delivery, in reverse order of installation.
Summary and key terms
- The shop drawing's piece list is the shop's work order; cut lists group pieces by machine and gauge.
- The coil line cuts, beads, notches and flanges straight duct blanks; blank width must fit the coil.
- Fittings are cut as nested flat patterns on the plasma table; the first of each type is checked.
- Assembly follows an order: liner, vanes and taps before the last seams.
- Each piece is checked for size, squareness, length, gauge, seams, reinforcement and features before labeling.
- Pieces are labeled, capped and staged by delivery so the field crew can trust and use them.
- Piece list
- A list of every piece on a shop drawing with its size, type, gauge and features.
- Cut list
- A list of blanks and patterns to be cut, grouped by machine and material.
- Coil line
- A machine that cuts, beads, notches and flanges duct blanks from coil.
- Nesting
- Arranging flat patterns on a sheet to waste as little as possible.
- First-piece check
- Measuring the first piece of each run before producing the rest.
- Staging
- Arranging finished pieces by delivery and installation order.
Practice problems
Work each problem on paper first, then reveal the answer to check.
A 36 by 18 in two-piece L needs a 55 3/4 in blank. The coil is 48 in. What now?
Show answer
Make it in four pieces with seams at all four corners.
Why are trucks loaded in reverse order of installation?
Show answer
So the first pieces the crew needs come off first.
Name four things checked on a finished piece.
Show answer
Size, squareness, length, gauge, seams, reinforcement or features.
Why check the first piece off the coil line?
Show answer
An error in the setup would be repeated in every piece of the run.
Lesson quiz · 5 questions
Score 60% or more to complete this lesson.
Create a free account to save your progress, take quizzes and earn a certificate.