
PLB-230 · Lesson 11 of 12 · 21 min
Pressure testing, leak checks and purging
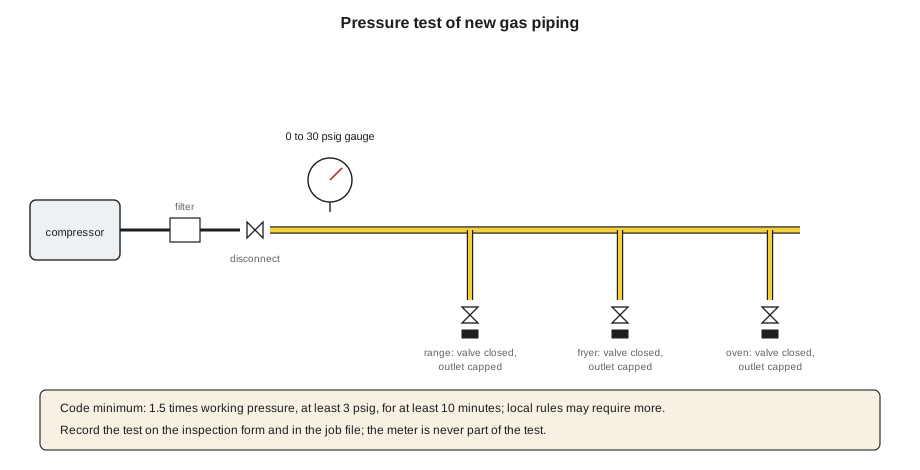
When the new 1-1/4 inch café main and the rooftop piping were complete, every joint visible and nothing yet covered, it was time for the pressure test. Maya set up the café test under Dana's supervision: caps on every outlet, appliance valves isolated, a calibrated gauge on a test tee, air from the compressor through a filter. The city inspector would witness the result. "The test proves the piping is tight before gas ever goes in," Dana said. "The inspection record proves to everyone who comes after us that we did it. Get both right."
This lesson covers the pressure test of new and altered gas piping, the leak check when gas is introduced and appliances are connected, how to find leaks, and how to purge air out of piping and get gas in safely. These are the steps between a finished installation and a working system, and they are where many serious incidents have happened.
Why piping is tested
A gas system has dozens or hundreds of joints, any of which could have a cross-thread, a cracked fitting, a missed CSST fitting step or a forgotten cap. A pressure test with air or inert gas at a pressure well above the operating pressure, held for a set time, finds leaks while the piping is still exposed and before any fuel is in it. The codes require every new installation, and every addition or alteration, to be tested before it is placed in service, before it is concealed, and in a manner the authority accepts.
The test is done before walls and ceilings are closed, so that any leak found can be reached. Where piping is installed in stages, each section is tested before it is covered. A test does not replace good workmanship: a joint that holds the test can still fail later if it was made badly, which is why the fitter's own check of every joint as it is made matters as much as the test.
Test medium, pressure and duration
NFPA 54 and the IFGC require the test to use air, nitrogen, carbon dioxide or another inert gas. Oxygen must never be used, because it can ignite oil or thread compound inside the pipe, and fuel gas is never used for the test. The code minimum test pressure is 1.5 times the maximum working pressure, but not less than 3 psig, held for at least 10 minutes, with longer durations for larger systems in some codes. Many jurisdictions require more: some Ohio building departments call for a 24-hour test at 20 psi for piping above ground and 50 psi underground, and many contractors test at 15 psig or more as company practice. The permit and the local amendments tell the fitter which test applies.
Appliances, appliance valves, regulators and meters are not exposed to the test pressure unless they are rated for it. They are disconnected, or isolated by closing their shutoff valves, if the valves are rated for the test pressure, with the outlets capped. A gas valve or regulator exposed to 15 psig can be damaged internally and may leak or fail later. The meter belongs to the utility and is never part of the customer's test.
The gauge must suit the test: a dial of a suitable size, a range with its maximum reading above the test pressure but not so far above it that small drops are invisible, and increments fine enough to show a meaningful change. For a 15 psig test, a 0 to 30 psig gauge with fine divisions works well. Gauges are checked against a reference or calibrated regularly, and a digital gauge or a chart recorder may be used where the authority accepts it.
Running the test and reading the result
Once the piping is pressurized to the test pressure, the supply is shut off and disconnected so that it cannot top up the pressure, the gauge reading and time are recorded, and the piping is left alone for the required duration. At the end, the reading is checked again. If the pressure has dropped, there is a leak, unless a temperature change explains the drop. If it holds, the piping passes.
Temperature matters because the air in the pipe expands and contracts as the pipe warms and cools. Piping on a sunny roof can gain pressure during a test, and piping in a cooling building can lose it, with no leak at all. A good tester notes the temperature, avoids starting a test on piping that is still changing temperature quickly, and does not explain away a real leak as a temperature effect. When in doubt, the test is extended or repeated.
# Pressure test of the cafe piping: did it pass, or did temperature fool us?
# Gauge readings are converted to absolute pressure; gas pressure is proportional
# to absolute temperature at constant volume (the ideal gas law).
ATM = 14.7                                    # psia
def required_test(max_working_psig):
    return max(1.5 * max_working_psig, 3.0)  # code minimum; local rules may require more
def expected_end(p_start_psig, t_start_f, t_end_f):
    return (p_start_psig + ATM) * (t_end_f + 460) / (t_start_f + 460) - ATM
print(f"2 psi house system: code minimum test {required_test(2.0):.1f} psig; job test 15 psig")
start, t0 = 15.0, 75.0
for t1, reading in [(75.0, 15.0), (66.0, 14.75), (75.0, 14.6)]:
    exp = expected_end(start, t0, t1)
    verdict = "pass" if reading >= exp - 0.03 else "LEAK: find it before retesting"
print(f"pipe {t1:4.1f} F: expected {exp:5.2f} psig, gauge {reading:5.2f} psig -> {verdict}")2 psi house system: code minimum test 3.0 psig; job test 15 psig pipe 75.0 F: expected 15.00 psig, gauge 15.00 psig -> pass pipe 66.0 F: expected 14.50 psig, gauge 14.75 psig -> pass pipe 75.0 F: expected 15.00 psig, gauge 14.60 psig -> LEAK: find it before retesting
The first two readings pass: the second drop is fully explained by the pipe cooling a few degrees. The third shows a drop with no temperature change, which is a leak. The rule Dana gave Maya was never to accept a drop as temperature unless the numbers support it, and never to adjust or top up the pressure during the test.
Finding and fixing leaks
A leak is found with a leak detection solution, a listed liquid that bubbles at a leak, brushed or sprayed onto every joint, or with an electronic leak detector. Soapy water mixtures that leave corrosive residues are avoided on CSST and some fittings; listed solutions are made for the purpose. An open flame is never used to look for a leak, at any time, for any reason.
When a leak is found, the system is depressurized completely before the joint is worked on. A threaded joint is taken apart, the threads inspected, cleaned and recut if needed, sealant reapplied and the joint remade. A leaking fitting is replaced. After any repair, the whole test is repeated from the start.
When the test passes, the result is recorded on the form the building department requires, and the inspector signs off the rough piping. Many contractors also attach a test record to the piping near the meter or test point, showing the date, test pressure and duration, and who performed it, and keep a copy in the job file. The utility is released to set the meter only after the inspection is approved.
Introducing gas and purging
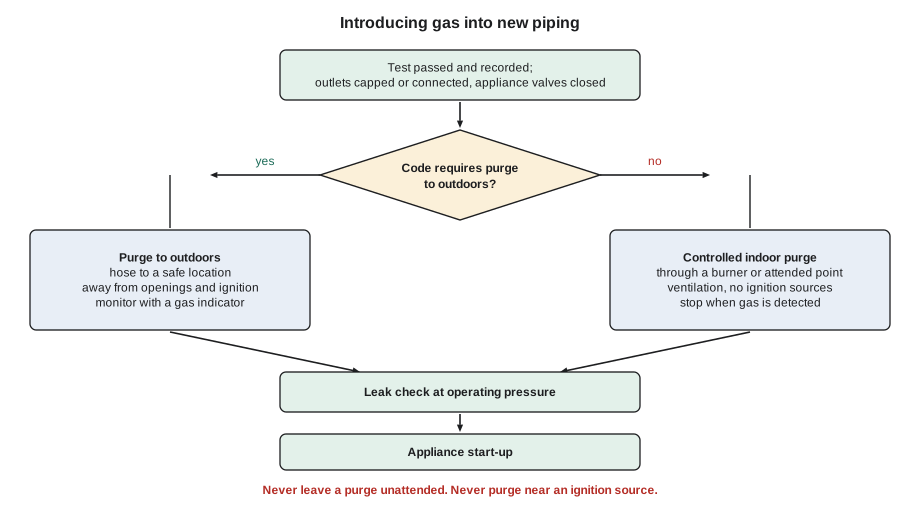
Before gas is introduced, the fitter confirms that every outlet is either connected to an appliance or capped, every appliance valve is closed, and the test has passed. Then the utility sets the meter, or the fitter opens the building valve if the meter is already in place, and the piping is purged: the air in the pipe is pushed out and replaced with gas.
Purging is one of the most dangerous moments in gas work, because a mixture of gas and air passes through the flammable range as the pipe fills. NFPA 54 and the IFGC require piping above set sizes, lengths or pressures, for example systems operating above 2 psig and larger-diameter pipes over threshold lengths, to be purged to the outdoors, away from ignition sources and building openings, with the discharge controlled and monitored. Smaller piping may be purged into the building under strict conditions: no ignition sources, good ventilation, the purge point attended at all times, and a combustible gas indicator used to stop the purge as soon as gas is detected. The purge must never be left unattended.
The 2009 explosion at a food plant in the United States, where gas purged indoors during the commissioning of a new water heater line ignited and killed four people, led to tighter purging rules in both countries' codes and in industry practice. The lesson is simple: purged gas must go somewhere safe, and someone must be watching the whole time.
Leak checks at operating pressure
After gas is in the piping and the appliances are connected, the system is checked for leaks at operating pressure. The common method is to close all appliance valves and watch the meter's test dial or a manometer for a set time, often 10 minutes, with no movement allowed. Every joint made after the pressure test, such as the appliance connections, is checked with leak solution. Appliance gas valve trains are checked as the manufacturer and code require.
A gas system that is altered later, for example when an appliance is replaced, is leak-checked in the same way before the appliance is put back into service. A small leak at a union or connector is still a leak; it is fixed, not tolerated, because small leaks grow and because a small leak in a closed room is how explosions start.
Worked problem
A failed café test
Maya pressurizes the café piping to 15 psig at 75 °F. After the test period, the gauge reads 14.6 psig and the pipe temperature has not changed. What does she do?
Show solution
- The drop is not explained by temperature, so the piping has a leak.
- Brush listed leak solution onto every joint, starting with the joints made most recently and those under strain.
- When the leak is found, a union that was not fully tightened, depressurize the piping completely.
- Remake the joint properly, inspecting the seat and threads.
- Repeat the full test from the beginning, and record only the passing test.
Answer: Find the leak, depressurize, repair properly, and retest from the start.
Testing additions and existing systems
When new piping is added to an existing system, the new section is tested on its own before it is connected, because the existing piping and its connected appliances cannot safely take the test pressure. The connection between the new and old piping, made after the test, is then checked with leak solution at operating pressure once gas is restored. If there is any doubt about the condition of the existing piping, for example after a fire, flood or long shutdown, the authority or the code may require the existing system to be tested as well, with its appliances isolated.
Gas supply restored after any shutoff, whether for an alteration, a utility interruption or a repair, is treated carefully. Before the main valve is opened, every appliance valve and pilot valve downstream is confirmed closed, so that gas cannot flow into an open burner or an unlit pilot. Then the system is leak-checked and each appliance is relit following its instructions. On Kingsway, the shutdown checklist for the café and the house system lists every valve to close and reopen in order, and each step is initialed.
Common mistakes
MistakeTesting with oxygen or fuel gas.
InsteadUse air, nitrogen, carbon dioxide or another inert gas.
MistakeLeaving appliance valves and regulators exposed to the test pressure.
InsteadDisconnect or isolate components not rated for the test.
MistakeExplaining away a pressure drop as temperature without checking.
InsteadCalculate the effect or extend the test; otherwise find the leak.
MistakeLooking for a leak with a flame.
InsteadUse listed leak solution or an electronic detector.
MistakePurging gas indoors unattended or near ignition sources.
InsteadPurge to the outdoors where required, monitored at all times.
Summary and key terms
- New and altered gas piping is pressure tested with air or inert gas before it is concealed or placed in service.
- The code minimum is 1.5 times working pressure, at least 3 psig, for at least 10 minutes; local rules may require more.
- Components not rated for the test pressure are isolated, and the meter is never tested.
- Pressure changes with temperature; only a calculated temperature effect explains a drop.
- Leaks are found with listed solutions or detectors, repaired depressurized, and the test repeated.
- Purging passes through the flammable range; large or high-pressure piping is purged outdoors, monitored.
- After gas is introduced, a leak check at operating pressure confirms the system is tight.
- Test medium
- The air or inert gas used to pressurize piping for a test.
- Test duration
- The time the test pressure must hold without loss.
- Purging
- Replacing the air in piping with gas, or gas with air, in a controlled way.
- Combustible gas indicator
- An instrument that reads gas concentration, often as a percentage of the LEL.
- Leak detection solution
- A listed liquid that bubbles where gas escapes from a joint.
- Test tag
- A record of the test attached to the piping system.
Practice problems
Work each problem on paper first, then reveal the answer to check.
Which gases may be used to pressure test gas piping?
Show answer
Air, nitrogen, carbon dioxide or another inert gas; never oxygen or fuel gas.
What is the code minimum test pressure for a 2 psi system?
Show answer
3 psig (1.5 times 2 psig).
What is the minimum code test duration?
Show answer
10 minutes, unless local rules require more.
Why must the supply be disconnected during the test?
Show answer
So it cannot top up the pressure and hide a leak.
Where must larger or higher-pressure piping be purged?
Show answer
To the outdoors, away from openings and ignition sources, monitored.
May an indoor purge ever be left unattended?
Show answer
No.
Lesson quiz · 5 questions
Score 60% or more to complete this lesson.
Create a free account to save your progress, take quizzes and earn a certificate.