
HSE-403 · Lesson 5 of 12 · 21 min
Photographs, sketches and timelines
Three days after the collision, Elena laid out the team's material on the long table in the distribution center training room: 140 photographs, printed and numbered; a measured sketch of the end of aisle 14; still frames from the camera footage; and a roll of brown paper taped along one wall with a timeline written on it in marker. Grace Whitfield had expected the timeline to cover a few minutes. It started five weeks before the collision.
Photographs, sketches and timelines are how an investigation turns scattered evidence into a picture that everyone can see and test. Photographs record conditions exactly. Sketches show distances and relationships that photographs distort. Timelines put events in order and, just as importantly, show which conditions existed long before the moment of the incident. This lesson covers how to do each well.
Photographing a scene
The most common advice for incident photography is to work from the outside in. Start with overall shots that show the whole area and how it connects to its surroundings, taken from each corner or approach. Then take mid-range shots that show the relationship between key items, such as the forklift and the staging lane, or the walkway and the stacked pallets. Finish with close-ups of specific details: the corroded connector, the frosted mirror, the faded walkway paint. Every close-up should be preceded by a mid-range shot that shows where the detail is, or it will be hard to place later.
A few habits make photographs much more useful. Include a scale, such as a ruler or a tape measure, in close-ups, and take the same shot with and without it. Photograph labels, serial numbers, gauges and settings so they can be read. Keep a photo log that records each image number, what it shows, where it was taken from and the direction the camera faced. Do not delete any photographs, even poor ones, because gaps in the numbering raise questions. And never edit the originals; if an image needs cropping or brightening for a report, save a copy and keep the original untouched.
Elena also takes photographs from the points of view of the people involved. With the forklift still in place, she sat in the driver's seat, turned as a driver would to look back over the right shoulder while reversing, and photographed what she could see. From there, the stacked empty pallets on the far walkway hid most of the travel aisle to the left. She then stood where Marie had been about four seconds before the impact, at her eye height, and photographed toward the staging lane. From there, the pallet stack hid the rear of the truck until it was almost in the aisle. Those two photographs did more than any description to show why neither worker saw the other.
Photographs taken later, to show something the original scene could not, must be clearly labeled. The team returned during the day shift with the warning light repaired on another truck and photographed the blue dot it projected on the floor, so readers of the report could see what the light was supposed to do. Each of those photographs was captioned 'reconstruction, taken on day 3 with a working light on truck FT-09', so nobody would mistake them for the scene as found.
Drawing a sketch
A sketch is a scaled or roughly scaled drawing that shows the positions of everything relevant, with measurements. It does not need to be artistic. It needs to be accurate, clearly labeled and tied to fixed reference points that will still be there after the scene is cleared, such as rack uprights, building columns, doorways or painted floor lines. A sketch from the first hour, drawn on a clipboard, is usually redrawn neatly later, but the original should be kept.
Two simple measuring methods cover most needs. In the baseline method, investigators choose a straight line between two fixed points, such as the face of a rack, and measure along it to a point opposite each object, then measure from the line out to the object at right angles. In triangulation, they measure from two fixed points to each object; the two distances fix its position. Elena used the face of the rack on the staging lane side as her baseline and the building column at the aisle end as her zero point.
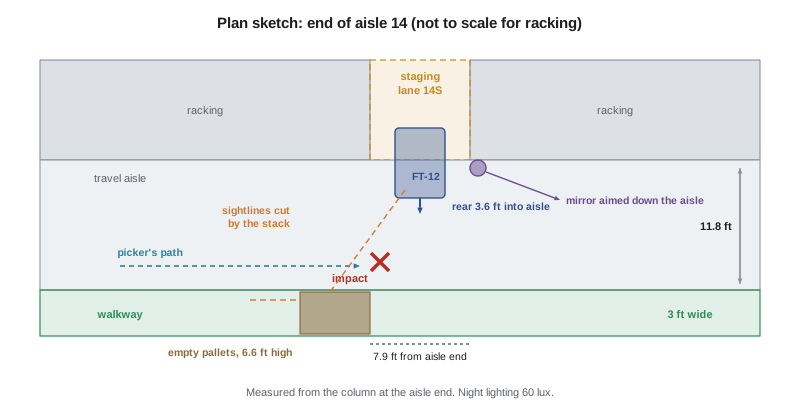
The finished sketch showed the key distances. The travel aisle was 11.8 ft (3.6 m) wide between the rack faces. The painted walkway on the far side was 3 ft (0.9 m) wide. The stack of empty pallets stood across the walkway 7.9 ft (2.4 m) from the aisle end, 6.6 ft (about 2 m) high. The staging lane opened into the travel aisle with no gap or barrier. The forklift had stopped with its rear wheel 3.6 ft (1.1 m) into the travel aisle. The stain where Marie had lain was 2 ft (0.6 m) from the rack face on the walkway side, that is, in the travel aisle, just outside the line of the blocked walkway. The convex mirror was mounted 10.5 ft (3.2 m) up on a column, angled to show traffic coming down the travel aisle, not traffic leaving the staging lane.
Sightlines and visibility
Many vehicle and machine incidents come down to the question of who could see what, and when. A sketch makes that question testable. On Elena's sketch, Luis drew straight lines from the driver's eye position, looking back over the right shoulder, and from Marie's approach path. The pallet stack cut both lines. The mirror's field of view, which they checked by standing in front of it with a colleague walking past, covered the travel aisle but not the mouth of the staging lane. Even with the frost removed, the mirror would not have shown Marie to Jordan, or Jordan to Marie.
Visibility also depends on light and contrast. At 60 lux, a dark blue freezer suit against dark blue rack uprights and black shrink-wrapped pallets is hard to see, especially for a driver who has just come from the bright dock. Without the blue spotlight on the floor, Marie had no visual warning of a reversing truck. Without a high-visibility vest, Jordan had little to catch his eye. And with the evaporator fans running at 84 dBA and her hood and neck warmer up, the reversing alarm was easy to lose in the background noise. None of these conditions alone would have caused the collision. Together, they left almost no margin.
Building the timeline
A timeline lists events in order, with a time, a short description, and the source of each entry. Good investigation timelines have two parts. The short timeline covers the minutes or hours around the incident in fine detail, often second by second near the critical moment. The long timeline covers the weeks, months or even years before, and shows when each of the conditions that contributed to the incident first appeared. The long timeline is often where the most important findings are.
The short timeline for aisle 14 came mainly from the warehouse system, the forklift logger and the camera footage, adjusted for the 47-second camera clock offset found in lesson 4.
- 1:52 a.m. Jordan's task screen shows an urgent replenishment flagged red: twelve pallets for the 3:00 a.m. truck (warehouse system).
- 2:06 a.m. Dispatcher message to all freezer drivers: 'need lane 14 cleared by 2:30 for the 3:00 truck' (warehouse system).
- 2:11 a.m. Marie scans her third pick on the route through aisle 14 toward the dock (warehouse system).
- 2:14:31 a.m. Jordan picks up a pallet in staging lane 14S and begins reversing (logger, camera).
- 2:14:48 a.m. Marie walks into camera view in the travel aisle, scanning a label as she walks (camera, adjusted).
- 2:14:52 a.m. Impact sensor event; truck stops (logger).
- 2:19 a.m. Ken calls the ambulance (phone record).
- 2:31 a.m. Paramedics arrive (dock gate log).
The long timeline came from documents and interviews.
- One year before. Blue warning lights added to the forklifts; pre-use checklist not updated (purchase records, checklist form).
- About eight months before. Pickers stop wearing high-visibility vests in the freezer because they do not fit over freezer suits; no alternative is provided (interviews).
- About four months before. Night lighting in the freezer reduced to save energy over the winter (building system settings).
- Six weeks before. Jordan starts at the site; practical evaluation on site trucks and routes not completed (training file).
- Five weeks before. End of aisle 14 converted to a temporary staging lane for a new customer, by email, with no safety review (email).
- Four weeks and two weeks before. Two near misses at the staging lane exit reported by pickers; both closed with 'drivers reminded' (near-miss log).
- About ten days before. Empty pallets start being stacked on the walkway at aisle 14 because the usual pallet return area is full (interviews, camera).
- Seven days before. Oldest saved footage already shows the truck reversing without a blue dot (camera).
- Six days before. Day-shift driver reports the light not working; marked 'parts on order'; truck stays in service (maintenance system).
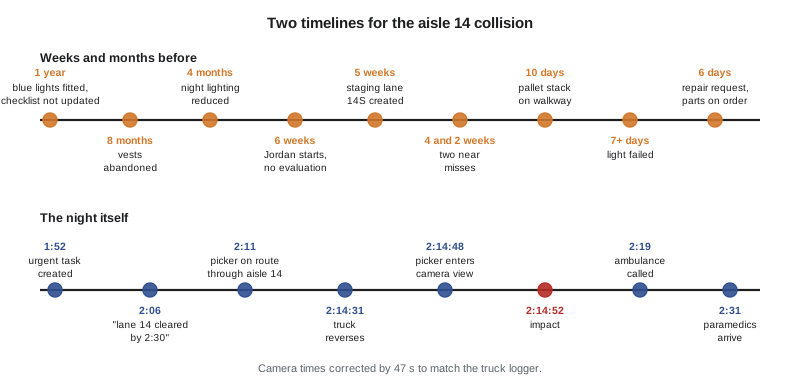
Laid out on the brown paper, the long timeline changed the conversation in the room. The collision had taken four seconds. The conditions that made it possible had been building for months, each one introduced for a reason that made sense at the time: comfort, energy savings, a new customer, a full pallet return area, a part on order. Nobody had decided to put a picker in the path of a reversing truck with no warning. The system had drifted there one reasonable decision at a time.
Merging time sources
Building a short timeline means combining data from systems with different clocks. Luis wrote a short script to merge the sources after correcting each one to the forklift logger's clock.
# Merge events from several systems onto one corrected timeline.
# Offsets are seconds to ADD to each source's clock to match the forklift logger.
offsets = {"logger": 0, "camera": 47, "wms": 3, "phone": -12}
events = [
    ("wms",    "02:14:28", "pick scanned by Marie, aisle 14"),
    ("camera", "02:13:44", "truck begins reversing from lane 14S"),
    ("camera", "02:14:01", "Marie enters camera view"),
    ("logger", "02:14:52", "impact sensor event, truck stops"),
    ("phone",  "02:19:12", "ambulance called"),
]
def secs(t):
    h, m, s = map(int, t.split(":")); return h * 3600 + m * 60 + s
def fmt(x):
    return f"{x // 3600:02d}:{x % 3600 // 60:02d}:{x % 60:02d}"
merged = sorted((secs(t) + offsets[src], src, what) for src, t, what in events)
for t, src, what in merged:
print(f"{fmt(t)} [{src:<6}] {what}")02:14:31 [camera] truck begins reversing from lane 14S 02:14:31 [wms ] pick scanned by Marie, aisle 14 02:14:48 [camera] Marie enters camera view 02:14:52 [logger] impact sensor event, truck stops 02:19:00 [phone ] ambulance called
The merged timeline showed that Marie had scanned her last pick about 24 seconds before the impact, at a pallet less than ten meters from the point of collision, and that she came into camera view four seconds before it. Jordan's reverse took about 21 seconds from the moment the truck began to move to the impact. At about 6 km/h, that is a walking pace. Neither person had been rushing in the obvious sense. Both had been concentrating on the next step of their task, as their screens and their instructions asked them to.
Worked problem
Choosing what goes on the long timeline
Show solution
- Ask, for each condition found in the evidence: when did it start, and who knew?
- The faded walkway paint: last repainted two years ago, according to the facilities records. Add it.
- The forklift's last full service: three weeks before, with no fault noted on the light. Add it, because it shows the failure was recent.
- Marie's start date and pick-rate history: she had worked at the site for four years and her pick rate was average. Add it, because it rules out inexperience.
- Each entry gets a date, a short description and its source, so others can check it.
Answer: Include every condition that contributed, with when it started and the source.
Common mistakes
MistakeTaking only close-up photographs of the damage.
InsteadWork from overall to mid-range to close-up, so every detail can be placed.
MistakeDeleting blurry or duplicate photographs.
InsteadKeep every image and a photo log; edit only copies.
MistakeDrawing a sketch with measurements from objects that will be moved.
InsteadMeasure from fixed reference points such as columns, rack uprights and doorways.
MistakeBuilding a timeline that covers only the minutes around the incident.
InsteadAdd a long timeline showing when each contributing condition began.
MistakePresenting reconstruction photographs as the scene as found.
InsteadLabel reconstructions clearly with when and how they were taken.
Summary and key terms
- Photograph from overall to mid-range to close-up, with scale, a photo log and untouched originals.
- Take photographs from the viewpoints of the people involved, and label reconstructions clearly.
- Sketch with measurements from fixed reference points, using baseline or triangulation.
- Use the sketch to test sightlines, lighting, contrast and noise.
- Build a short timeline from data sources with corrected clocks, citing the source of each entry.
- Build a long timeline showing when each contributing condition began; it often holds the key findings.
- Photo log
- A record of each photograph: number, subject, location and direction.
- Baseline method
- Measuring positions along and at right angles from a straight reference line.
- Triangulation
- Fixing a position by measuring from two known reference points.
- Sightline
- The straight line along which a person can see from a given position.
- Short timeline
- A detailed sequence of events around the moment of an incident.
- Long timeline
- A sequence showing when contributing conditions developed in the weeks, months or years before.
Practice problems
Work each problem on paper first, then reveal the answer to check.
In what order should a scene be photographed?
Show answer
Overall shots, then mid-range, then close-ups.
Why did Elena photograph from the driver's seat and from Marie's eye height?
Show answer
To show what each person could actually see; the pallet stack blocked both views.
What did the mirror test show?
Show answer
The mirror covered the travel aisle but not the mouth of the staging lane, so even unfrosted it would not have helped.
What is the difference between the short and long timelines?
Show answer
The short timeline covers the minutes around the incident; the long timeline shows when contributing conditions began, over weeks or months.
What did the long timeline show about the collision?
Show answer
Most conditions had built up over weeks or months, each for a reason that made sense at the time.
Lesson quiz · 5 questions
Score 60% or more to complete this lesson.
Create a free account to save your progress, take quizzes and earn a certificate.